
Opening strategy
In go, both short-term tactics and long-term strategy are important. At the beginning of a game, strategic considerations take center stage, but as the game progresses, tactics gradually become more important. Tactical maneuvering certainly does take place in the opening, but only within the context of strategic considerations.Intuition is important in making strategic decisions in the opening. It is impossible to make precise calculations of the outcome of moves in the opening, so players must rely on their feelings for a good move. There are two principles that can guide intuition. One is the efficiency of a stone played in relation to other stones. The other is balance.
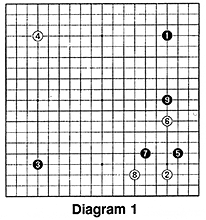 Diagram 1 shows a typical opening. Each side establishes a presence in a corner. Play then spreads along the sides and eventually the positions develop in the center.
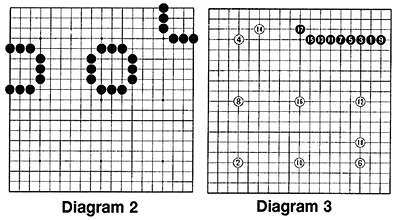
The reason the first moves are made in the corner is because this is the most efficient place to take territory. Diagram 2 illustrates this. In the upper right corner, it takes six stones to surround nine points of territory. On the left side, Black must play nine stones to surround the same amount of territory. However, in the center it takes 12 stones to control nine points. From this we can conclude that when taking territory, which is the object of the game, stones work most efficiently near the corners and least efficiently in the center.
|
In Diagram 3, Black concentrates his moves in the upper right, while White spreads his stones throughout the board. Black has secured almost 30 points of iron-clad territory, but White has the strategic advantage. White's position is well balanced and his stones are working efficiently throughout the board. Black's stones, on the other hand, are concentrated in one part of the board. He has "put all his eggs into one basket," as the proverb goes, so his position is unbalanced.
Answer to last week's problem
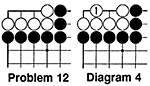 In Problem 12, you were asked to make two eyes for the group of five white stones. The correct answer is for White to play 1 in Diagram 4; the white stones are alive because the points to the left and to the right of White 1 are eyes. With two separated eyes the white group cannot be captured.
 If it is Black's turn to play, he can kill the white stones by playing on the same spot (Diagram 5). After this, neither side will make a move here because both players will realize that the white stones are dead.
For example, White cannot play 2 in Diagram 6 because he puts himself into atari and Black will capture the six white stones with 3.
If White demands proof that his stones are dead, Black will atari with 1 in Diagram 7. White captures with 2. Black next plays 3 in Diagram 8. If White captures with 4, Black plays again at the 3 position and captures seven white stones.
False eyes
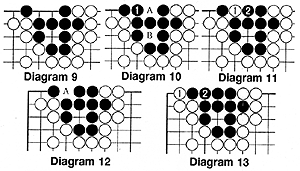
Look at the black group in Diagram 9. Is it alive or dead? If it is Black's turn, he can get two eyes--A and B--by playing at 1 in Diagram 10.If it is White's turn, he can destroy the eye at the edge by placing a stone at 1 in Diagram 11. If Black captures with 2, the result is shown in Diagram 12. Black is reduced to only one eye because the point A is false eye. That is, A seems to be an eye, but eventually Black will have to play on that point. For example, if White later ataris at 1 in Diagram 13, and, if Black connects at 2, Black is left with only one eye (the point B in Diagram10) and can be captured on the next move.
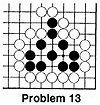
Problem 13
Where should White play to prevent Black from getting two eyes?