Example of a pro game
This was the first game of the Oza title match between the challenger, 25th Honinbo Cho Chikun (Black), and defending titleholder O Rissei.
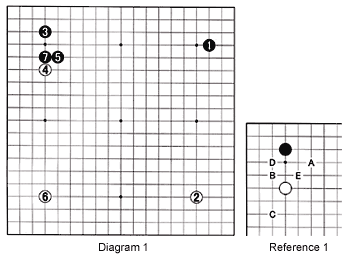
Diagram 1 :
O loves to use the kakari of 5 in response to black 4 to see how his opponent will answer. This helps him to decide his own strategy. This technique is called yosu-miru. O has used this move in many title games. The move was first introduced by Honinbo O Meien. Next, White occupies the last empty corner. Black 7 is a thick move. Where should White play next ?
Reference 1 :
When White makes the approach in the upper-right corner, Black can choose between A through D (in order of most frequently played) or play tenuki. A move at E is a recent innovation. All of these moves have advantages and disadvantages, but we don't have the space to go into detail here.
Diagram 2 :
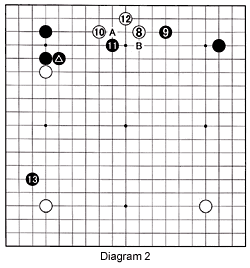 The wariuchi at 8 is a solid move. This moves makes miai through a two-space extension to either the left or right side. How should Black answer this move? Should he approach from the left or from the right-in which direction should he steer White ? Black 9 seems to be the right move because the extension at 10 has no impact on Black's solid position on the left side-the marked stone is especially strong.
Black 11 is another yosu-miru move. White could answer at A, but then Black hems him in with a move at B. Eventually, White would probably have to extend one more time to the left of 10, coming even closer to Black's impregnable stones. But this approach won't have any impact and therefore is not very efficient. The exchange 11-12 is a clear kikashi (forcing move) in favor of Black, as it forces White into a low position. Note that once you have played a kikashi, you don't need to concentrate on that stone and can move elsewhere. Next, Black approaches at 13. How should White respond ? (Hint-remember our lessons about the star point about a month ago).
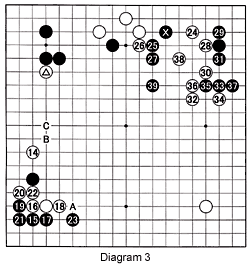 Diagram 3 :
A move around A would be standard. However, Black then could extend to B or C, swallowing up, or at least endangering, the marked white stone. White can't allow Black to extend in that direction, so he is forced to play a pincer. But which one ? In this case, white 14 because it takes sente after the joseki (standard sequence) to 23. White wants sente to play at 24. The distance between the marked black stone and the first move Black played is a little too great. White 24 tries to punish Black for overextending. However, White is also weak on the left side.
Every move from 25 to 39 is played with a few objectives in mind: 1. Move out to the center. 2. Don't let the opponent connect his stones. 3. Connect your own stones. 4. Make a good shape, both in respect to eyes and efficiency. 5. Move to the center faster than your opponent and block his escape path while doing so.
Seen from this perspective, the moves to 39 are understandable. For White's next move, keep in mind all of the above objectives. Also keep in mind that connecting weak stones to stronger ones is worth about 20 points by making them stronger and preventing further attacks.
After black 39, where should White play ?
Diagram 4 :
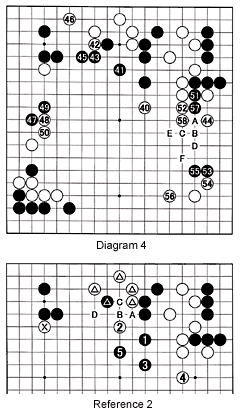 Looking at points 1 and 5 above, white 40 makes sense. But in fact, without point 2, this was a bad move-see Reference 2. Black 41 was a perfect move because it satisfied points 1, 3, 4, and 5, especially point 3. After black 45, White had to lie low and abide his time with 46, necessary to make eyes and fairly large in terms of territory but lacking strategic significance, while black 41, 43 and 45 build strength and link up Black's stones.
Black 47 and 49 isolate the single white stone and keep White from expanding his position in the lower-left corner. After having built strength, Black next goes for the kill with the combination 51 through 57. After White 58, if Black pushes through with A, the sequence white B, black C, white D, black E, white F is unavoidable. This would result in a tumultuous all-out fight with high stakes on both sides.
Of course, both players are good fighters, but O is especially well-known for staging upsets in tough situations. With Black leading, he should try to follow a strategy that involves less risk. His objective is simple: isolate the huge white group in the upper-right corner. Where should Black play? You'll find the answer next week.
Reference 2 :
After black 1, White should first play at 2. This move cuts at the marked black stone and strengthens White's marked stones. Sure, Black's move at 3 is good, but his stones are still weak even after playing at 5. Black would like to cut at A, which would be followed by white B and black C, but a white move at D captures the black cutting stones, including the marked one. It is hard to say where White should play next, but there is no doubt his marked stones, including the one marked X, are stronger, making fighting on this part of the board a little easier.
Solutions to last week's problem 3
Solution 3A-Problem A :Black 1 is easy enough.
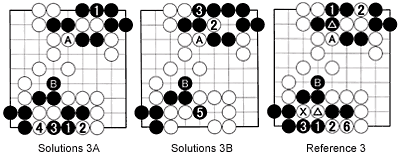
Problem B :
Black 1 and 3 seem like reckless moves as white 4 captures four stones.
Solution 3B-Problem A :
White 2 is no threat. Black simply connects at 3.
Problem B :
After white 4, Black comes back and plays 5 to capture three white stones-this combination is called the "ishino-shita" tesuji.
Reference 3 :-Problem A :
Sure, black 1 makes use of the ishi-no-shita tesuji, but he loses points in doing so (at least two points).
Problem B :
Black 1 is wrong. White 2 in combination with his next move kills Black. Capturing two stones, black 3 still seems fine, but white 4 plays where the white stone marked with a triangle is. Black has to pick up where the white stone marked with an X is and white 6 connects to make Black's eye a false one.
