You must remain flexible. But whether stick to your course or change your mind, there must be a good reason.
5 more basic principles of handicap go
Last week, we listed five general principles for handicap go. In fact, those principles are useful even when you're not playing with a handicap. Here are five more.
* In a nine-stone handicap game, don't think of the corners as your territory, even if four of the handicap stones are on the 4-4 points at each corner.
* It is best to think of the corners as White's territory. That way, you will not be upset if White invades.
* Be aware of cutting and being cut. Sometimes you cannot avoid being cut, but think rationally. Should you try to save those stones, or abandon them?
* Just because your opponent is stronger, don't assume that you should answer every threatening move he makes. Often he will play strange moves in an effort to intimidate you, or omit defensive moves because he has no time.
* It is usually best to play for influence, rather than territory. But remember that there are two kinds of territory--that which is worth points but has no strategic significance, and that which has an impact on the status of a group because it forms a base or makes eye space.
These principles will help you control your emotions, and make you more aware o f how to think and make decisions.
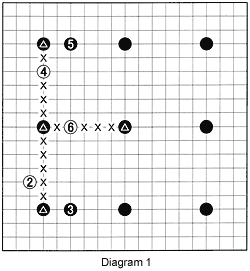
 Diagram 1: We have been studying this diagram over the past few weeks. As can be seen, White's strategy is very simple: He is trying to isolate one of Black's marked stones by cutting the lines (indicated by X's) between all Black's marked stones. We have established that trying to ensure life for the isolated stone is usually a bad idea. We also discussed sacrificing the stone, a plan that works well if executed properly (see principle 3 last week).
Diagram 2: We then went on to conclude that the best plan was probably to cut through the lines between White's surrounding stones (see principles 3 and 4).
 Diagram 3: We then discussed moves A, B and C. This week we will focus on black 1. If you look at Diagram 2, this is outside the line connecting the marked white stones. However, the move is aimed at determining White's intentions. Depending on White's response, Black should be prepared to either sacrifice the marked stone or ensure that it survives.
Diagram 4: This is the solution to last week's Problem 2. The question was, how should Black respond if White plays at 2? Black 3 is an ideal move, as this interdicts White's defenses. True, white 4 and 6 hurt black 1, but black 5 and 7 do the same to White's stone. In fact, both of White's marked stones are isolated. This is a good result for Black.
 Diagram 5: This is the solution to last week's Problem 3. The question was, what should Black's response be if White plays at 2? Black 3 is a flexible move. In other words, Black is willing to sacrifice his marked stone if he is sure of capturing the marked white stone. White 4 threatens the marked black stone, and black 5 does the same to the marked white stone. But the marked stones have not been captured yet. While limiting White's territory, Black can still save his marked stone by playing at B, C or D. On the other hand, White can still invade at A and ensure life in the corner.
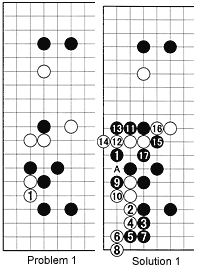
Problem 1: How should Black respond to white 1?
 Solution 1: Black should play at 1. White can now live in the corner with 2 and 4. But Black forces White to live on a small scale with moves 3 through 10, and then strikes at 11 and 13. If White insists on keeping Black's stones split with 14, black 15 and 17 capture four white stones. In other words, White can take the corner, but then he loses his territory on the other side. Note that Black should not play at 2 instead of 1, as this would permit White to link up his groups with a move at A.
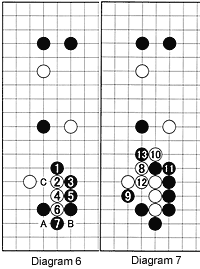
Diagram 6: What often happens in nine-stone handicap games is that Black is afraid of being split like this. However, there is no need to worry. Just be sure to play at 3, 5 and, especially, at 7--never play at B or, even worse, A. After black 7, White cannot cut at A or B next, because he would have a problem when Black plays at C, a move that would capture three white stones. So White needs to protect against C first.
 Diagram 7: White 8 protects against the cut, but black 9 threatens a snapback, so after exchanging 10 for 11, White needs to come back to defend his three stones by playing at 12. But black 13 would make a mess of White's position.
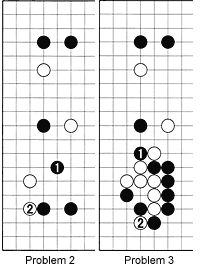
Problem 2: In response to black 1, white 2 is a likely move. How would you respond? Refer to all 10 principles provided last week and this week. The question to ask yourself is: "Does the lower left corner have strategic importance?" Then work out what strategy you would use.
 Problem 3: In Diagram 7, black 13 was supposed to make a mess of the white position. That move is black 1 in this problem. How should Black answer white 2?
The answers will appear in next week's column.
