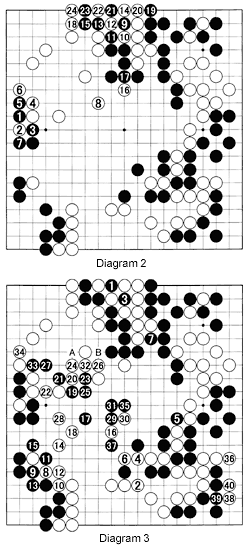
 In go, it is easier to create new groups than to give them away. This is probably due, in part, to the mental attachment players form with their groups. In defending his Meijin title in the fifth game of a best-of-seven match with Cho Chikun, however, Yoda (White) keeps giving away stones and groups. In Diagram 3, he gives away as many as 10 stones without hesitation.
Diagram 1: White has just played the marked stone. This is actually quite a dangerous move (see Solution 2). However, Black wastes his chance and makes territory with 1 and 3. Black 5 through 13 are a good combination, strengthening Black's superiority in the center. However, White quietly makes territory with 12 through 20. Even though Black missed a decisive chance, most top pros analyzing the game still thought Black was leading.
Solution 1: The question last week was how Black should continue after White ignored black 1 by playing at 2. Black should have exchanged 3 and 5 for 4 and 6, then played at 7 to cut off White's marked stones. As Black can exchange A for white B, the marked stones may die, but even if they don't, the thickness Black has built with the marked stones will come in handy during the battle to come.
 Diagram 2: In response to black 1, White cleverly plays 2 through 6 to gain sente and occupy the focal point for center territory at 8. With 9, Black initiates a long sequence which finally ends in a two-step ko when Black plays 21 and 23. This is a so-called "flower-viewing" ko, in which Black has little at stake and White a lot. White is the underdog in this ko fight, but even if he loses it...
Diagram 3: The drama is not over. Black captures the ko, but then White plays 2, supposedly a ko threat reserved for Black. Unwilling to leave it at that, without a challenge, Black captures at 3. White then goes on to sacrifice his stones at the upper edge, but white 8 through 14 are a clever way to limit Black's corner territory in sente while expanding White's center. Surrounding a large center territory, white 16 and 18 finalize the furikawari (exchange of territories/groups) initialized by Black in the ko fight. However, even at this point, Black is not completely lost. His last chance is to play at 37 after white 26. Instead, he tries to trick White with 27. This stone becomes mochikomi (loss without compensation) when White answers with 28.
After white 40, Black can live in the lower right corner, but the score on the board is about even, which means White will win the game by a slim margin equaling the komi (compensation Black has to give for playing the first move). On seeing white 40, Cho resigns, giving Yoda his third Meijin title in a row.
Handicap go

Diagram 4: After the handicap stones are on the board, White plays the kakari (approach) at 2, which is a standard move. The main responses are A through F and tenuki. In the past weeks, we have dealt with A and B and the possible corner invasions White could launch. This week we will look at C as a response.
Diagram 5: Often the Black player believes black 3 and 5 will protect a white invasion at A. And in fact it does hamper such an invasion, but the result is not necessarily better for Black. The reason for playing at 3 is to entice white 4. The exchange 3 for 4 is the only difference to answering 2 at 5 right away. Black's reason for this exchange should be to take away White's base in order to attack using the marked stone. A possible attack is shown here. However, there are many cases in which the exchange 3 for 4 hurts the marked stone. So be careful--don't play 3 automatically just because the marked stone is in place.
Diagram 6: After the exchange 3 for 4 in Diagram 5, White can still invade at the three-three point with 1. Now Black can choose between two basic scenarios. If we imagine that the marked stones have found a safe harbor and are no longer vulnerable, the combination of black 2 through 8 captures the most territory. However, keep in mind that after this exchange, White is much stronger.
Note that White cannot play 7 at 8 because Black would next connect at 7, threatening to either capture at A or at B. Either way, White gets a bad result.
 Problem 1: Instead of black 4 in Diagram 6, Black can also play at 4 as shown here. How should White respond?
Problem 2: In the second basic scenario, the marked white stones are weak. In that case, Black should usually descend to 2 to keep White's stones separated. In general, the moves 3 through 5 can be expected next. How should Black respond?
