Take the Initiative
Let's have a look at the advantages of taking the initiative by first checking the solutions to last week's problems and then following a game between two young top pros.
Solution 1A :
How should White answer black 1 ? Grabbing the other large point with 2, is the best White can do. After black 3, though, White had better block with 4 even if this allows Black to play at 5 and then switch to 7. If White allows the marked stone to be captured, he can't win-trying some trying several different variations, Black still won each game by 4 or 5 points. So allowing the marked stone to be captured is out of the question. Before capturing 3, White must first play 8 in sente, threatening to capture black 7.

Black needs to connect with 9 to avoid being captured. But White captures with 10 and 12. White 22 concludes the game with the result being 12 points for Black and 10 plus 1 prisoner (11 points) for White. Black wins on the board by one point, but allowing for a komi (compensation by Black to White for playing the first move) of 2 points, White wins by 1 point. Such is the power of initiative.
Solution 2A :
White 1 is an uncomplicated move-it cuts up Black's groups and makes miai-if Black defends one, White kills the other one, so Black must decide whether it is best to lose the group at the bottom or the the one at the top. When Black plays 2, white 3 kills the three black stones at the bottom.
Solution 2B :
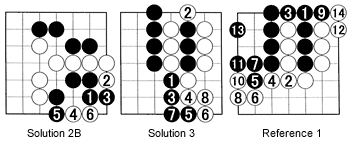
Even if Black resists with 1, White first limits Black's total eye space, then hits at the vital point with 4 and 6. Check for yourself that no matter what Black does next he can't make two eyes and he can't escape.

Black 1 to 7 is the winning combination. Black's territory is 17 points while White's territory is 12 points plus 3 prisoners (no komi) for 15 points. Black wins by 2 points.
Reference 1 :
Black could save his three stones by descending to 1 and connecting with 3. But White would then take the lower edge with 2 to 10. In the end, the score wouldn't even be close with White at 16 points against Black's 5 points.
Reference 2 :
Cutting at 6 and then throwing in with 8 is sometimes a great endgame tesuji (clever move) but when White plays at 8, Black doesn't just capture at 11, he first destroys more White territory with 9 before capturing with 11. The score would then be Black's 16 points (1 point less than in Solution 3) to White 13 (2 points less). If Black immediately captures 8 by answering that move at 11, he loses the game.

This would be the situation then. Now White can play at 10. Black needs to defend with 11. White then blocks with 12 and Black can't connect his stone by playing at 14 (as this would endanger all of the stones in the lower-left corner). He has no choice but to come back with 13, but then White can capture the ko with 14. There are no ko threats and so White is able to connect in between 12 and 14. In this instance, White would have 13 points plus 4 prisoners for 17 points against Black with 13 plus 3 prisoners (16 points). White wins by 1 point.
Solution 4 :
This is the game we started last week between Naoki Hane (Black) and Keigo Yamashita (White). Black has just defended his stones in the lower-left corner with the marked black stone, while grabbing a lot of territory. White has two relatively weak groups (the marked groups) with a black group in between. So attacking that group (taking the initiative) might be a way out. Black could have played at A, leading to White playing at B, but by not doing so, White was provided a window of opportunity. White grabbed his chance by trying to cut in with 1. It is now too late for black to play at a, anc he can't connect at D either, as White will cut with C. So in the end Black had no choice but to connect at C himself.
Reference 4 :
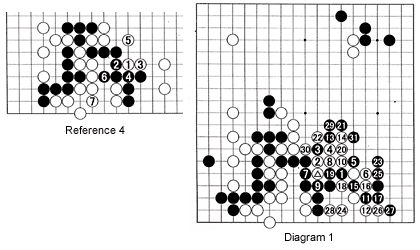
White 1 basically forces Black to connect at 2. If the moves to 5 follow, Black can still play at 6, which has to be answered by White at 7. Now you see that black 2 isn't necessary anymore to connect his stones. At the same time, you can see that the black stones are in trouble and will probably die.

So what happens after White plays the marked stone? A hectic fight breaks out as Black tries to break out while White is trying to avoid being split. Marked by tesuji after tesuji in trying to ensure damezumari (shortage of liberties) of White's stones, in the sequence from 1 to 31, Black's stones (13 in all) are captured, but he manages to seal in the white stones on the side.
 Diagram 2 :
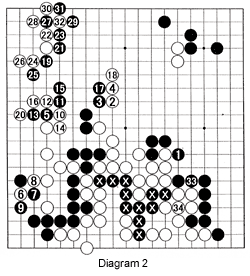
Even though the marked stones are dead, after black 1 (black 31 in the previous diagram) you can see that Black is building a huge moyo (sphere of influence). On the right side, in fact, Black is leading slightly. White 2 is a key point in the center to isolate the black center group. However, Black challenges with 5, which White gracefully accepts by cutting with 10 and 12. After black 19, white 20 is needed to eliminate the warui aji (bad potential) of black 5 and 13. This allows Black to take the initiative with 21 and 23. Since he has a lot of ko threats in the lower-right corner, Black starts a ko by resisting with 31.
Diagram 3 :
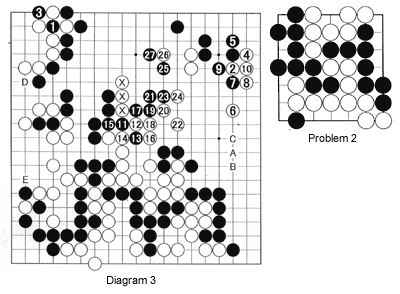
After his ko threat, Black recaptures the ko with 1. White plays his ko threat at 2 and Black finishes off the ko with 3, enabling White to build a group on the right, inside Black's moyo. Black first forces White into a low position with 7 and 9, then attacks again with 11 and 13, finally cutting off the three marked white stones in the sequence to 27. Black is slightly ahead at this point.

Look at Diagram 3. After black 27, White has an exquisite move, which looks very strange, but let him to jump into Black's territory just enough to reduce the territories in sente and win the game by half a point. Can you find this move? Hint: it uses the three marked white stones.
Problem 2 :
Though the game looks hopeless, Black can still win by playing his next few moves right (White gets 2 points komi). Hint: Territory points are not counted in a seki-a tandoff where neither player can move-which is about to happen in the upper-right corner).
