Go and business (2)
Western businessmen who come to Japan are often dismayed by the tendency of their Japanese counterparts to never give clear responses to their questions. During negotiations, the Japanese position is ambiguous until the very end. A common complaint is that Japanese never directly say "No!" but neither do they say "Yes!" Partly because of this trait, Shintaro Ishihara, the current governor of Tokyo, and Akio Morita, the late president of Sony Corp., wrote the book "The Japan That Can Say No. "I think this trait can be traced to a concept in go called "aji." Indeed, many of Japan's ruling elite--businessmen, bureaucrats and politicians--are go players (the membership list of the Japan Go Association can almost double as a directory of the top names in the Japanese business and political world). Aji is such a useful concept in their games that it has become second nature to use it not only in business negotiations, but also in their human relationship. Aji is an advanced concept and its use in games can be extremely subtle, but I will try to explain it.
Aji
Aji refers to the latent possibilities that exist in a position. Although these possibilities may never be realized, they are always lurking in the background and their presence influences the course of the game, enabling certain moves to be made and inhibiting others. Let me give an example.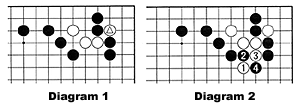
In Diagram 1, the three white stones on the left seem to be trapped: they have no room to make the two eyes necessary to form a living group. However, they can escape into the center because of the presence of the marked stone in the corner. As the position stands, this marked stone has no chance of escape and at the end of the game it will either be captured or simply taken off the board as a dead stone. Still, it has, as go players say, "aji." How can White use this aji to save his three endangered stones?
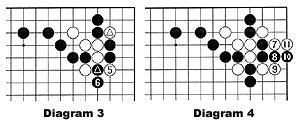
The key move is for White to jump to 1 in Diagram 2. Black cuts through with 2 and 4, blocking White's access to the center.
Next, White ataris the marked black stone with 5 in Diagram 3, so Black must defend by extending to 6. Now the aji of the marked white stone comes to life.
White ataris with 7 in Diagram 4 and drives the black stones into the corner with the sequence to 11. The four black stones can be captured on the next move.
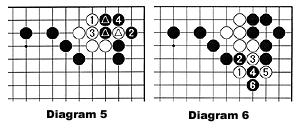
It would be a serious mistake for White to first play 1 in Diagram 5. With this move, White threatens to capture the two marked black stones and save his own marked stone in the corner. Black will defend with 2. White might further atari with 3, but Black will capture the marked stone with 4. Now there is no longer any aji that White can use to escape.
After the moves in Diagram 5, suppose White jumps to 1 in Diagram 6. Unlike Diagram 2 to Diagram 4, this attempt to escape will end in failure. After Black extends to 6, White has no follow-up moves on the right side and White's four stones at the top do not have room to make two eyes, so they will be taken off the board at the end of the game.
White 1 and 3 in Diagram 5 might appear to be aggressive moves, but in reality they are crude because Black destroys the aji of the marked stone in Diagram 1. It is like ignoring the age-old proverb that advises, "Don't burn your bridges behind you."
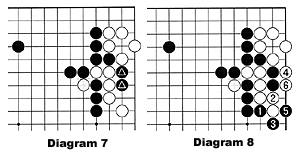
In the opening and middle part of a go game, strong players always avoid destroying aji. Even if they can earn some profit by settling a local position, they prefer to leave it undefined because of the aji that is there. Here is an example.
The position in Diagram 7 is the result of a joseki, a standard opening sequence in the corner. The two marked black stones are dead, but they have some aji and Black should be careful not to destroy it, since it will be a constant source of concern for White. Therefore, a strong player would never play the sequence from Black 1 to 5 in Diagram 8 early in the game, even though it confines White to the corner and prevents him from expanding his territory along the side. Instead, Black will leave the position as it is in Diagram 7 and will wait to see how the game develops.
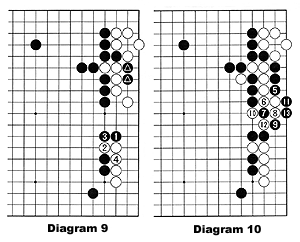
The position in Diagram 9 is from an actual game. Black attacked with 1 and 3, forcing White to defend with 2 and 4. But now the aji of the two marked stones above have come to life. Black ataris with 5 in Diagram 10, then plays 7. After White 8, Black blocks with 9 and, when White ataris with 10, Black squeezes with 11 and 13.
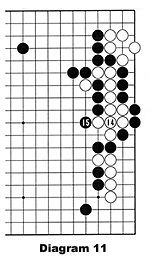
White connects with 14 in Diagram 11, but Black ataris with 15 and there is no escape for the white stones. Had Black played the sequence in Diagram 8, Black would never have made the large capture in Diagram 11.
|
Problem 2. White has just played 1, threatening to capture the two black stones at the top. Where is Black's tesuji?

