Both Jesus and the Buddha advised ...
By Rob Van Zeijst
Both Jesus and the Buddha advised people to travel light. Some people have interpreted this literally, but probably this advice is meant for life's journey and refers to the luggage of our ego and our interpretations of personal experiences. Basing decisions on the ego and solely relying on personal experiences may weigh us down and prevent us from accumulating wisdom.
On the go board, the same is true. We should differentiate between what is important and what is not, and be prepared to subordinate and sacrifice what is less important to a greater strategy. This way, groups do not get weighted down and become difficult to maneuver around.
Travel light: sacrifice the unnecessary
While they may have served a purpose in the past, some stones have lost their meaning and there is no reason to stay attached to and try to save them no matter what.
Let's look at a few situations that call for tactical sacrifice.
Diagram 1: If Black is strong on the right side and White has stones in the lower left, instead of rescuing his original stone at 2, it is often a better idea for White to develop the lower side with 4 and 6 and give up one stone.
Reference 1: After Black's pincer at 1, the idea behind white 2 is to build strength and pincer black 1 with 4. Note the exchange 2 for 3 is a territorial loss for White. However, when Black is strong in the upper right, as in this example, after black 5, White has two weak groups. Even without the marked stone, many pros would prefer Diagram 1 for White.

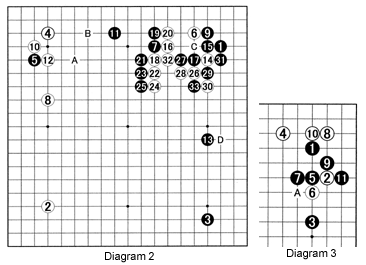
Diagram 2: After black 7, White plays 8 to induce black A, white B. However, this would leave black 7 in a wishy-washy position, so Black attempts to start a fight with 9. For his part, White starts another one with 10. Both players try to sacrifice their respective stones at 5 and 6 to avoid a heavy attack. Instead of 13, black C is the proper move, but this would give White an excellent splitting move at D. Black 13 increases the scale of the fight and tempts White to move his stone at 6. White complies with 14 and on. Next, he sacrifices that stone to get forcing moves at 26, 28, and 30. However, black 33 looks severe.
Diagram 3: Instead of saving his stone at 2, White uses this stone and white 6 to establish a position at the top and the corner with 4, 8, and 10. This is a strategic sacrifice to develop the top.

Solution to last week's problems
Solution 1: In over 90 percent of games, when White cuts with the marked move, Black's best response is 1, 3 and 5. White must play at 6 to avoid the sequence of black 6, white A, black B. The combination 1 through 5 reveals a wide array of techniques so let's have a closer look.
Reference 2: Black 1 is usually the worst choice. White can then subdue Black at least in the sequence through 9. Black's position is painfully low. White can proceed with A or around B, aiming at the vital point C. In the worst case Black's stones marked with triangles become a weak group, but even in the best case, Black's center influence has disappeared. The cause was his attachment to the stones marked X.
Reference 3: The aim of black 3 is to induce white 4. If White falls for this, Black makes a perfect wall in sente (taking the initiative) with 5 and 7.
Reference 4: White's high-level move at 4 avoids the developments of Reference 3. On the other hand, black 5 and 7 lack skill. After 8, he has to defend against the cut at A with 9, losing the initiative. This shows that Solution 1 is the best answer.

Solution 2: After black 4, white 5 is a good light move. An alternative is A, aiming at B, black C, white D, black E, or simply playing D right away.
Reference 5: Attaching too much value to the marked stone, white 1 is heavy and slow. After 2 and 4, White is under heavy attack and will have problems making shape and eyes.

Problems
Problem 1: Have another look at Diagram 2. Black 33 looks like a severe move. However, White treats his stones lightly. How should White play?
Problem 2: The moves through 13 form a joseki (set pattern). Usually White switches elsewhere. Of course, he has a strategy in mind when Black cuts at A next. If Black does cut at A, how should White respond?

Van Zeijst is a four-time European go champion and European representative at the Fujitsu World Championship.
