A top pitcher can hurl a baseball ...
By Rob Van Zeijst
A top pitcher can hurl a baseball with the precision of half the width of the ball. Professional newscasters can divide the text they read into small units and can control the speed of their delivery to a deviation of as little as a quarter of a second by controlling their breath. What would happen to the pitcher's control if the ball was one centimeter larger in diameter? Or if the newscaster reports from the peak of Mt. Fuji, where the air pressure is less and oxygen is thinner. These may seem ridiculous questions and what on earth do they have to do with go?
In go there is the komi system in which White is awarded a number of points to compensate for Black playing the first move. How many points should this komi be? When I talk to amateurs, many preferred playing Black even if the komi were as much as 10 points. This is in stark contrast with pros. Almost all pros wanted to play Black if the komi were 5.5 points while White was favored if the komi was 7.5. A pro thinks in very small units, and in go, that unit is one point. After the komi changed from 5.5 to 6.5 points, former Kisei Naoki Hane had a losing streak of about 16 games, apparently because this change upset his rhythm.
Changing komi to 6.5 points
The komi was changed from 5.5 to 6.5 points a few years ago, apparently because of the opinion of one man: Lee Changho, the world's top player at the time and an expert on positional judgment and the endgame. Statistical research carried out after this change seems to support the validity of this opinion. After the change, Black's winning percentage dropped from about 52.5 percent to about 50.5 percent. The outcome of the 2004 Honinbo title match below, which we started looking at last week, was affected by this change and helped to influence these statistics, because it was one of the first games to use the new komi rule. The game pitted Meijin Norimoto Yoda (Black) against Honinbo Cho U.
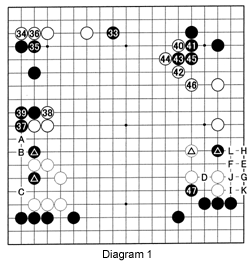
Diagram 1 (33-47): White has just played the marked stone, enclosing the marked black stone on the right. Black then extends along the top with 33 and White protects his corner at the top left while putting pressure on Black's stones. In turn, Black reinforces his stones with 37. Note white 38. Wouldn't it be best if he blocked at A? Not really. Black's connection at 39 threatens to connect his marked stones with B and C. As White cannot eliminate both threats with just one move and he would not get much territory here anyway, he abandons this area altogether to build influence with 38 and takes the initiative in switching to the next area of interest. White 40 is worthy of note. While preventing Black from developing at the top, White expands his framework on the right by inducing the sequence through 46. However, Black then strikes at 47--this is the vital point of White's shape here and provides the solution to last week's Problem 2. What are the virtues of this move? First, if White wants to play it safe, D is the right move, but then Black can force the sequence E, white F, etc. through L, greatly reducing White's territory here. Can you guess how White answers 47?

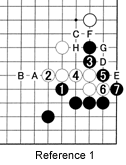
Reference 1: The reason why black 1 constitutes the vital point is that if White plays the most natural move at 2, Black will follow with 3, an excellent move. This forces white 4, allowing Black to connect underneath with 5 and 7 to destroy White's entire area on the right. Note that Black cannot move out to C, because of the sequence white D, black E and white F, which would make miai between G and H--if Black plays one, White plays the other. As you can see, white 2 now looks insipid. It should have been at A or at B. Can you guess White's response to black 47 in Diagram 1?

Diagram 2 (56, 59, 62, 65, 68, 71, 74, 81, 84, 87 and 90 are played in ko): If you followed Reference 1, you can understand why White played at 48. However, this immediately led to an explosive ko. Almost all the moves in this figure are either in ko, ko threats, or answers to ko threats. In the end, Black increases the value of the ko with 91 and White solves it with 92. When playing 100, White builds a nice center, but in real terms, Black is leading slightly. In the end, however, White wins by half a point as the result of the komi being changed to 6.5 points.

Diagram 3: White 2, 4 and 6 initiate the large-scale nadare joseki (avalanche joseki) with many variations along the way. After 12, there are two variations, as Black can choose between A and B.
Diagram 4: After a shaky start, the moves through 11 form a joseki. Often before 8, White exchanges 11 for A. In the end, Black will come back at B.
Diagram 5: The moves 10 through 15 show the variation referred to above. The difference is the 1-for-2 exchange. This is an unconditional loss of two points for White. That is the sole reason the joseki changed after black 1.

Solution to last week's problems
Solution 1: Whatever happens, White must first play the vital point of 1. Black should respond with 2 to defend against a white throw-in. Next, White can choose between starting a defense on the right at A or B, or the bottom at C or D.
Solution 2: This was explained in Diagram 1 and Reference 1. Can you see the resemblance between the shape in Solution 1 and black 1 and 3 in Reference 1?

Van Zeijst is a four-time European go champion and European representative at the Fujitsu World Championship.
