Proverbs guide your hand (***)
An interesting feature of proverbs is that there are some that express opposing ideas, such as "The first blow is half the battle" and "An oak is not felled with one blow." Proverbs have also penetrated the world of go. Uncritical acceptance of any of them is not likely to transform you into a strong go player, but a solid knowledge of proverbs with their situational application will bring guaranteed improvement.I will introduce two proverbs that have opposing meanings.
"Do not make moves that strengthen your opponent !"
Reference 1 : Beginners often share the mistaken belief that attaching a stone to an oppornent's attacks it. As you can see here, the original white stone has four liberties. After black 1 and white 2, Black has three liberties against five for White. In addition, after the 3 for 4 exchange, Black's two stones have four liberties, while White's three stones have six. White is getting stronger faster than Black !
Diagram 1 : In this situation, where would you play if you were White?


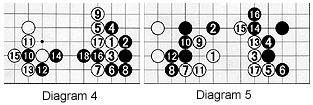
Diagram 4 : White 1 is another move that strengthens Black's position. The moves to 8 may follow. Now White faces a tough choice. If he extends with 9, Black may start a fight in the lower left corner, that he is bound to lose. But while sacrificing his stone at 10, 12 and 14 become sente, enabling Black to cut with 16 and 18 in order to capture white 7. Since he lost most of the territory he was so busily defending, this is another disaster for White.
Primed for quick settlement of one's stones, this technique is less concerned with how it strengthens the opponent.
Diagram 5 : After the result in Diagram 3, White can invade with 1. Black 2 is a common defense that keep White from connecting underneath to his stones on the left with a move at 7 while preventing an escape into the center at the same time. Now White plays a series of attachments at 3, 5, and 7, then plays a timely move at 9. next 11 to 17 then make life a breeze for White.
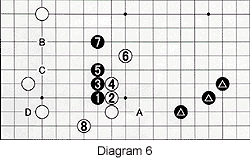 Diagram 6 :
If Black judges the exchange black A for white 4 not good enough, Black can play at 1 instead. This strengthens both White's and Black's stones, but White's strength has virtually no impact on the marked black stones, while after white 8, Black can aim at reducing moves at B or C or invade with D, exploiting the weakness between white 8 and White's lower left corner.
Diagram 7 : This game between Honinbo Shusaku, often referred to as the greatest go player who ever lived, and Sendayu Sekiyama, arguably the strongest amateur player ever, played in June 1851, illustrates both proverbs.
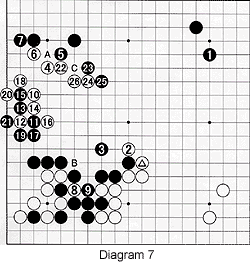 White has just played the marked stone. After Black's expansive move at 1, White needs to invade somewhere. How does he do that ?
White 4 threatens to invade the corner. Black 5 defends against that threat-notice he does not directly attach to the white stone with a move at A. White 6 attaches. Black 7 prevents White from getting a base, but is not overly aggressive. The exchange white 8/black 9 creates a cutting point at B. White 10 makes a base. Black 11 does not attach-he only tries to contain the white group. But now notice white 12-again a tsuke. Black is forced to capture white 12, but thanks to his sacrifice, White gets forcing moves with 14 to 20, then plays another tsuke at 22. Notice black 23 again-he does not play at C (which would be a tsuke). But again white 24 is a tsuke.
Solutions to last week's problems
Solution 1 :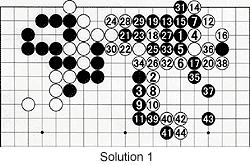 When Black invades at 1, leaning with white 2 is correct. By exchanging 2 for 3 and 8 and 10 for 9 and 11, White strengthens his own stones in order to fight Black on the other side with 4 through 16. A fight erupts resulting in Black securing two eyes and White running away while capturing the corner, which gives him an advantage.
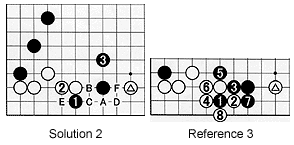
Solution 2 : After White plays the marked stone, exchanging 1 for 2, then jumping out with 3 is correct play for Black. The exchange 1 for 2 prevents White from connecting his stones underneath with A since Black can answer with B, white C, black D, white E, black F.
Problems
 Problem 1 :
Look again at Diagram 7. After white 26, it is Black's turn to do something about White's lower right corner. What should he do ?
Problem 1 :
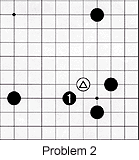
Look again at Diagram 7. After white 26, it is Black's turn to do something about White's lower right corner. What should he do ?Problem 2 : Black's four original stones form the double wing formation, a shimari (corner enclosure) with extensions in both directions. In response to the marked white stone, Black plays 1. What should White's next move be ?
