Madmen and common sense
Certified madmen were once asked by their doctors to answer certain questions. And sure enough, the answers proved that they were indeed mad. But when the doctors asked them to answer the same questions in the way a "normal" person would, they had no problem complying.
What is the significance of this? Maybe the notion that normal behavior assures us of a place in the community. From this, we can deduce that normality, or common sense, is learned behavior, such as logic, a shared notion of beauty and speech.
These behavioral patterns can be seen in the way scientific and academic learning progresses. We build on the knowledge that we acquire and make advances in the fields we are interested in. For example, law-or a belief in what is right or wrong-is not static but changes as society does. This process we can call evolution.
Basics of personal evolution
If you want to improve in go or any other intellectual process, it is a good idea to know the history of your field of endeavor. As Leon Trotsky asserted, be conscious of the basic moves or movements and try to become aware of the blind forces of nature. Or, as Graham Greene said, go into the trenches to test your understanding of which prototypes should fail and which should survive.
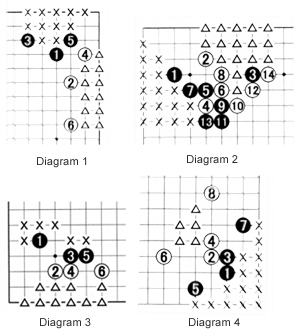
Diagrams 1 to 4 each show a joseki. As these joseki are the result of an evolutionary process of brilliant minds, they may be difficult to understand immediately.
By their very nature, neither Black nor White gains an advantage from a joseki. But just as a similar education can turn some people into leaders and others into followers,

a joseki could become advantageous or disadvantageous given the right circumstances. If we combine these four joseki, what do we get?
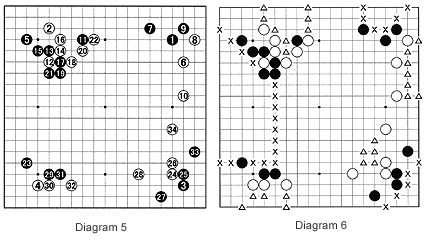
Diagram 5 shows an example of Black gaining terrific synergy. In Diagram 6, the XXX's indicate the borders of the territory Black can expect to claim, whereas the white triangles indicate White's prospects. It is clear that Black's position holds much more promise than White's, because the white stones are barely cooperating with each other. It is safe to say that the game is as good as over-Black's

position is too strong. Clearly showing he knows what he is doing, White does not make any mistakes in joseki. But Black's position as a whole is greater than the sum of White's individual parts.
Next week, we will delve a little deeper into this situation.
Linking up stones
Answers to last week's problems:
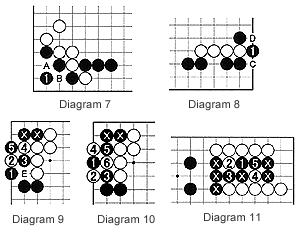
In Diagram 7, black 1 connects all his stones. If he plays A instead, White will play B. If Black plays B, White can cut at A. After black 1, White can play neither A nor B as he would put himself in atari.
In Diagram 8, black 1 connects all his stones. White cannot play at C or D, as he would immediately lose that stone.
Black 1 (or its mirror move at 5) in Diagram 9 is correct here. If White tries to cut with 2, Black captures the white stone and in the sequence to 5 Black manages to connect his stones. If white plays at E, black connects at 2.
Your first instinct may be to play at 1 in Diagram 10, but the combination of white 1 and 3 cuts off Black's 2 marked stones.
In Diagram 11, black 1 ensures that all marked black stones will be connected. White 2 and 4 are pointless and easily refuted with 3 and 5. This type of connection with two stones parallel to two other stones, is called a bamboo connection, and in this example you can see why it is so effective.

Problems
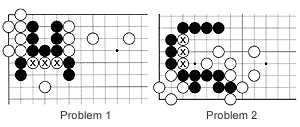
In both problems, Black plays first and captures the marked white stones.

