Where Zen and go meet
When a person takes up go, he or she initially should try to capture as many stones as possible. But when the player becomes stronger, this quest should be abandoned in favor of surrounding an opponent's stones from a distance. The next stage would be to build up one's own territory, while chipping away at the territory of an opponent. However, even with this larger issue in mind, head-on battles are still the mainstay of fighting for turf.In addition to an open mind and positive attitude, the skills required for an effective battle are an ability to "read" the board, technique and constant practice. There is no better way to improve one's "reading" aptitude than tsume go, which generally involves intricate life-and-death situations and an ability to determine the best move during a game. In effect, this means that regardless of what stage a game is at, every move should be considered from a whole-board standpoint.
This requires a Zen-like attitude in which one concentrates on the moment, rather than dwelling on the past or fantasizing about the future. This may sound simple, but accomplishing this even for one minute at a time is a major task. In this respect, Zen meditation may help improve concentration when one plays go.
Atari-seduction in disguise !
In the column two weeks ago, I mentioned that when a stone has two liberties left, an opponent can reduce that to one liberty, threatening to capture the stone with the next move. This is called atari. But although it can be gratifying, a player must be careful about playing such a move because it takes away the possibility of playing atari the other way. Quite often, it is best to think twice before making an atari move.Let's look at some examples:
Diagram 1 : With 1, White tries to capture the corner.
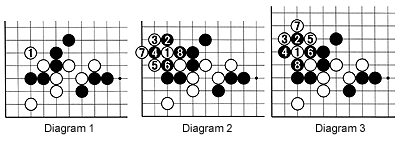
Diagram 3 : Alternatively, White can opt to play at 5. But now Black plays 6. White is forced to capture with 7, and again Black captures the pivotal cutting stone with 8.
Note that in Diagrams 2 and 3, the order of Black's moves 6 and 8 are reversed. In other words, Black played these moves only when he knew which one was the correct atari.
Diagram 4 : Now, let's apply the same principle to this situation in which the marked stones seem to be in trouble after white 1. Compare the shape here with the one in Diagram 1 and try to find the weaknesses in White's shape.
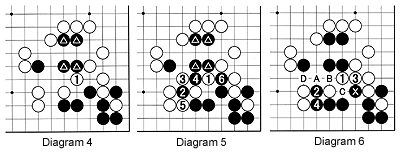
Diagram 6 : In this diagram, White plays at 3 after black 2. But Black then plays at 4. A white move at A is countered with B, if white C, black D is a good move. White can then capture the marked black stone, but this stone is not important.
Diagram 7 : Black's moves 1 and 3 form a tesuji combination. He could have extended to B instead of 3, but this looks so slow. There is an atari at A and B, but what should White do ?

Diagram 9 : Therefore, in most cases, just extending to 4 so as not to give Black any momentum is best. Generally, Black will make shape with a move like 5, after which 6 is the vital point, as it aims to cut at the same time. If Black defends with 7, white 8 grabs a big corner while taking away Black's base. The result is about fifty-fifty.
Solutions to Aug. 19 Problems
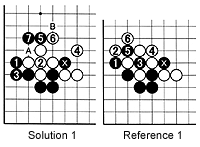 Solution 1 : Black 1, which threatens to take the ko while putting two white stones in atari, is correct. White 2 is a slow move to which Black 3 is a solid response. White 4 now captures the marked black stone, but black 5 is a splendid move that uses the marked stone fully. White has no choice but to play at 6, but now black 7 is a good move. A black move at B next is severe. (Note that Black must not make atari at A. After White connects, Black has to connect at 7 anyway.)
Reference 1 : White 2 is a much better move that in the previous diagram. If Black plays 3 and 5 now, white 6 will turn the white position into a wall, slowly suffocating the marked black stone.
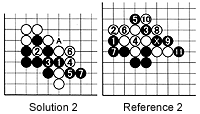 Reference 2 : Black could play 3 and 5 to force White into a bad shape, then connect with 7. White can get one black stone with 8 and 10, but black 9 and 11 are strong moves, too.
Solution 2 : Black 1 without any ataris is best. White cannot play at 4 immediately because of the double-atari at A. White 2 seems best, but even if Black just connects at 3, after white 4, black 5 (again without playing atari) and 7 gets Black out of isolation.
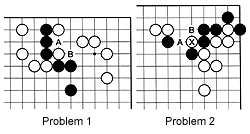 Problem 1 : Black's three stones at the edge are in jeopardy. You can spot atari at A and B. But rather than play at these points, what would you do ?
Problem 2 : White has just cut with the marked stone. Neither the atari at A and the one at B look quite right. Where should Black play ?
