Pick your fight (**-***)
The biggest difference between a 5-dan pro and a titleholder is not how accurately or deeply they can read the position, but how they arrange their troops before the real battle begins. A titleholder generally picks the battleground. This means he avoids an unfavorable head-on fight while laying the foundation for one that seems favorable.In two-day matches for the Kisei, Meijin and Honinbo titles, the first day often ends not after half the moves have been played-from 250 to more than 300 moves-but after only 30 to 60 moves. That is the normal pattern.
The reason for this is that they are arranging their troops in a favorable position, so as not to be drawn into something unexpected or to recklessly jump into an area where the opponent is much stronger.
Fuseki-foundation of sanrensei
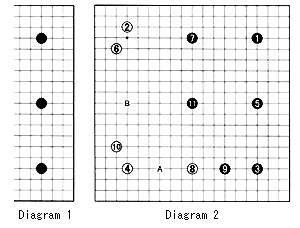
For beginners and intermediate players playing black, I recommend the sanrensei (three star-points in a row) fuseki because there are few variations. In employing this particular strategy, you will develop a sense for balance, attack and defense, and understand the difference between what is large and what is urgent.
Diagram 2: This is an example of how you deploy the sanrensei fuseki. If White makes a shimari (corner enclosure) with 6 after black 5, Black keeps expanding his moyo while keeping in check the influence of the White shimari. If White plays 8 (with the same idea in mind as black 7), Black 9 strengthens the corner and threatens to invade somewhere around A. While partly fending off an invasion around A, white 10 makes another shimari to strengthen the corner and lay some claim on the left side. Now a move around B springs to mind but the prime objective of the sanrensei fuseki is to build a large-scale framework to force the opponent to move in. This fuseki could cause White enormous anxiety because Black's moyo (framework) seems so large and invasion prospects are worrisome.
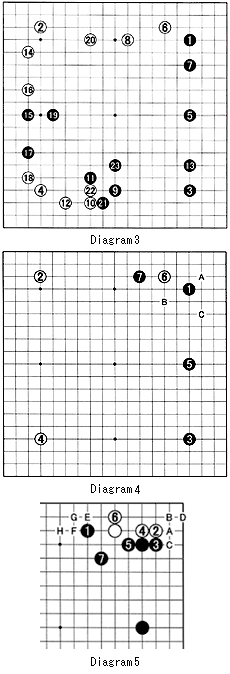
 Diagram 3: Black's position in the previous diagram is a little too good to be true. Instead, White can play 6 to keep Black's expansion in check. Black 7 is one way of responding. White 8 could also be one space to the left. Black 9 is the next key point, producing the yonrensei (or four star-points in a row) strategy. Black 11 occupies the crossroads between the black and white moyos. White 12 could also one space higher on the fourth line, and black 13 defends against invasions. If White does not want to invade yet, white 14 seems a good alternative. The wariuchi (splitting up the position) of black 15 makes miai of setting up a base in the direction of 16 and-when White plays at that position himself-Black plays at 17. White 18 now defends the corner while attacking the two black stones on the left side. Black 19 reinforces the position and threatens to invade around 20. When White defends at this spot, Black again grabs his chance to expand his moyo with 21 and 23. The result is roughly even, but among amateurs, White often feels a little uncomfortable because he feels forced to invade. A great deal of the strength of the sanrensei is derived from the psychological pressure on the opponent
Diagram 4: After white 6, Black can also opt for playing a pincer at 7-a popular move these days. White can respond in various ways, with the moves A, B and C the standard ones
Diagram 5: If White invades at the 3-3 point (also called san-san) with 2, Black should play at 3 (not at 4 because Black is not trying to build a wall toward the left, but toward the right side and the center). The sequence to 7 is a common joseki (standard corner variation). White can now play tenuki (elsewhere), but Black can later play at A, followed by white B and black C. White either answers at D (this is very painful, because his corner territory becomes so small and it is gote) or he can exchange E for black F and G for black H to take sente again. Taking sente is obviously a great advantage but allowing Black to build up so much center thickness is not a good strategy.
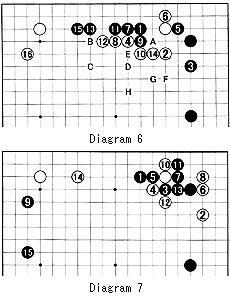
Diagram 6: As an alternative to white 2 in the previous diagram, White can also jump out toward the center. But the exchange 2 for 3 is advantageous for Black as he is making territory while White is not. Still, it makes sense if White wants to split up Black's positions. The sequence to black 13 is standard. White can now play at A, but 14 is stronger toward the center. Black 15 allows White to make a shimari with 16. Instead of 15, another way of playing is at B, with the aim of playing at 16 next. If White defends at 16 anyway, Black can move out into the center with C. Later, he can then aim at attacking the white center group (by playing at D, followed by white E, and a black move at F, G or H.
 Diagram 7: White 2 has been played a lot recently, first by pros, then by amateurs. White manages to break through and connect the corner to the right side with the moves to 8 and gets forcing moves with 10 and 12 as well. In the meantime, Black can play at 9 and force White to extend into the direction of Black's strength, a strategy that is slightly unproductive. Black 9 and 15 on the other hand, open up the board and play on the wider side, which is an advantage. In real terms, Black may have profited, but in a psychological sense, White has been able to upset Black's sanrensei strategy.
Depending on who I play and my mood, I frequently choose the psychological advantage over real gain. This is because I believe go is as much a game of psychology as one of board skills. If computers become really good at playing go, I may change my position, but for the moment I recommend you try sanrensei and see what happens.
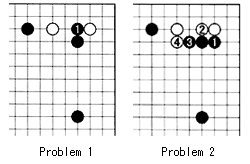
Problem 1: In diagram 5, Black should play at 3. If he chooses to play at 1 here instead, how does White respond ?

(The number of h indicates the difficulty level with one representing beginner with five the most advanced.)
