Keep your options open
Last week, we discussed why it is important not to play out your options, specifically not to play out ataris wherever they appear. Why is this ? From a theoretical point of view, by the very nature of playing atari, there is still another liberty left. If you can capture the stone you put into atari, there is no problem usually, but if your opponent can escape, it means you have shot your wad.Let's see how this works in practice by looking at last week's problems.
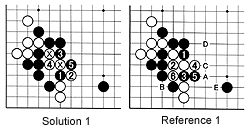 Solution 1: Black 1 then 3 are the correct moves. If White answers with 2 and 4, black 5 captures three stones in a snap-back.
Reference 1 : If Black makes a mistake and first plays at 1, after black 3, White will surely play at 4. After black 5, if the ladder is favorable, white 6 destroys the black position, by making miai of A and B. If the ladder is not favorable, White has no choice but to play 6 at C, black needs to connect at 6, after which white D follows. White is still aiming at E. This is bad for Black.
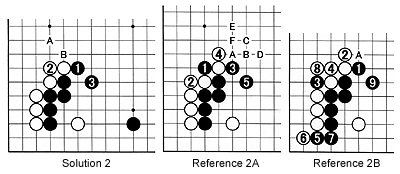
Solution 2 : Black 1, without playing any atari, is correct. Now White has to defend with 2, after which Black 3 makes a good shape. Black A or B are good moves that will threaten White's corner position.
Reference 2A : Black 1 is bad as he will be forced to play at 3 and 5. White can now play at A, black B, white C, black D, and white E. But since this also helps Black in developing a center position, simply playing at F after white 4 is a good alternative for White. At any rate, the stone at 1 is a lost cause.
Reference 2B : If White extends at 2 after black 1, black can now play the other atari, i.e. at 3 instead of at 4. White 4 is forced. Now Black can play 5 and 7 in sente and the come back to defend with 9. Big deal, you would say. But these two moves (5 and 7) are easily worth over 10 points in double sente, which means this exchange will present a difference of 10 points in the end result. Remember that 70 percent-80percent of the games between top professionals results in a win of less than 10 points.
Now you can also see why 2 was such a bad move. At the very least, it should have been at A.
Forfeiting possibilities
Diagram 1 : Here is another joseki where we find this truth applied. With 8, White could have played atari on 7 from either side, but instead played a tesuji at 8. Black must now extend at 9, after which white pokes out his head with 10. Both Black and White now defend their positions with 11 and 12, respectively.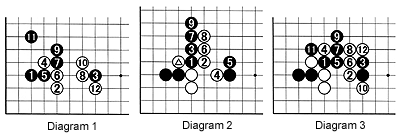
Diagram 2 : What happens if White plays out the atari with 2 ? After that he needs to defend with 4 but this provokes black 5. To prevent getting sealed in, White needs to play 6 and 8, but Black is more than happy to comply and make territory on the fifth line on the left side. As a side-effect, the marked white stone also dies. This gives White a result so bad he will probably lose the game.
Diagram 3 : So you might wonder what happens if Black extends toward the center with 3 as in Diagram 2. Remember that White had two possibilities for playing atari ? In this case he chooses the other possibility, i.e. he plays at 4 after which he can play 6 and 8 in sente in order to come back with 10. Black also has to defend his position with 11. White 12 is a good thick move that renders the two black stones worthless.
Diagram 4 : Here is another example of a joseki in which the obvious atari is not played. The moves to 17 (which could be at A or somewhere in that neighborhood as an alternative) are a set pattern. When Black plays a hane with 5, White exchanges 6 for 7, then plays 8, setting up a potential double atari at 9. Black therefore has to back off and defend at 9 himself after which white 10 moves out to the outside world. Black then exchanges 11 for 12, then plays 13, which threatens multiple atari without actually playing any. The exchange 13 for 14 ensures that black 15 becomes sente.
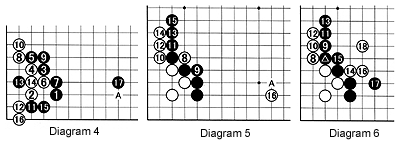
Diagram 5 : Instead of the stylish move at 8 in the previous diagram, if White plays out his atari with 8 and 10, he keeps pushing from behind. He is now forced to play at 14 as well to prevent that Black plays there in sente. White can now grab sente and play at 16 or A or somewhere in that region but Black's thickness is overwhelming and white 8 has almost no life left. This is a bad result for White.
Diagram 6 : You may argue that after white 8 (in diagram 4 and 6) Black may extend at 9 all the same. Then we get a comparable position with diagram 5, but now White cuts with 14 (and not at 15). First of all, Black has to connect with 15 (empty triangle), a bad shape, making the marked black stone virtually useless. Then White moves out with 16, Black defends with 17, and White can play at 18. Now Black's position is split and he has to cope with two weak groups. This is a disaster for Black.
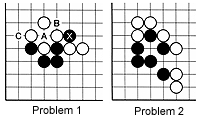 Problem 1 : Black to play. He has to defend his corner and, of course, the sequence black A, white B and black C springs to mind. However a white stone at B will definitely hurt the marked black stone. What is Black's move ?
Problem 2 : Black to play and break through into the center.
