Solution to last week's problem
Problem : Last week's problem centered on how both Black and White should continue to play. This is not an easy problem and there are no definite answers. The most important thing is to try to comprehend the various solutions that are available through the records of game played by top professionals.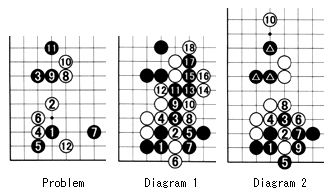
Diagram 2 : An alternative for Black is to play at 5 as shown here. But now White gets sente to play at 10, which effectively puts pressure on Black's three marked stones. This result favors White.
Diagram 3 : As an alternative, Black could divert at 3. The moves to 8 are a reasonable continuation. Neither is left behind in this exchange, but it depends on the overall board situation.
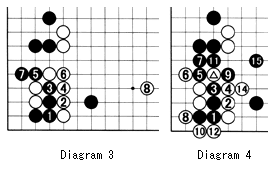
Diagram 5 : Instead of white 14 in the diagram above, if White plays at 14 here, Black can counter with 15 and 17. White can try to capture with 18 and 20, but successive tesuji at 21 and 23 followed by the tesuji combination of 25 to 31 spell disaster for White irrespective of the ladder-Black A and B are miai now. If the ladder favors Black, he can forget the exchange of 27 for 28.
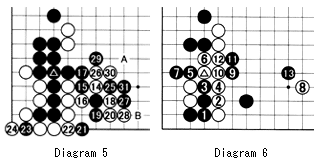
(1) The ladder has to favor White (see Diagram 1).
(2) If (1) is true, then Diagram 3 is the best result for both.
(3) If one party goes astray during the variation, the other party has to have an array of tesuji ready.
(4) Knowledge of shapes and strength is important, e.g. white 6 in Diagram 3.
Then there is a final question. What happens if the ladder favors Black? Answer: White 12 in the original problem is a bad move.
Diagram 7 : In that case, White has to resort to defending at 12, making miai of the placement at 13 or attacking the three marked black stones with 14.
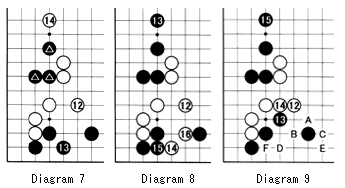
Diagram 9 : Now clever minds may come up with the combination of 13 and 15, playing on both sides. However, a professional will immediately reject this, because White becomes strong in the center. In addition, White can now either play at A, black B, white C and build even more thickness. Alternatively, he could start with C. If Black responds at A, next white D is a good placement. Black needs to answer at E, and then take the corner by cutting at F. In other words, White can do as he likes. The move at 13, which defends but only up to a point, is called a maniawase (makeshift) move.
One of the greatest differences between pros and amateurs is that pros seldom play these stopgap moves while amateurs do all the time.
So, a lesson to be learned from is this :
If you need to defend, do so properly. If you play stopgap moves, you may get away with it for a moment, but later you have to come back to cover the weaknesses that are left behind. In other words, instead of accomplishing what you should have with one move, you took two moves. Still, there is no definite answer for this joseki and there have been many experiments between top pros.
Going through all these variations will be a delight for some and a cumbersome task for others. Those who feast on the many possibilities and are entranced by still more intricacies that arise from joseki research will become stronger, while those who shy away will only improve slowly.
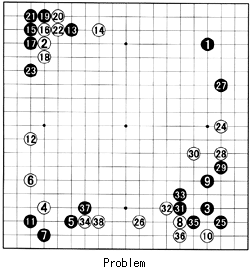
This week's problem
To make up for the complications encountered this week, here is an interesting fuseki problem.In this game for the Oza title between O Rissei (Oza, Black) and Cho Chikun (25th Honinbo, White), O faced the following whole board problem.
After white 38, where should Black play?
