Evolving game
Go has changed both on a strategic and a tactical level over the years. If a certain tactical maneuver has lost its soundness, its underpinning strategy loses its significance, too.We find these changes in joseki. The word joseki means a fixed or standard pattern. Many people believe that joseki are only played in the corners and at the beginning of a game. But frequently large sections along the sides are involved, and although most joseki are played at the beginning, there are standard sequences that we can refer to as middle-game joseki. As joseki appear in almost every game, this implies the exchanges are even.
However, a word of warning is perhaps necessary here. People often play joseki in the belief that the outcome will work out evenly. Nothing is further from the truth. And, of course, that is the reason why there are so many joseki. I personally believe there are more than 10,000.
There is a saying that the more joseki you study the weaker you get. The reason is obvious. People play joseki without questioning whether or not it applies to the situation at hand.
If you are serious about becoming a stronger player, I suggest you study joseki by following the method below. Keep in mind the end result when you play a joseki. In other words, imagine what the situation will look like before you play it out on the board. Do this for all the joseki you know that apply to the stones that are already on the board.
All joseki moves serve a purpose. Make sure you understand what that purpose is. In fact, every move that follows should be treated with suspicion.
Joseki often consist of whole strings of tesuji (moves that save the situation), and are often changed because of the discovery of a forceful tesuji. Study those tesuji.
Stones in the neighborhood often affect joseki, for example, ladder-breakers.
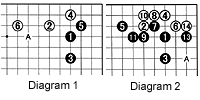 Diagram 1 : Here is an example of a basic joseki that has changed over the years. As a matter of fact, this probably derived from strategic dilemma. 6 could be at A.
Diagram 2 : Since the pincer at 5 has been played. The result to 12 is standard. Although A would be a significant move, White often plays tenuki (elsewhere). Black should then exchange 13 for 14 as quickly as possible.
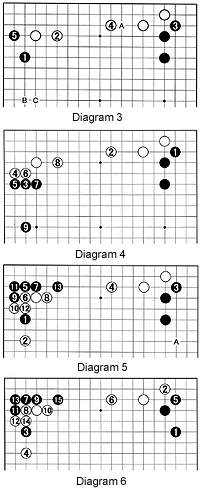 Diagram 3 : This is the modern approach. Before deciding whether to play A or 3, Black can play kakari (corner attack) at 1 first. White will usually answer with 2, because he is afraid of repercussions if he allows a black double kakari at that spot. Once White has answered with 2, Black should no longer think about playing at A as this would be an overplay. Therefore, exchanging 3 for 4 is correct now. H should then play at 5 (or at B or C).
Diagram 4 : If Black changes the order and exchanges 1 for 2 first, White will answer in a different way. Because White's upper right position is strong, he does not fear a black invasion in that area. Therefore, he can go for territory and play at 4. One possible result is given here. White is happy because he has secured a lot of territory while Black's stones on the left are over-concentrated.
Diagram 5 : As in Diagram 3, Black gets what he wants, White will want to change the flow a little. One idea is to pincer at 2. The sequence to 13 has been seen in some recent professional games. But now White has sente and could play at A, which depending on the circumstances could be a strong move.
Diagram 6 : For this reason, Black plays at 1, after which the sequence to 15 follows. This is one example of how a joseki is interrupted (in the upper right) to first settle another corner before deciding how the joseki should be settled.
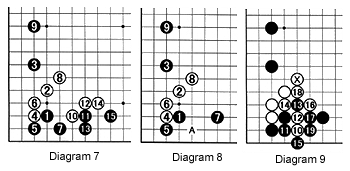
Diagram 8 : The next step in the evolution is black 7 instead of A. After white 8, Black again extends at 9.
Diagram 9 : White 10 looks strong, but Black has prepared a counter. The moves to 14 are forced and White threatens to capture the corner, but the tesuji of black 15 saves the corner stones. The moves to 19 are inevitable. It is clear that the marked white stone is in a ridiculous spot.
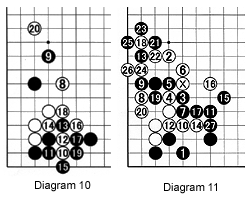 Diagram 10 : White 8 has been tried in several professional games, the idea being that we get the same result as in Diagram 8 but with the marked stone at 8 instead.
Diagram 11 : Black now plays at 9 but after the moves to 19, White can switch to 20 to seize the initiative. Note there is a ladder involved when White plays at 16. This is a variation that occurred in the finals of the Fujitsu World Championship between Yoo Changhyuk (Black) and Ma Xiaochun (White). Both chose sharp moves with the result that four black stones were captured but Black managed to develop on two sides-more or less equal result.
We will discuss some other developments of this joseki next week.
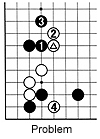
Solution to last week's problem
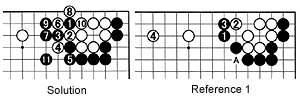
Black 1 is a nice tesuji that forces White to play at 4 and 6. Black can now build a solid wall and the white stone on the left is isolated,