More on honte
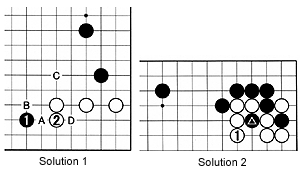
A honte move is one that can stand up by itself, whereas other moves need reinforcement later. Let's look at last week's problems to illustrate this point.Solution 1 : In response to black 1, you may be tempted to play at A, followed by black B and white C. However, this leaves behind a vulnerable spot at D. In most cases, it is best to play honte at 2, leaving behind no weaknesses for Black to exploit later.
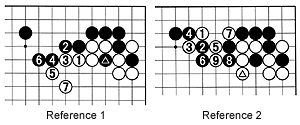
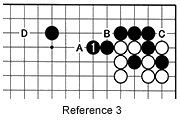
Reference 2 : If Black ignores the marked white move, White will strike at 1. Black 2 is the usual answer, but with the combination to 7, White wreaks havoc. Black 8 is futile as White keeps marching on with 9. Notice how well the marked white stone is placed.
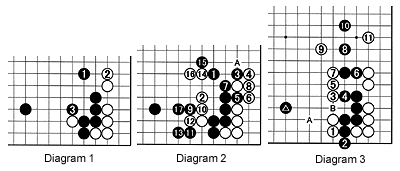
 Reference 3 : Defending with black 1 is best. Now compare this diagram to Reference 1. White keeps sente in both diagrams. White's territory is slightly smaller here, but so is Black's. In addition, White may later play at D (aiming at an invasion), which would not be possible in Reference 1. Note that black 1 is preferable to a move at A, because white C threatens to cut at B later. Black 1 is honte, too.
Applying honte
In offering some more examples of honte, I would like to introduce a system that I call Qarts (Quantitative Analysis of Relative Territory and Strength), which is for upper intermediate and advanced players (amateur 1-dan to pro strength. Qarts assigns assets and liabilities to each group, with a weak group without eyes assessed at minus 20 points and a slightly stronger group with sufficient space for one eye as minus 10 points. We therefore can describe weak and strong groups in terms of territory-the ultimate reward for their existence.Diagram 1 : Black 1 is a move often seen in actual games. What is the best response? White 2 is correct-it is honte. Black also would probably be wise at playing honte-at 3.
QARTS : White has 12 points plus alpha (extension possibilities) on the right. Black has about 20 points plus extension possibilities) using one extra stone. Grand total: eight points in favor of Black using one stone.
QARTS : White has about 12 points (no extension possibilities) on the right. Black has about eight points (plus extension possibilities on both sides) using one extra stone. Subtotal: four points in favor of White with Black using one stone. But White also has a liability of 20 points-the group in the center without eyes and without potential to attack has to forego any profit and consider extra reinforcement. This is usually assessed at minus 20 points. Grand total: 16 points in favor of Black using one stone.
Diagram 3 shows a Black overplay. What happens if Black plays somewhere else rather than at 3 in Diagram 1? That would usually be an overplay, as White can play kikashi with 1, then at 3 and 5. White 7 and 9 take the initiative in the center. White 11 takes profit while keeping Black's stones eyeless.
QARTS : White has 18 points plus alpha (extension possibilities) on the right. Black has zero points. White has a somewhat weak group, but Black's group shows less potential eye space. I would assign 10 extra points to White for this. Grand total: 28 points in favor of White using one stone. As an alternative to 11, White may prefer playing at A, which removes the aji (bad potential) of the ko at B, while making eye space and putting pressure on the marked black stone.
 QARTS : White has 12 points plus alpha (extension possibilities) on the right and about five points around A. Black has zero points. White has a fairly strong group, but Black's group shows no potential eye space. I would assign minus 20 points to Black for this. In addition, the marked black stone is weak and may become a liability amounting to minus 10 points. Grand total: 47 points in favor of White using one stone.
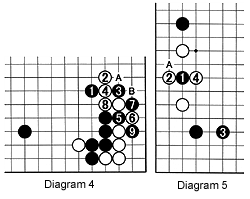
Diagram 4 : A white move at A seems to give him more territory on the right. However, black 3 and 5 form a tesuji (clever local move), capturing White's corner in the sequence to 9. Instead of 2, a white move at A may seem good, but a black move at B later could be devastating.
Diagram 5 : Sometimes, Black probes at 1 before defending with 3. Even though Black cannot do anything at this point, usually it is a good idea for White to add a move at 4 fairly soon afterward to prevent a possible black attack at A. In other words, white 4 is honte.
Problems
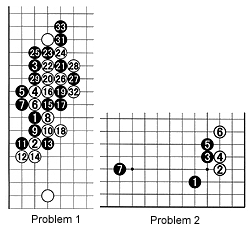 Problem 1 : (intermediate) The moves to 33 are a large-scale joseki that was popular during the early '90s. Note that White plays 30 where 21 is. Play this sequence out on the board and determine where White should play honte to build strength in the center.
Problem 2 : (intermediate) The moves to 6 form a joseki. Often aggressive players try to scare the opponent by building huge frameworks, inviting an invasion so they can start a fight. Black 7 is such a move. But before invading, White must first strengthen his stones. Where is the honte to accomplish this?
