Breaking down the borders
I have never been a big fan of making choices. It can be an unsettling experience: you may make a wrong choice and find out too late that you cannot do anything about it. I have been told that I should live with my mistakes and learn from them. But learning is not easy when you hold on to old ideas. Only last week I wrote that old ideas form the basis of improvement. But now I think I was wrong. New ideas do not come from old ideas, they often are a new combination or interpretation of old ideas. Here are some new ideas.
Mergers and acquisitions are a hot topic these days because by combining resources and expertise the funds saved can either contribute to immediate profits or be passed on to consumers to gain a loyal customer base and increase market share. At the moment, the greatest merger is taking place in Europe with the various member countries of the European Union breaking down borders and tying the knot to increase efficiency, standing and economic power in the international community. The biggest hurdles are the differences in language and culture. Fortunately in go, the stones have only language and one culture: eyes and territory. On the other hand, connecting stones, the equivalent of merging, has been practiced for almost 4,000 years.
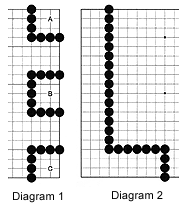
 In Diagram 1, Black uses 25 stones to form the groups A, B, and C. The three groups each have 9 points of territory for a total of 27 points. In Diagram 2, Black has broken down the borders between his three groups and combined the 25 stones to make one group with a full 75 points in territory, almost three times as much as the three groups A, B and C together. What does this mean? Obviously, combining resources, in this case eyes and borders, are much more efficient. But how does this work in practice when mapping out one's territory in the beginning?
Back to the basics
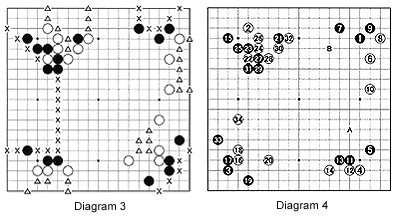
Last week we looked at an example in which Black gained synergy by combining the strength of his various groups. In contrast, White just followed the joseki (standard exchange in the corner) moves he had learned by heart. For reference, the result of that example is shown again in Diagram 3. Now we will have a look at another combination of the same joseki but with White gaining the edge and Black losing out. In Diagram 4, the same local exchanges take place but in different corners. After the moves to white 34, not only have the Black's three stones around A lost their importance in building influence, but they seriously risk becoming weak stones, especially because White in capable of launching a variety of threats against the black stones around B.

 To attain a stronger position, it is necessary to understand the balance of territory as well as the balance in power. As an exercise try combining the four joseki in different ways to figure out how this influences the balance in power. First try it on the board, then in your head. This will increase your understanding of splitting groups not through tactical maneuvers but by separation and isolation.
Solutions to last week's problems
Diagram 6: Black 1 is the vital point and after sacrificing his original stone with black 3 and 5, White is faced with damezumari (shortage of liberties) and can not escape.
Diagram 7: Black 1 to 7 sacrifices two stones while inducing a similar condition of damezumari. Diagram 8 shows the situation after black 7 in the previous diagram. A and B are now miai, meaning that if White plays A, Black plays B, and vice versa. This means that White loses all of his marked stones.

Problems
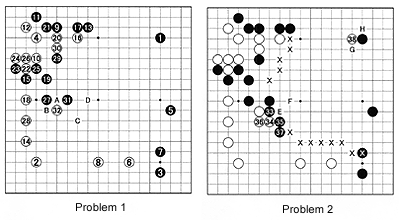
Problem 1: In this game between Masao Kato, 9-dan, (white) and Rissei O, 9-dan, (black) in 1992, both players set out mapping out big moyo (frameworks). With 15, Black is the first to invade. While providing a lifeline to the outside, White 16 and 20 is a combination that spoils Black's chances of ever linking up his invader with the black stones 9, 11 and 13. White 18 is also an important move as it prevents Black from making a base. Black 19 is natural. White 22 makes eyes for himself while preventing Black from sliding into the corner with a move at 24. Black 23 to 27 are kikashi (moves that eventually will have a great effect) to enable Black to move out into the center with 31. White 32 hopes for black A. If Black plays there, where would White play next-B,C or D ?
Problem 2: White 32, however was a dubious move. In the sequence to 37, Black has all his stones on the outside, allowing for synergy to develop with his stones on the right and upper side of the board (XXX marks), while White's stones 32, 34, and 36 are all on the inside. The three white stones do not strengthen White's position nearly as much as Black's. Clearly Black gained a lot in this exchange. But Black has a flaw in his shape at E. White would like to cut there, but at the moment the ladder is good for Black. Trying to exploit Black's weakness, White plays a ladder-breaker with 38. What is the answer to this move?

