Yamashita the new Gosei king (**-*****)
Keigo Yamashita won the Meijin title for players under 13, when he was 7 years old. Recognized for his unusual talents, Yamashita, who was born in Asahikawa, Hokkaido, came to Tokyo the next year to study at Ryokusei Gakuen, the private go school run by Yasuro Kikuchi, an amateur who has won various amateur titles and even upset professional go players. Kikuchi must have had an idea of what was to come when his student turned professional at the tender age of 13.Yamashita, now 21, has just taken his first major title, the Gosei title, in a drawn out battle extending over five games with veteran Koichi Kobayashi. In some of his previous games, Yamashita started out on the 5-5 point and has shown on other occasions that he was not afraid to use his own style and imagination. In this way, he won the first two games and seemed on his way to grab the title with only one more win. Kobayashi, who is known for his perseverance, made an all-out effort and scored victories in the next two games. However, Yamashita won the decisive fifth game.
Young eyes, fresh concepts
This game between Yamashita and Kobayashi, is a marvelous example of our theme last week: sacrifice. Unfortunately, Yamashita plays the opening moves in a fairly conventional style. However, later we will be able to enjoy some major fireworks. Yamashita is White.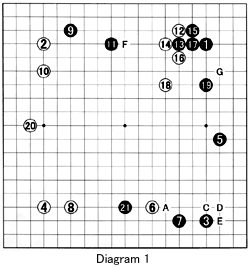 Diagram 1 : With the moves to 5, Kobayashi sets up the low Chinese fuseki building up a vast moyo (framework). White 6 could have been at A, but this would lead to a severe black pincer around 21. In many games in the past, White has then played at C, followed by black D and white E, after which a battle royal erupts. But the variations seem too complicated and recently white 6 has become a standard move.
Black 7 aims at attacking white 6 later by playing around 21 or trying to encircle it on a grander scale by playing around 8. That is why white 8 is played-it does not prevent an invasion/attack around 21, but it serves to reduce the scale of the battle and tilts the field where it will take place in White's favor. In addition, it makes territory and strengthens the lower left corner.
Black 9 and 11 expand Black's moyo-11 could have been played at F instead. In that case, White would probably have played at G.
The moves 13 through 17 are a favorite pattern of Kobayashi's, who is known for his territory-oriented style.
White 18 is a nice, light move. However, Black must have felt satisfied with 19.
White sets up his own moyo with 20 and black 21 combines an invasion with an attack.
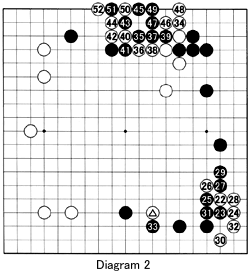 Diagram 2 : White 22 now tries to either sacrifice his marked stone or connect to it, depending on Black's answer.
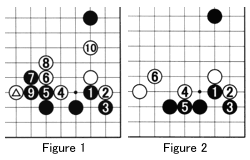
Figure 1 offers one possible sequence: After black 1, white 2 is a good kikashi (forcing move) if Black answers with 3. After this passive black move, White has plenty of possibilities to use his marked stone to settle his stones on the right side, e.g. by playing 6 to 10. As an alternative, he could cut at 9 instead of playing at 8.
Figure 2 : In response to white 4, black 5 is too passive. Now a move around 6 more or less connects all of White's stones.
Returning to Diagram 2 it can be seen that with 25, Black intends to build influence and isolate the marked white stone.
Setting up a sacrifice, white 26 is a splendid move. This enables White to live in the corner with 28 and 30 while creating a defect (at 26) in the black wall.
 Forcing White to answer with 32, Black plays 31 first, then connects his stones and finishes his wall with 33.
White 34 starts the next round. The sequence to 52 is filled with exquisite moves.
In principle, when you have a weak group, you should try to escape into the center and in the process make one eye or potential eyes.
White 36 adheres to the principle given above. Black 37 is a natural move to take away eyes. White 38 builds strength in the center. Now the question is: Can Black cut at 39 ?
Figure 3 : If Black retreats with 3, white 4 threatens to exchange A for black B. Later, White can strike at C, reversing the roles of who is the attacker and who is being attacked. In addition, a white move at D is large in territory and he makes a good eye-shape at E. Black cannot defend against all of these threats at the same time.
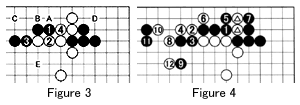
With 43 and 45 in Diagram 2, Black goes all out in trying to capture the two white stones, including 34, at the top on a larger scale. But white 46 and 48 are brilliant moves that sacrifice two extra stones in order to play a very odd-looking tesuji. White 50 sacrifices yet another stone and he then plays 52.

Problem 2 : This is the situation at this moment. White has just played the marked stone. What are the best moves for Black and White ? Where should Black move first ?
Solutions to last week's problems
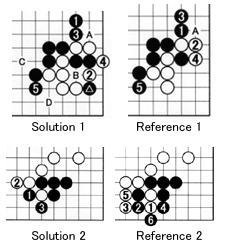 Solution 1 : Black 1 is correct. White 2 is the best response followed by black 3 and white 4. Black can now turn his attention to the other side with 5 (or C). Black can exchange A for B at any time he wants. In addition, the move at D has increased in value thanks to the presence of the marked black stone.
Reference 1 : In the old joseki Black played 1 for 2 and then some stone (e.g. 3) to force white 4. But A is no longer sente for Black. That is a loss of at least 3 to 5 points.
Solution 2 : After black 1, white 2 is the best move. Now Black has to capture with 3.
Reference 2 : If Black leaves the situation as is and plays elsewhere, White descends with 1, sacrificing an extra stone. After black 2, white 3 and 5 squeeze in sente. The result is that Black's territory did not increase, but White's influence is tremendous.
(The number of h indicates the difficulty level with one representing beginners and five being the most advanced.)
