Asking the right questions (**-***)
As a teacher, I love being asked questions. For students, asking the right questions is a great way to establish contact and get feedback. It is also the first step to improvement. My favorite answer to a question is another question, such as: "What do you think the answer is or should be ?" Sometimes this can be confusing and exasperating, but good results can be obtained. By providing hints, I try to make the student find the answer to a question by himself. Sometimes students find different answers to the same question, but that is all right.As a matter of fact, students should be encouraged to find as many answers as possible, starting with the obvious one. After finding a number of answers, a selection procedure follows. What is sufficient? What is good? What is better? What is best? Asking questions, finding answers, recognizing a qualitative difference between the answers and selecting according to expected results through evaluation, is the reasoning process.
But there is a vital element missing. If you are a parent, this will hit home. When they are small, children will ask just about any question that enters their minds, questions like: "Why is that thing green ?" So the main problem is: What question to ask? And if students do not ask questions, the teacher should employ techniques to prompt them to do so. For example, they could ask a student: "In this situation, what should you be asking yourself ?"
In go, I have a number of lists of standard questions that ideally should provide a lead to the thinking process. There are multiple lists for different levels. Examples of simple questions are "Can it be cut ?" or "Can it be connected ?" More difficult ones are "Is it dead or alive ?" or "Is this move bigger than that one ?" The most difficult questions are "Is it urgent or only a big move ?" or "If I give my opponent what he wants, can I profit from it ?" Another tip: always consider the questions you ask yourself and try to pose better questions.
More types of keima
Making a base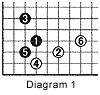 Last week, we saw that the keima can help in establishing a base. Black 3 and white 4 and 6 in Diagram1 are examples of this. The situation in Diagram 2 occurs frequently: Black has a moyo and White invades at 1. If Black caps at 2 (Diagram 3), he blocks White's escape route to the center but it allows White to quickly make a base by exchanging 3 for 4, 5 for 6 and 7 for 8. Finally in the sequence to 12, White lives very easily and in sente, too.
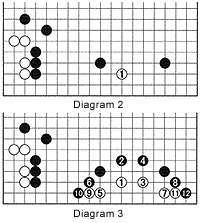
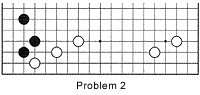
Diagram 4: Black 1 is another keima that serves to steer the marked white stones away while building up a moyo on the left. White will have to defend at 2 in order not to get locked up. Black 3 is a second keima serving the same purpose as the first keima. Once more, White has to defend with 4. Finally, Black guards his corner with 5 and looks forward to greater gains. White can no longer procrastinate and with his reduction move at 6 (a keima attack), White aims to make a direct threat at C. In addition, he also wants to cut at A and B, but if things look too dangerous he can play at D or E.
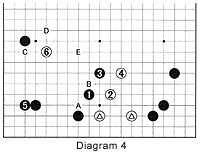
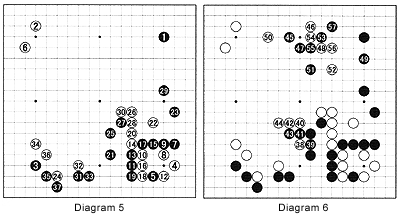
Diagram 6 shows moves 38 to 57. White 38 prepares for the keima at 40 to force Black to answer and to allow White to take control in the center. Black 45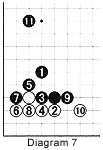 tries to negate the influence White has built in the center and White 46 pincers to start a fight. Black 47 could have been one space to the right, but this kosumi is stronger than a keima, which would prove its value later. White 48 keeps up the attack with the best move available for this purpose: the keima. Black 51 and White 52 are both keima, but then Black 53 attacks where the keima's weakness lies-in the sequence to 57, Black manages to cut the White stones into two groups. A confusing fight breaks out, resulting in Black strengthening his center group and grabbing control over the upper right corner. The lesson to be learned is that a keima as a means of attack is fine, but it has to be reinforced.
Diagram 7: Starting with the keima at 1, Black attacks the unnumbered white stone. The moves to 11 are a standard corner sequence, or joseki.
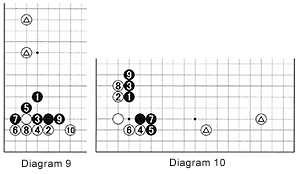
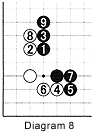 Diagram 8: A variation on the previous diagram, this is another joseki. In both diagrams Black ends up with outside thickness. But White gets more profit out of the exchange and Black could find himself holding the short end of the stick. For example, when playing out the two previous results as shown in Diagrams 9 and 10, Black's thickness is negated by the marked White stones.