Losing your bonus (*-*****)
Maybe you are a stockholder or even trade in the stocks of e-commerce companies. Perhaps you might leverage your potential by purchasing options. Or you might work for an e-commerce or software company and receive half or even more of your salary in a juicy stock-option package.But that juicy package could disappear if the stock market collapses. That is what white-collar workers discovered when they saw their bonuses-sometimes more than four times their monthly salary-whittled away, or, in some cases, disappear altogether.
Fortunately, you have more control over your destiny on the go board, and if you are skillful, you can cash in on your potential. On the other hand, if you are unskilled or play without sufficient thought, it is easy for that potential to disappear. But even this is sometimes better than being overeager to use that potential.
The potential of aji
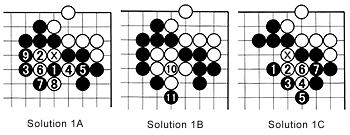
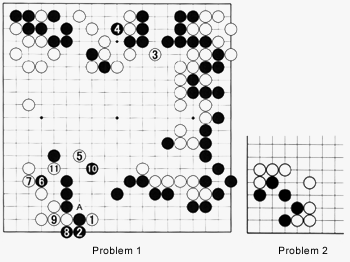
Solution 1A to Problem 1: The problem was to capture the marked white stone. Black 1 and 3 are a combination that set up a geta (net). White 4 and 6 seem to upset Black's plans, but by squeezing with 7 and 9, it becomes clear that White cannot avoid capture after black 11 (Solution 1B).
Solution 1C: Playing black 1 is another way of capturing the marked white stone. Even if White tries to resist with 2 and 4, black 5 and 7 make the capture. Do not make the mistake of playing 5 at 7, that would be disastrous.
Both solutions fulfill the same mission, but the marked white stone still has some potential (aji).
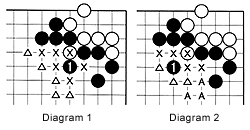 Now look at Diagrams 1 and 2. Both have crosses and triangles that indicate places where White could play in an effort to save his marked stone. The crosses denote moves that are too close to Black's thickness (once Black responds to the moves) to have more than a local meaning. They would actually inflict a loss on White.
White could also try to save the marked stone by playing at one of the triangles. This would be farther away from Black's thickness, so that although it presents a local threat, it also could have strategic implications, depending on the situation.
A more effective threat would be for White to play at one of the A's in Diagram 2. This shows there is striking difference in the potency between the threats.
Black 1 in Diagram 2 leaves White in a much better position to carry out effective threats, so a professional player would almost certainly choose to make the move shown in Diagram 1.
Although the beginner may find this difficult to understand, a rule of the thumb is that in Diagram 1, the marked stone is left with only one liberty, while in Diagram 2 it has two liberties, thereby presenting a greater threat.
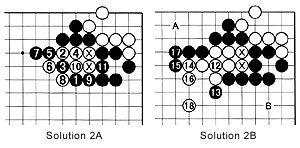
But we can see the difference in the potential threat the two marked white stones pose, compared to Solutions 1A through 1C.
So White risks losing his two marked stones, but the threat they pose, or the aji they have, is much greater, too. Therefore, sacrificing two stones is better than just one.
Because the threat is direct and damage imminent and often irreversible, aji is a little easier to understand when we discuss ladders.
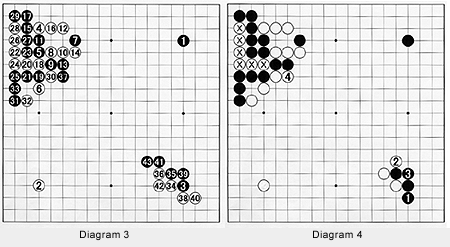
Diagram 3: This an example of White sacrificing as many as six stones (18 through 28) to play a ladder breaker at 34 and 36. Black is forced to play 37 to make sure his two stones at 9 and 13 are not captured in a ladder.
Diagram 4: Imagine what would happen if Black ignores the threat and tries to profit locally in the lower right corner by playing at 1 instead of at 37 in the previous diagram.
White will play at 2 and Black at 3, and then white 4 would deliver a fatal blow to the upper left corner by capturing two black stones in a ladder and thereby setting the marked white stones free.
White has just played at 1 to test Black's reaction. Black resists with 2, but now White can aim at cutting at A later. The way the two players handle the aji of the cut at A is the highlight of this game. White 3 is a ladder breaker. It loses points locally when Black counters with 4, but the combination of white 5 and 11 is superb. Try to work out the best responses for both players. I do not expect anyone to answer correctly (I did not get all the moves), but it is very instructive nevertheless.
