Following a basic plan in go is vital. However, as there is no such thing as a sure-win strategy, you will soon discover the drawbacks of your plan as well as the advantages. But even this is a point in your favor, because if your opponent follows a particular plan you will soon understand his weaknesses.
Last week, I offered Part I of the sanrensei fuseki (opening), which is recommended for beginners and intermediate players both for its relative simplicity and similarity to handicap games. Let's continue with this strategy.
Sanrensei-Part II
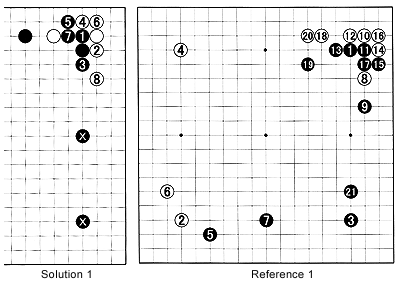
Solution 1: In this diagram, if Black at plays at 1, White should play at 2. The moves through 8 are a joseki (standard corner exchange), which by definition means the local result is about even. However, the influence of the black wall is directed to the upper left and ignores the presence of the marked black stones on the right side. Therefore, black 1 is a move that is inconsistent with the sanrensei strategy.

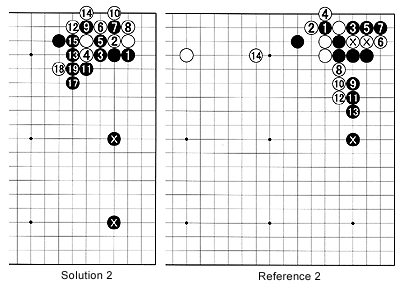
Reference 2: If he cuts at 1 (9 in the previous diagram) first, Black can pick up the two marked stones in the corner by playing at 5 and 7. But white 8 forces Black to answer at 9. Even if White forces 10 for 11 and 12 for 13, he can then stake out a large moyo (framework) with 14 while the marked black stone has Black overconcentrated on the right side. Instead of forcing 10 and 12, White can also play at 14 right away and wait for a chance to invade at or around 13.
The invasion
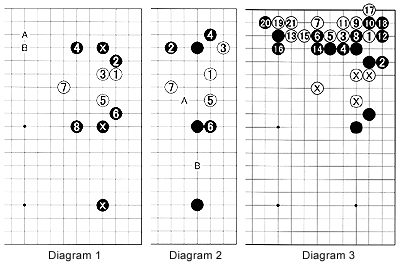
Diagram 1: As we saw last week, Black can build up a terrific moyo by using the sanrensei strategy. Feeling the need to invade, White will play a move such as at 1. Black 2 is not primarily meant to defend the corner but to make White heavy and to prevent him from making a base. White 3 is forced-permitting a black move here is too painful. Black 4 defends while keeping up the pressure. Of the three or four standard possibilities, white 5 is the most frequent move. Black 6 deprives White of a possible base, defends and makes territory as well. White 7 is a good choice but Black keeps up the pressure with 8 while expanding his framework on the right and on the lower side. Instead of 8, Black may opt to play at A or B.
Diagram 3: Once the marked white stones are more or less safe from attack, White should invade fairly early on to consolidate his territory. In the sequence to 21, you can see how easy it is for White to live.
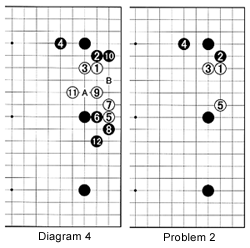
 Diagram 4: This is an alternative if White wants to confuse the issue and build a makeshift base. Instead of A, white 5 takes away potential territory but black 6 and 8 are good answers. White 9 provides eye-space, but black 10 threatens to take it away while grabbing a large amount of territory in the corner. White 11 is almost unavoidable but 12 is a solid move. Black is preparing to switch to B to attack his eye-space. The result is good for Black.
Problem 1: In Diagram 3, Black should not play at 2 if the marked stones are completely safe. Where should he play ?
Problem 2: White can also played at 5, although this is usually not a good move, because it forces Black to make natural, good moves and there is little likelihood that he will make a mistake. How should Black answer white 5, and how should White proceed from there ?
NEXT WEEK: More on the 3-3 invasion.
