The answer is in the doing
A fool can ask more questions than 100 wise men can answer. Hmmm, I was not going to introduce myself that way, but this is what came out. Last week, I posed some problems and some of them were quite difficult. However, even if one does not know the answer, one can still remain a wise person. As the Roman author of mimes, Publilius Syrus, put so elegantly about 2,000 years ago: Not every question deserves an answer.But if you have decided that questions need answers, here is a good old English proverb: The shortest answer is doing.
So let' get some answers then.
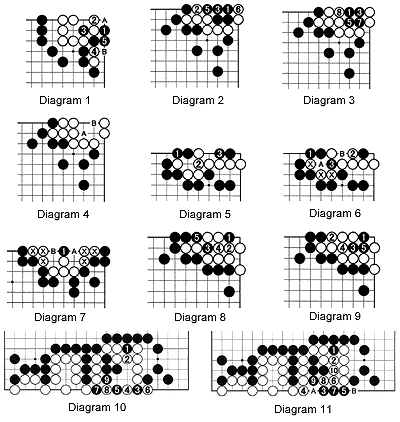
In Diagram 1, Black 1 seems a strange and dangerous move, but after black 5, White can neither play at A nor at B because of damezumari (shortage of liberties).
In Diagram 2, Black 1 takes the vital point. Even if White enlarges his eye space with 2, black 3 follows. There is no point in White playing anywhere now. So, assuming White played tenuki (elsewhere), Black can exchange 5 for 6. Then we get the shape in Diagram 3. Now Black can play the moves 1 to 7 (White plays tenuki with 2, 4, and 6). Now we arrive at Diagram 4. This shape we call a "coffin" as no matter where White plays, it is dead-White needs a stone at A and at B to make two eyes. Therefore after black 3 in Diagram 2, White's group is dead.
In Diagram 5, Black 1 forces white 2 giving black the opportunity to kill with 3.
In Diagram 6, if White answers black 1 with 2, black 3 follows. White would like to capture at A now, but then Black recaptures four stones (marked stones plus stone at A) at 3 with a technique called "snapback." In the end White has to connect at B at some stage, leaving White with only 1 eye.
In Diagram 7, Black 1 hits White at the vital spot. White can now neither play A nor B as this would put his own (marked) stones in atari.

In Diagram 8 Black 1 is the correct move. With 2, White seems to have secured two separate eye-spaces, but black 3 puts White on the spot. Notice that White cannot play 4 at 5 as he would put himself in atari.
In Diagram 9, what about enlarging his eye-space with white 2? Black 3 to 5 follows and White is dead.
In Diagram 10, black 3 is the key move. If White plays at 4, the combination of black 5 to 9 captures 3 white stones.
In Diagram 11, be careful not to play black 3 after 1 as white 4 to 10 puts Black into damezumari (shortage of liberties)-Black cannot connect at A as White then captures at B.

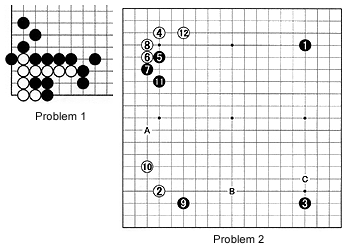
Problem 1 shows another damezumari situation. Hint: Black can threaten to connect his three stones prompting White to fill in some of his liberties.
Problem 2, After white 12, where should Black play, at A, B or C ?
Next week we will discuss the European preliminaries of the Fujitsu Tournament that is under way in Amsterdam.
