Quantity or quality ? (***-*****)
Wherever we go and whatever we do, these days we more often than not use quantitative analyses to guide our qualitative judgment. We naturally utilize numbers in hard sciences but nowadays statistics has infiltrated the so-called soft sciences in fields ranging from psychology to education to give us a greater understanding of trends and to verify methods.An analysis of a go game by top professionals sounds like economists discussing their interpretations of the facts as they search for the truth. But in go-as in economics or some physics experiments-the participants or observers change the facts as the game progresses. This is how we get closer to the truth.
Although most top pros display a mixture of both in their playing style, there are two distinctive styles: influence-oriented and profit-oriented. But lately, the latter style finds a lot of followers, and it is surprising how accurate a prominent representative of the profit-oriented crowd, the South Korean Lee Chang Ho, one of the world's strongest players, can qualify his decisions by quantifying every situation. Even under great pressure and in the thick of battle, he can keep his cool and maintain an objective profit-loss grasp of the situation to back up his decisions. In his view, quantity is quality.
Value of ko
Last week, we had a look at how many points a simple ko was worth. When playing a ko, keep in mind the value involved.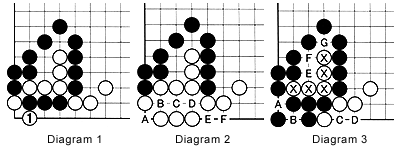
When you make an evaluation of a situation, try to form a mental picture of the end result.
Diagram 2 shows the position when White wins the ko. White's territory is six points (A through F) and he has captured three stones (not counting the number of stones captured during the ko fight itself), making a total of nine points.
Diagram 3 represents the outcome when the ko is decided in Black's favor. Black has captured stones at A and B and can capture a stone with C. Let's assume that White answers with D, therefore giving White no points at all. As the marked white stones are dead and the points E, F and G are points for Black, the points in captured and dead stones total eight. Excluding these stones, the territory won by black is worth 10 points, making a grand total of 18 points in favor of Black.
So the local difference between these two outcomes is 9 + 18 = 27 points and except for some minor details this is a pretty good approximation. It would cost White three moves to carry out this maneuver, therefore the value per move is only nine points, barely worth fighting for during the middle game when moves are routinely worth 10 to 20 points and often even more.
Now I would like you to take another look at a problem I posed a few weeks ago.
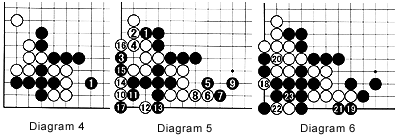
Diagram 5: Before playing 5 (1 in the previous diagram), Black should make the preparatory tesuji of 1 and 3. This slows White down when he tries to approach with the tesuji combination of 10 and 12, after first increasing his liberties with 6 and 8. Even though Black plays a slow but safety-first move at 9 (the marked stone in Diagram 7), in the sequence to black 27 in Diagrams 6 and 7, Black wins the semeai. In the actual game, Black did not see the tesuji of 1 and 3 and started the semeai right away.
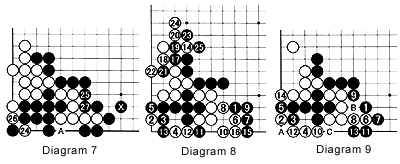
Diagram 9: White read the sequence shown here fairly well. This would be a two-step ko (as Black has to play B and C to approach), but White was afraid of the threat that constantly looms above him as Black can start the ko at A at any time. The ko is worth only 17 points in territory for White but for Black it is worth about 24 points. White's stones on the left side would also be in a precarious position if he loses the ko. This would be a good result for Black.
This is an extremely difficult problem at a professional level and if you can follow this explanation, I applaud you.
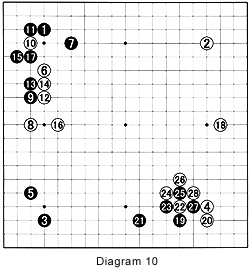
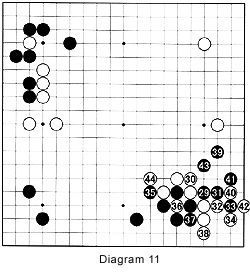
 Ko fights are extremely difficult, especially when taking the ko does not immediately result in a gain. Here, the top player of Japan at the time makes two mistakes in the same ko fight.
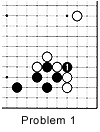
Problem 1: How does White take the initiative when Black cuts at 1 (29 in Diagram 11) ?
Problem 2: 36 (in Diagram 11) was another mistake by White. What move should he have played ?
