Extensions in go are actually the materialization of our ideas about the relative strength of our stones, i.e. if you believe your position is strong, you can extend farther from it, while you ought to limit your extension if your position is weak.
Third line vs fourth line
The third line is the line of territory; the fourth line, the one of influence-in theory that is the significance of these two lines. Let's we will discuss the virtues of the third line and the extensions used.
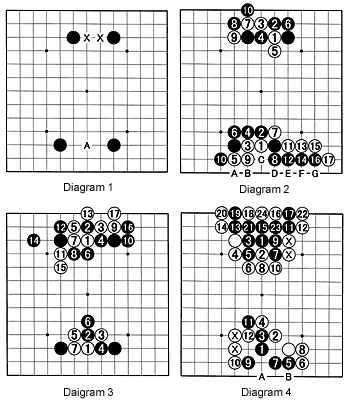
Diagram 1 : There are two crosses between the two black stones at top to signify this is a two-space extension, the most usual one on the third line.
On the other hand, the three-space extension below seems to make more territory but it has an inherent weakness (at A) and sooner or later needs reinforcement.
Diagram 2 : What happens when a two-space extensions comes under attack ?
Of course, the most severe attack would be splitting the two black stones. Let's see if that is possible.
In the example at the top, Black plays passively and tries to connect underneath (go players refer to the edge as 'under' or 'below' no matter if it concerns the upper edge). White 1 and 3 are harsh moves that Black answers with obvious moves. But no matter how White fights, in the end, his cutting stone at 3 is captured.
In the example below, against white 1, Black plays on top (i.e. farther away from the edge than white 1). Even if White cuts at 7, black 8 needs to be answered with 9 (otherwise Black plays there to capture two stones). Black 10 captures the four white stones. White may keep trying with 11, etc., but after white 17, it is obvious White faces capture as he has three liberties (A, B, C) against Black five (C, D, E, F, G), i.e. Black needs only play three moves to capture while White would need five moves to capture five of Black's stones.
Diagram 3 : Now look at what happens to three-space extensions.
In the example at the bottom, White ends up with a fiasco, so he has to play more subtly.
In the example at the top, Black tries to connect underneath with 2 but White captures that stone. Finally White manages to cut at 11. The result is bad for White as in the sequence to 17 he barely lives with just three points in territory while he has a weak group at 11 and 15. On the other hand, Black is strong and alive on both sides.
So yes, White did manage to cut but he gets a bad bad result.
But just imagine if there was a white stone to begin with at the place where black 14 is. In short, a three-space extension can be dangerous.
Diagram 4 : Here are two examples with three space extensions from a wall of two stones (the marked white stones). In the example at the top White plays on top of the black invader and captures the whole black group in the sequence to 24.
In the example at the bottom, White adopts another strategy with the kosumi (diagonal move) of 2. Black struggles to make two eyes, but after white 12, A and B are miai, i.e. if Black plays at A, White plays at B, and vice versa.
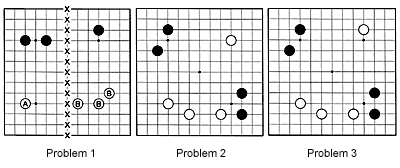
Problem 1 : How should White extend with A ? And with B ?

Problem 2 : Where should Black extend ?
Problem 3 : This resembles the previous problem, but there is a different solution. Where should Black extend now ?
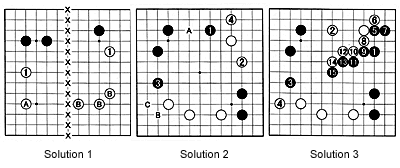
Solution 1 : From A, the two-space extension is best as A is not so strong.
On the other hand, as B is strong, a three-space extension is best.

Solution 2 : Black should make a three-space extension at 1 as this attacks the white stone in the upper right as well. White is compelled to defend at 2. Next, if Black makes a two-space extension at 3, white 4 is a good move. Remember, the three-space extension has a weakness at A, and indeed it is White's aim to invade there.
However, Black can invade at B now to prevent White from closing off the corner with C.
Solution 3 : This time Black wants to extend at 1, which prevents White from closing off the corner with a white move there. White naturally plays a two-space extension with 2. Next black 3 is strong, white 4 seals off the corner and Black can switch to 5 to reinforce his three-space extension. The struggle in the center then focuses on Black preventing White from invading the original three-space extension.
Answers to last week's problem
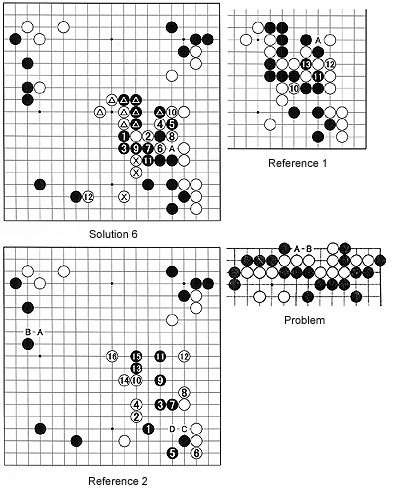
Solution 6 : When Black (Cho U) played 1 (45 in the game shown last week), this is when O Meien (White) realized he had a problem. He had completely overlooked that Black could resist white 4 with 5, then sacrifice a stone with 7 and connect with 9 and 11. As a result, at the bottom Black's stones are strong, leaving White's marked stones weak. White has to reinforce with 12, but in the center neither Black nor White are strong. In the end White managed to live at the bottom but in exchange, Black grabbed the initiative in the center and won the game by 2-1/2(harf) points.
Reference 1 : White would have wanted to cut with 10 instead of playing at A, but then after black 11, White has to connect at 12 and Black starts an enormous ko that White can ill-afford to lose but has no chance of winning. White cannot play at 13 instead of 12, as black 12 would follow.
Reference 2 : The conclusion is that black 1 in solution 6 is a brilliant move that put White on the spot. In retrospect, White should have played differently to begin with. He should have left out the exchanges A for B and C for D, then played 14 in response to black 13. If Black plays at 15 which is correct shape in this situation, 16 gives White a reasonable result.
Problem : Both black A and B seem to kill the white group. But only one of these moves does the job. Which one and why ?

