The art of tenuki
Open any magazine or newspaper these days and you will find some moralistic article about how to think, how to behave and what to expect in the new millennium. However, I opt for tenuki, which in a sense means to widen one's horizons.Sometimes when things do not turn out the way you want or imagined, you might fell like switching to something else. And even if things do go well, you might want to look on the other side of the fence. Nothing wrong with that, it is human nature. Of course, the consequences may be nasty but this is what sets humans apart from animals: our ability to think, reason, project different solutions and to come back to a stubborn problem that has defied solution. In real life, we might indulge excessively in alcohol, food or other pleasures, or we are constantly on the move from country to another, cannot leave our computers alone or play games such as go all the time.
In go, it sometimes needs a great deal of will power to take one's eyes off a particular part of the board where the action is and widen one's horizons to include the rest of the board. Look at the games played by beginners and you will see that this is not easy. They generally start in one corner and keep battling until they reach the opposite corner.
Tenuki is used to describe the action of playing somewhere else. It does not have negative connotations in itself, but it is used sometimes as a technique to confuse an opponent if a certain situation could turn out badly if played out immediately. Even though it does not seem to have much significance, tenuki is a profound concept that can be divided into six basic types.
In the beginning, most moves in a professional game are a form of tenuki. Each side sets up bases at different locations from where to fight on an even or, ideally, more than an even footing. This is the first reason for playing tenuki-stablishing a presence somewhere else.
The second reason for playing tenuki is to test the response of the opponent.
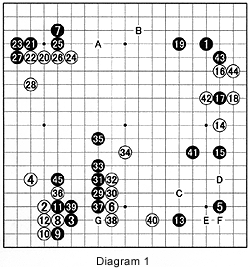
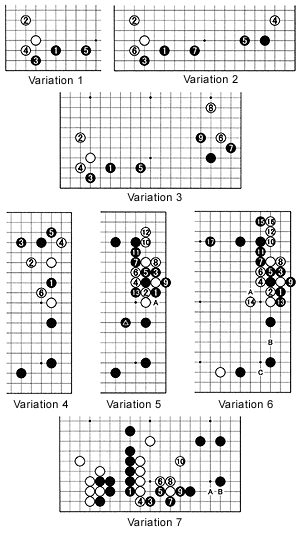
 Diagram 1 shows a game with a number of tenuki. The first tenuki is black 5. Locally, the moves to 5 in Variation 1 are a joseki (standard corner sequence). But White can also play tenuki. In Variation 2, he can play 4 to make sure that Black plays at 5. Now, White can come back and finish the joseki by exchanging 6 for 7 and then extend to 8. Compare this with Variation 3 in which White first completes the joseki from 1 to 5, then plays 6. Now, Black can be more aggressive and play at 7 and, because of the presence of black 5, he does not need to worry about an invasion at the lower edge.
Even though white 6 attacks black 3, black 7 is another tenuki. This is the third type of tenuki: Black is challenging White to prove that white 6 is the correct move. Because of Black's tenuki, white 8 is natural, but it cannot be denied that Black is developing faster. If Black plays tenuki now, White would play at 39 and unconditionally secure a large territory with one move. Black 9 and 11 are forcing moves because after these moves White does not have one move to secure a large territory. Black 13 is another tenuki aiming at reviving the three black stones in the lower left corner. White 14 is a tenuki again, challenging Black to help those three stones. Black 17 is a yosu-miru (probe) move to see how White responds and to map out a strategy accordingly. Variation 4 shows an alternative for White. The disadvantage of this variation is that White is gote (too late) and Black can shift to the upper left corner first. So the move actually played ensured that White could play tenuki at 20. This is the fourth type of tenuki: locally ignoring a profitable move to take a large point elsewhere.
After the joseki to 28, it is time for Black to help his three stones with 29. In the sequence to black 39, Black has managed to escape forcing White to defend his own stones with 40. White also threatens to invade at D or E. Black 41 defends against these threats while preparing for Variation 5. The sequence to 12 is standard after which Black plays at A but thanks to the presence of the marked black stone, black can play at 13. Actually, black 41 is doubtful. It is probably better to play as in Variation 6. After black 13, White's stones around A are too weak to make an invasion around B or C feasible.
White 42 defends against the possibilities discussed in Variation 5 and 6. After white 44, black B is a good move locally. A is another good point. C is big territorially as it defends against invasions around D, E and F. But since Black is leading in terms of territory, it is important next to strengthen the slightly weak group on the lower left. Black 45 is one possibility, but black G would be a more aggressive move. In Variation 7, black 1 makes an eye shape for the black group and also threatens to attack White's base. If white plays tenuki, black 3 to 9 take away White's base forcing White to defend with 10 while defending indirectly against invasions at A or B. Whatever the best move is, it is clear that Black should defend somewhere. This is the fifth reason for playing tenuki: reinforcing a weak group before it comes under attack and to prepare for an invasion somewhere else or prevent an indirect invasion. This form of tenuki is the most difficult because a large move is often easy to spot but a move aimed at reinforcement does not seem to make any territory.
There is a proverb that encompasses this idea: "Important moves before large moves." That will be our theme next week. The sixth type of tenuki is the one that distracts the attention. This is often employed by nations that focus on problems abroad to distract attention from domestic problems. In the game of go, this can lead to complications that can either cure cure the problems or aggravate them.

