The problem with go
When playing go, the scale of the action very quickly becomes so enormous and involves so many variables that it seems insurmountable. What is more, a result that is locally good may be disastrous for the rest of the board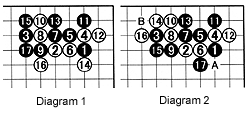 Diagram 1: The moves to 17 constitute a well-known joseki. Many medium-level players know this pattern, but actually it involves a lot of sophisticated techniques. For example, the wedge at 8 indirectly induces 11, which enables White to capture black 1 with 12 and 14. The result is that White has sacrificed two stones (white 8 and 10) and captured only one (black 1).
Diagram 2 : If the ladder is good for White, he may want to play at 14. The question of the ladder arises if black plays at 15 now. He now threatens to capture two white stones (2 and 6) in the ladder with 17. Of course, White could defend against this threat by playing 16 at A, but then Black captures three stones (8, 10, and 14) by playing at B.
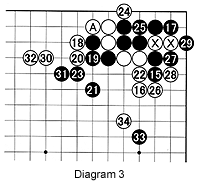 Diagram 3 : But let's suppose White has a stone in the lower left corner that prevents the ladder from working. Then after 14 (the marked stone), Black has no choice but to play at 15 to force 16, after which he can capture the two marked white stones in the corner with 17. The sequence to 34 is a rather advanced joseki. In the meanwhile, White uses 22, 26 and 28 to use his marked stones until their last drop of life to build a makeshift position on the right in order to proceed on the left with 30 and 32. Black now counterattacks with 33, but with 34, White is preparing to stage a long battle.
Again this sequence involves a sacrifice by White to build positions on both sides.
Diagram 4 : When Black plays 1 and White approaches with 2, pincering with 3 is a common move. After white 4, Black can play at 6 (more common) or at 5, which leads to the sacrifice shown here. Black 13 makes use of White's shortage of liberties.
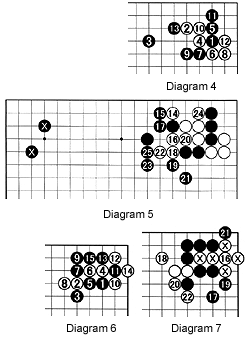 Diagram 5 (continued) : In response to 14, black 15 is severe. White struggles to get an extra liberty by playing the sequence through 22. Finally White can relax and come back to 24 and capture the corner. 25 finishes Black's wall. This quasi-joseki is especially good for Black when he has some stones in the upper right corner, e.g. the marked ones.
Diagram 6 : Here is another joseki. When White attaches at 4 he has to be aware of all the complications Black can inflict on him. For example Black 5 and 7 are strong moves. In response to the white hane at 10, Black sacrifices a stone with 11 in order to squeeze with 13 and 15.
Diagram 7 (continued) : When Black plays 17, responding with 18 is about the best White can do. With the follow-up of 20 and 22, White sacrifices his corner stones (marked) and builds thickness, waiting for a chance to exploit his dead corner stones even more.
Let's now have a look at an example involving sacrifice from a recent professional game between Satoru Kobayashi (White) and Naoto Hikosaka (Black), both 9-dan.
Diagram 8 : Black has just invaded at 1. White can defend at A or he can attack the invader with B, followed by Black C and White D, which starts a fight. However, White starts a maneuver that changes the landscape fully by expanding the magnitude of the fight.
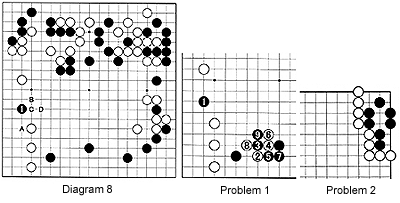
Problem 2 : In this problem, White is to play first and apply the technique discussed in this column.
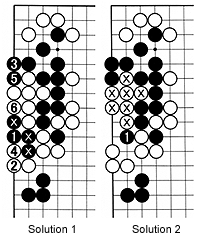
Solution to last week's problem :
Solution 1 : The unlikely move of black 1 is the solution. The idea behind it neatly fits in with this week's lesson on sacrifice. With the moves that follow, White manages to capture four black stones (1 and three marked stones). But......Solution 2 : After the four black stones are removed, the situation shown here appears on the board. Black can now capture the important (marked) white stones with 1 which also provides life for his group surrounding it.
