Answers to last week's problems
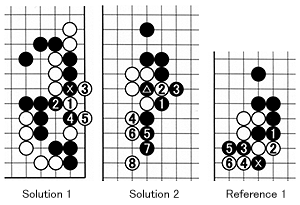
Solution 1 : A ko out of the blue. After Black plays the marked stone, White should play hane at 1. When Black cuts at 2, the combination of 3 and 5 creates a huge hanami-ko (flower-viewing ko) for White as he has little to lose, while Black may lose all his territory.Solution 2 : Black builds influence. Black should play at 1, allowing the marked stone to be captured. The moves to 8 would be a likely follow-up. Black does not need to capture white 2 quickly by moving where the marked stone is.
Reference 1 : This is an example of a disastrous sequence for Black. If Black defends his single stone, his marked stone will be cut off. Black 3 and 5 are useless as these stones cannot avoid capture.
Other types of ko
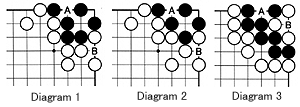
Diagram 1 : Black is alive. This is a double ko. If White captures with A, Black captures with B. So the Black group is alive, but there is one catch: If there is a ko (worth less than 15 points), this is a indefinite source of ko threats.
Diagram 3 : Black is alive. Even if White captures at A, Black can capture at B. White will run out of ko threats eventually. At that point, Black can always capture the White stones inside his group with a move at B.
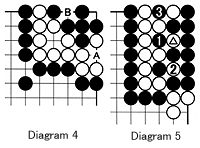
 Diagram 4 : This is a situation with two ko fights that cannot be won by either player. If Black plays at A, then White will play at B. So both groups are alive. When the groups do not have two eyes but cannot kill one another, they are both alive in a situation called seki.
Diagram 5 : Triple ko that leads to jigo (draw). Very rarely, a situation arises that involves three interdependent ko battles. If Black plays at 1, White has to play at 2, after which Black is in atari again. Therefore, he needs to play at 3. White is then in atari and has to play where the marked stone is. This could go on forever, however. According to the Japanese rules that prevail throughout most of the world, this situation cannot be solved and the game is ruled a nongame (mushobu) and needs to be replayed.
Problems
 These problems all involve ko.
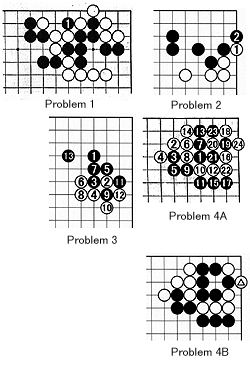
Problem 1 : Black has just put White in atari with 1. What should White do ?
Problem 2 : This is a situation that arises frequently-a kind of middle-game joseki. If White plays at 1, black 2 could be a mistake. How can White profit from this ?
Problem 3 : This is a joseki with a ko. After Black captures with 11, White must not hesitate to put Black in atari at 12. Black should play at 13, rather than starting the ko by cutting below 12. Now try to answer the following questions. What kind of ko (direct, multistep, multistage, flower-viewing, etc.) is this? Who will start the ko and when will it start ? What will be the end result? How much is it worth ?
Problems 4A and 4B : In Problem 4A, the moves to 7 form a joseki. White 8 is an overplay. But after white 14, the corner becomes a ko. Problem 4B shows the result of the previous diagram. White has just played the marked stone. How should Black respond? Hint: Remember to evaluate the situation (value of the ko) coolly and then decide what is important.
