Sometimes people ask me how and why I solve hypothetical go problems. Such people reason that it would be rare to encounter the same problems in an actual game. What's worse, when you find a problem in a go practice book, you already know there must be an answer and that is a big hint.
However, by regularly taking on such go conundrums, it is possible to train the mind to look for obvious as well as not-so-obvious moves. On top of that, the mind gets programmed to be always on the lookout for and to avoid certain shapes that may cause problems later. In other words, the mind is trained to recognize patterns and to deal with them-isn't this what IQ tests usually focus on ?
Solution to last week's problems
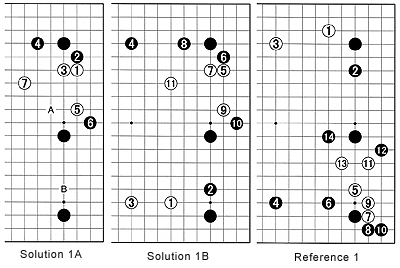
Solution 1A : Invading the widest possible area is the most usual approach. The area around 1 satisfies this rule. Black 2 prevents White from sliding into the corner while limiting his base. Black 6 fulfills a similar role. White can now run out into the center with a move like 7 or A. His aim is to establish a fairly strong group, allowing him to invade at B. To prevent that, Black could play at B himself or keep up the attack with a move around A. This fuseki (opening) is especially popular among aggressive young players and statistically shows the best winning percentage of all openings.
Solution 1B : Another approach is playing 1, on the fourth line, to prevent Black from expanding his moyo (sphere of influence) too easily. Black 2 is the standard reply, but this response is by no means certain. White should be prepared for a Black pincer near 3 and the start of a fight. A move by Black at 4, however, would represent an attempt to expand his moyo on the other side of the board. White would then have the opportunity to invade at 5.
Both solutions have pros and cons and neither approach can guarantee a result one way or the other.
Reference 1 : What White should be wary of is approaching from the other side and invading at 5 as this may lead to a relentless attack on the white group. If White is not skillful at quickly settling a weak group (sabaki or shinogi), the attack could spill over to all corners of the board.
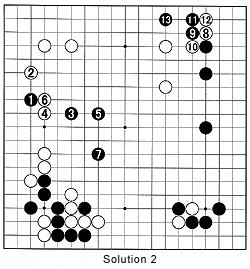
Solution 2 : In last week's problem featuring players Koichi Kobayashi and Keigo Yamashita, Kobayashi chose 1 and 3 to create sabaki (light shape).
 White 2 is the correct line of defense-he doesn't want Black to slide into the corner. White 4 is an attempt to start a fight by Yamashita and a lesser player would probably have accepted it, but Kobayashi judged it was better to avoid a fight and just establish a strategic presence in the center. Notice that it took White three moves to capture black 1, which Black used to play three moves in the center. Notice too that black 7 aims to cut the five white stones below it.
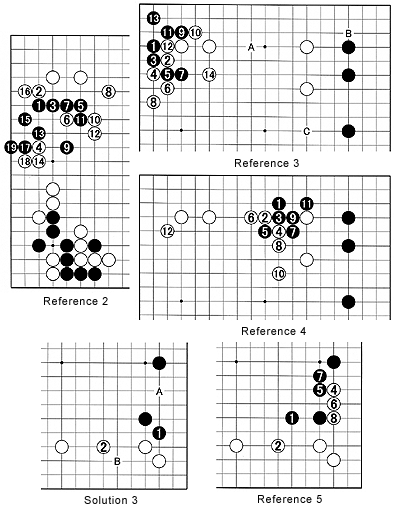
Reference 2 : Black 1 is heavy-it provokes 2 and 4. Sure, Black can live in gote (by not answering back immediately), but White ends up building overwhelming thickness-this is a sure way to lose.
Reference 3 : Black 1 is another standard invasion point. The sequence of moves up to white 8 are a standard way of settling this corner. In the end, however, Black needs to defend his corner with 13. White 14 arrests the black 5 and 7, while a move at A would take the upper territory. But this is not the scale at which Yamashita plays. He would be more likely to play at B or even C.

Reference 4 : If Black invades at 1, White may play a shoulder-hit at 2 to sacrifice a stone in order to establish power in the center, thereby safeguarding his moyo on the left. This is a scary prospect for Black.
Solution 3 : After black 1, White can't invade at A anymore. Instead, White needs to play at 2 to prevent a black invasion around B.
Reference 5 : Black 1 is tempting and White will defend at 2 without hesitation. However, if Black doesn't add another move to defend and plays elsewhere, sooner or later, White will invade at 4. In the sequence to move 8, White takes away Black's territory and turns it into his own.
New Problems
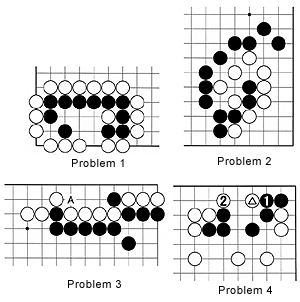
Imagining what will happen and visualizing the result helps in the selection of an appropriate strategy with the right move to take following on from that strategy as a secondary process.Problem 1 : You won't see this in a real game. Black to play and live.

Problem 2 : A problem like this one is more likely to appear in a game. Black to play and kill the entire white group.
Problem 3 : Black's single stone is completely surrounded by white stones. There is a cutting point at A. Can Black do anything ?
Problem 4 : White has just played the marked stone. If Black connects at 1, White can connect his stone with white 2-oops ! Your task: Try to find a better move than black 1.
