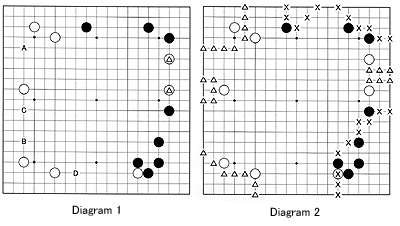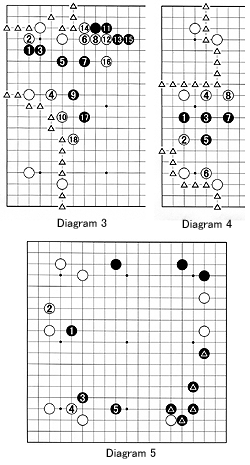
Diagram 2 : Before making a decision, let's first judge the territorial balance. What can both players expect gain as territory ? Let's use the crosses to represent to the borders of Black's territory and the triangles the borders of White's. The territorial points work out to :
| Black : | Lower Right | 42 |
| Upper Right | 17 | |
| Upper Side | 8 | |
| Total ................................. | 67 | |
| White : | Upper Left | 23 |
| Right Side | 6 | |
| Left Side | 6 | |
| Lower Left | 20 | |
| Komi | 5 | |
| Total ................................. | 60 | |
As far as the territorial balance is concerned, there is no need for a deep invasion that takes away a lot of territory.
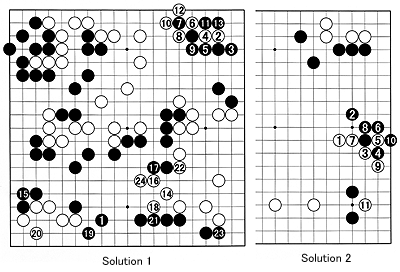
 Diagram 3 : What is worse, a weak group could be created through an invasion. For example if Black invades at 1, white 2 keeps Black from making a base and even if White continues to attack only mildly, Black might be successful in canceling out some territory on the upper left (from 24 to less than 20). But White is more than happy with the compensation (an increase from 25 to more than 55 points) that he gets on the lower left.
This is the result of Black having created a weak group, which according to the QARTS system, was worth minus 20 points. And assuming that Black's group in the center is alive, or has two eyes, it has made two points.
Diagram 4 : Maybe the invasion point was wrong. So let's try another one. Even if White does not aggressively attack Black, but only deprives him of his base and contains him, we can expect the moves to 8. Now count again, White's territory on the left went from about 49 to (43 + 23 =66), while Black's territory did not increase. Again, because Black created a weak group, White gained about 20 points.
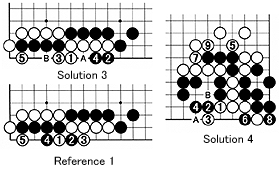
Diagram 5 : The jump of white 4 in both Diagrams 3 and 4 seemed to contribute to White's increase in territory while keeping Black weak.
That is the reason why black 1 is the vital point-it limits White's space for expansion, while providing a foothold for a possible invasion later, while at the same timing avoiding the pitfall of creating a weak group, with possible liabilities of 20 points or more. White 2 is a proper answer that provides Black with the least momentum. Based on the same concept, black 3 forces White to defend somewhere-a plausible answer would be white 4. Now 5 allows black 1 and 3 to work together with the marked black stones on the lower right.
Better yet, Black is not handicapped by any weak groups. And when counting, you see that White's right side has not become much bigger while Black's lower side has. Meanwhile, Black is also threatening to attack the two white stones on the right, which could result in Black taking the initiative in the center.
Solutions to last week's problems

Solution 2 : By applying the QARTS theory, I hope Solution 2 will be more understandable. White 1 looks like the right move as it sets up the combination of 3 and 5, when Black answers at 2. The result to 11 puts Black on the spot.
 Solution 3 : White 1 is the correct answer. Black's best shot is filling in liberties with 2 and 4, but White does the same with 3 and 5 and it becomes apparent that Black cannot put White into atari with A or B.
Reference 1 : White 1 seems to be good, but when Black throws in at 2, the moves to 5 are natural. Black can now start a two-step ko by playing his next move at 2 (capturing white 1). Granted, the ko that follows does not favor Black, but it is better than being captured unconditionally as in Solution 3.
If White starts off playing 1 at 5, something similar will happen.
Solution 4 : White 1 and 3 increase his liberties by one. Now Black wants to block at A, but then white B is double atari. So black 4 is unavoidable. Next, Black only needs to fill in White's liberties with 5 to 9 to win the semeai (capturing race).
