Mixed-doubles go
In mixed-doubles go, one plays with a partner of the opposite sex, alternating turns without mutual consultation with one's partner. As part of a team, one cannot just think for oneself but has to take into account what one's partner wants and what he or she can understand. Sometimes misunderstandings lead to hilarious behavior in which partners avoid looking at each other or start laughing.
On Nov. 13 and 14, the annual mixed-doubles go tournament took place, marking its 10th anniversary. In addition to the main tournament with hundreds of participants, the international event counted 32 pairs from 22 countries. Last year, the winning team was from South Korea where go is very popular, and this country was expected to be one of the top contenders. However, unexpectedly, the finals was played between two Japanese teams.
Serious business
You may believe that mixed-doubles go would not be taken seriously by professionals but nothing is further from the truth. As a matter of fact, the Ricoh Cup 2000 for professional pairs with a first prize of 5 million yen will launch its first round on Dec. 11 and 18. It will be held at the Garden Hotel near Ebisu Station in Tokyo. Happily for go fans in the Kansai area, the finals will be held in Osaka on Jan. 8.Does the level of play go down very much when two minds play instead of one? Let's have a look at last year's finals of the Ricoh Cup with Meijin titleholder Terumi Nishida, and Shikun Ryu, 7-dan, on White and Kikuyo Aoki, 7-dan, and Kunihisa Honda, 9-dan on Black. It may not be a coincidence that the male half of the pairs were not titleholders but the female halves were among the strongest women as a pair may only be as strong as the weakest of the two players.
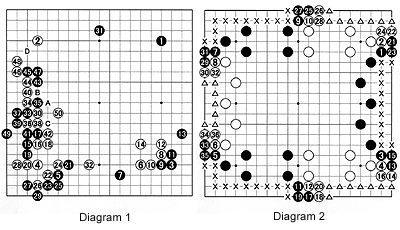
Here are the first 50 moves of the game.
Note that the first moves by Black and White are made by the female partners, so it is possible to figure out who was responsible for what move.

In Diagram 1, the moves to 26 are common, but Black 27 is aggressive. White quietly descends to 28 and then counterattacks with 30, the vital point of Black's shape. Instead of immediately escaping with the stones around 15, black 31 provides an escape route for those stones while taking territory on the upper side. Black makes use of the cross-cut technique with 33 and 35 in order to make sabaki, a light way of treating one's stones and with the willingness to sacrifice one or two stones if called for. White 36 and 38 force Black to live on the edge. But before doing so Black plays forcing moves himself with 43, 45 and 47, creating defects in White's shape. Professionals don't like to be forced to do anything-they are likely to counter. See Diagram 2.
Black 43-instead of B or first exchanging A for 50-is a high-level technique that often stuns amateurs. Professionals in general do not like to fix the shape as this removes possibilities, e.g. once Black exchanges A for 50, he cannot cut at C anymore. This is the very reason that before defending at D, White plays 50 to eliminate the threat of a black cut at C.
After white 50, in Diagram 1 should Black connect at B or play at A ?
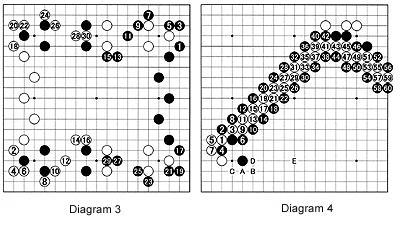
Diagram 2 illustrates the reason why pros don not like to passively answer every move. Here, if White responds to every threat Black makes, he loses the game by a large margin. Just roughly comparing the territories on the first and second line (as all other conditions have stayed the same) shows Black has about 22 points in the lower left, 22 in the upper left, and 18 on the right for a total of about 62, while White's territory amounts to 14 in the upper right, 14 in the lower right, and 10 on the left for a total of about 38. While the conditions were exactly the same for both players at the beginning of this diagram, 36 moves later there is a difference of about 24 points. That is a loss of roughly two-thirds of a point per move, just because White answers each and every one of Black's moves.
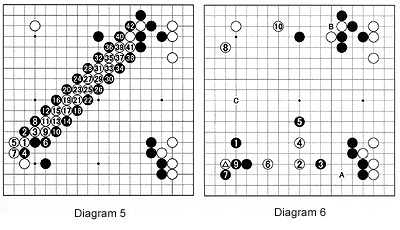
Diagram 3 shows what could happen if White mirrors Black's moves. Whole territories change hands, but the result is still even.
Of course, this is a simplified representation but it offers a clue why a pro is reluctant to answer his opponent's moves.
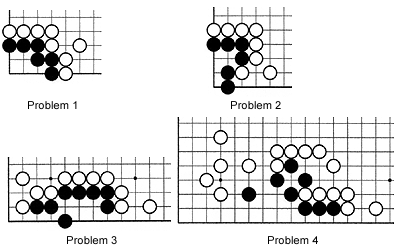
The solution to last week's Problem 1 is shown in Diagram 4, Black 42 is the key move; after white 45, Black can play the ladder in different ways but this is one solution. This means White cannot play the combination of 1 and 3; therefore he should play at A instead, black B, white C, black D, white 5, black E follow. In Diagram 5, the combination of white 1 and 3 is impossible as this diagram illustrates. But playing the joseki from A to E as indicated in Diagram 4 is not very appealing either. Black's marked stones are working well together with black 1 to 7. Note that all of White's groups are low, effective for making eyes individually, but the groups don not work together as Black's stones do.


In Diagram 6 offers an alternative. White 2 plunges into Black's sphere of influences, aiming at A later. Black 3 defends against that, white 4 runs away, black blocks his way, and white 6 makes a base. Admittedly this hurts his marked stone, but after white 10, he makes miai of playing at B and C.

In Problems 1, 2, and 3, White kills a black group. Hint for Problem 4: the first move is obvious but White's second move seems to be counterproductive.
