
Boshi-erasing influence
A veteran go player often tries to avoid a direct confrontation by trying to counter an opponent's influence from a distance, rather like a diplomat dealing with a crisis between countries. This week we will examine boshi (literally, hat) as a means to contain and erase influence.
Erasing Thickness
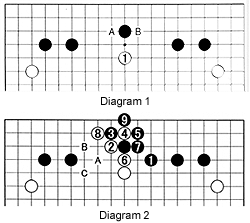 Diagram 1 : This position can often be found in handicap games. Boshi at 1 is one way of dealing with Black's influence. White next aims at playing A or B.
Diagram 2 : Black usually answers with a keima (a move similar to a knight's in chess) in either direction, e.g. at 1. Next White usually attaches (tsuke) at 2. The moves to 8 are a standard pattern. The idea being to play light moves, White will try to form a better shape with moves at A, B or C or play tenuki (elsewhere).
Diagram 3 : In this case, when White has a double-wing formation, i.e. a shimari (corner enclosure) with extensions in both directions, a black boshi at 1 is an ideal move. Black's aim is to play tsuke at A or B next.
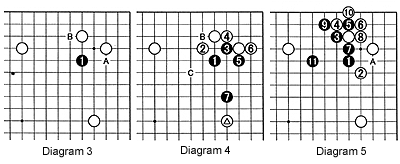
Diagram 4 : White can defend against the threat of B by playing at 2, but then Black can make a base relatively easily. After black 7, the marked white stone looks a little forlorn. If White defends that stone, black C is a good move. In fact, it is such a good point, White may want to play at C instead of defending his marked stone.
Diagram 5 : On the other hand, if White chooses to defend against the threat A by playing at 2, the combination of black 3 and 5 form an elegant tesuji to make sabaki (settling a situation by making a light shape), allowing kikashi moves at 7 and 9. The moves through 10 form a middle-game joseki (standard corner exchange). Black 11 is a nice, light move.
Solutions to last week's problems
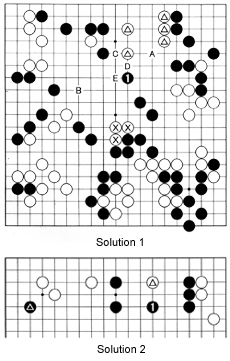 Solution 1 : In this game between Kisei titleholder O Rissei (Black) and Meijin titleholder Norimoto Yoda, Black played boshi at 1, which put pressure on the marked group at the top and isolates the three marked white stones in the center. White will have to defend his group at the top as a move at A would prove traumatic as it takes away White's eye-space But if he does, black B is a good move that aims at a combination of black C, white D, black E, making a substantial territory in the center. Even though White gives it all he has and Black slackened off a little, Black won this game by 1-1/2 points.
Solution 2 : Black's boshi at 1 is the right move as it connects his stones at the top and captures the marked white stone. Note that reinforcing his marked stone is desirable for Black, but first things first. If Black plays 1 somewhere else, White would not hesitate a second to play at that spot himself, separating the black groups.
Solution 3 : Black 1 is correct. White can now start a ko with 2 but as the first to take the ko, Black has the advantage.
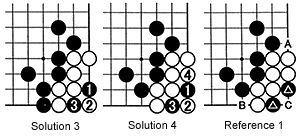
Solution 4 : Black can try attacking as in the previous diagram, but white 4 is a surprise move, so White stays alive.
Reference 1 : After white 4 in the previous diagram, this is the situation. Thanks to the outside liberties at A and B, White can capture Black's marked stones at any time by playing at C.
Problems
 Problem 1 (intermediate): White can invade and involve himself in a battle if he wants to, but it is also possible to confine the black moyo (favored option in this case). Where should White move ?
Problem 2 (intermediate): White's two marked stones are in trouble. What should White do ?
Problem 3 (advanced): This problem is slightly more difficult in the sense that the answer is not obvious. However, Black's next move will have to be answered by White and it will then be seen that Black's move is a boshi. Where should Black move ?
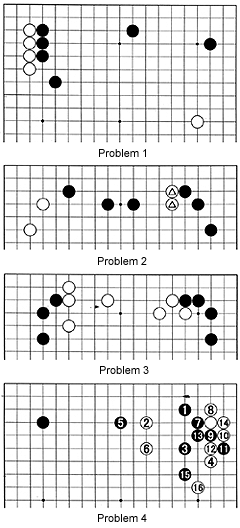
Problem 4 (beginners): The moves from 1 to 16 are a joseki (black 5 could be played one space to the left). Where should Black move next and what should White's response be ?