Invasion tactics
Timing is important when mounting an invasion. When an invasion destroys the territory of one's opponent, a player must make sure that his opponent does not, seemingly out of the blue, create another viable territory. Particular care must be taken about the 3-3 point.
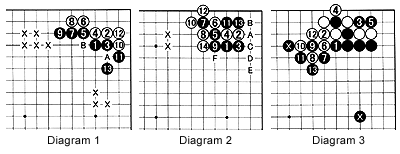
Diagram 2: As the result in the previous diagram is not particularly favorable for Black, he can try the double hane of 5 and 7. White is virtually forced to capture with 8 and 10, but now Black can capture the corner and gain a lot of profit. White gaining territory in the corner. Although not absolutely necessary, white 14 is a thick move that is often played soon in the game. In principle, the result is good for White if there is a black stone around the X's (as white 14 then splits the black position). But White would be overconcentrated if there is a white stone around the X's. Note that there would be some aji (bad potential) in the corner if White exchanges A for B. After this exchange, moves at E and F become a threat, aiming at white C, which Black cannot answer with a move at D.
Diagram 3: If Black already has played the marked stones, instead of capturing the corner with 11 and 13 in the previous diagram (allowing White to take the vital point with 14), Black should play there himself with 1. If White answers with 2, Black can capture the corner. Even if White tries to split Black's stones now with 6 and 8, black 9 to 13 form an excellent combination that makes use of all Black's stones.

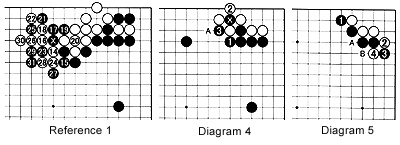
Diagram 4: White will capture with 2 giving Black a chance to give atari with 3. White will usually play at the spot where the marked black stone was before, which is then followed by a black move at A. Once more, this gives Black terrific thickness.
Diagram 5: If White does not like this, he has a tricky alternative. After Black 7 in diagram 2 (black 1 here), White can try to confuse the issue with the combination of 2 and 4, aiming at the double-atari at A. To defend against this threat Black can play at A himself or at B. As B usually leads to an inferior position, A is the better move.
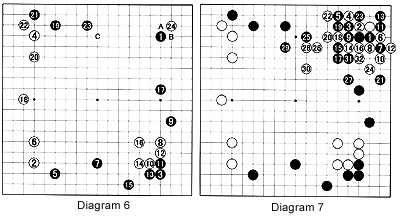
Diagram 6: This is a game played between Masaki Takemiya (white) and Koichi Kobayashi (black) for the Judan title in 1992. After black 23, White invades with 24. Black now has the choice to block at A or at B. A may seems to be better, but if White gets sente (such as in the variation in Diagram 1), he can play at C, which greatly reduces the effect of the wall Black has just created.

Solutions to last week's problems
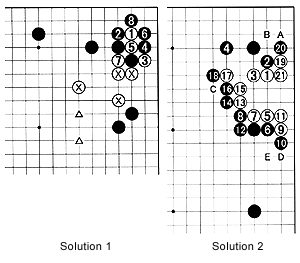
Solution 1: If the marked white stones are strong (e.g. White has stones around the triangles), he can invade at the 3-3 point. Last week, we saw how small the territory Black would be able to retain if he descended at 3. Therefore, if there are no prospects for an attack on the white center group, the correct response is black 2. After white 3, Black can play at 5 or 4. Playing at 4 usually is the better choice. Note black 6-White could extend to 8, but if Black then connects at 7, he makes miai (play one or the other) of capturing white 3 or the three stones in the corner. White has no choice but to comply and capture with 7 after which black 8 completes the combination to get the best result territorially.
