Last Sunday, a student asked me what the theme of the tsumego problems posed last week was. The answer, of course, is that anything is possible on the go board, so consider all possibilities. Many people do not realize that all problems have given solutions, and of course, this is a great hint. However, in real life on the go board, you are faced with a multitude of problems that interact, are interdependent or have many solutions, and that the best solution in a specific situation may not be the best for the overall result. Then again, many problems just don't have answers, at least not satisfactory ones. And last but not least, often you are not even aware that a problem has crept up. More tsumego will increase this awareness.
Solution 1 : Black 1 is the only move. Playing at 2, White prevents Black from connecting his stones underneath, while making his eye space as large as possible. Black 3 needs to be answered by white 4, and black 5 kills the white group. Even though the space looks huge-enough to live-it is only one eye. Notice that black 5 is necessary. If Black omits this move, White will play there and make a seki (stand-off).
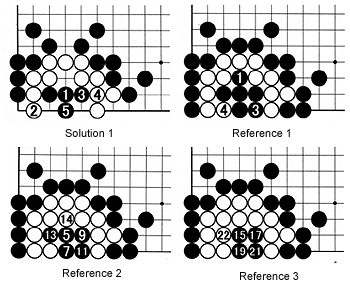
Reference 1 : White doesn't gain anything by actively trying to capture Black's stones and just waits. After Black fills in all the outside liberties, he can play 1 and 3 to put the white group in atari (having only one liberty left). Finally, White captures 6 black stones, but......
Reference 2 : Black 5 hits the vital point and, again assuming White just sits back as he doesn't gain by playing here, goes on to put the white stones in atari again with 13. White 14 again captures.
Reference 3 : Again, Black occupies the vital point at 15. Finally again, White captures with 22, but Black can keep coming back and every time the space gets smaller-claustrophobia is the word-and finally White succumbs.
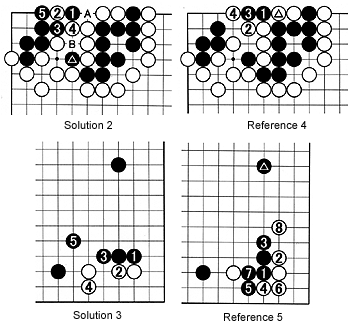
Solution 2 : Black 1 make optimal use of the marked black stone. White can't connect at A, as black B would capture him. White 2 and 4 are tricky, but black 5 is a quiet move that ensures a connection. Notice he shouldn't capture at A, which would temporary put all white stones in atari, as it would put himself in atari as well.
Reference 4 : Black 1 is wrong. White 2 is a good move that keeps Black's stones separate.
Solution 3 : Allowing White to connect with 2 and 4, black 1, 3 and 5 are correct. All of Black's stones work together and form solid influence.
Reference 5 : On the other hand, cutting with 1 through 7 may feel natural, but now the marked black stone is not working as well as it could have.
Solution 4 : Cutting at 1 is correct. If White plays at 2, black 3 and 5 keep White in atari, allowing Black to capture two white stones.
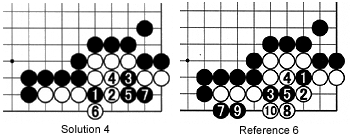
By the way, if White answers black 1 with a move at 5, black should play at 2, threatening a throw in at 3, while expanding his liberties to three. Try it on the board and you'll see-this would kill White's entire corner.
Reference 6 : Cutting at 1 is like the throw-in mentioned above, but by actually playing it beforehand (not subtly threatening it). This loses a liberty, and assuming white 6 at the place where black 1 was captured, Black loses the semeai, or capturing race.
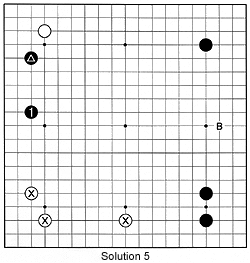 Solution 5 : Playing at 1 is correct for Black. The reason is twofold. It strengthens the marked black stone while at the same time countering the influence of the marked white formation. On the other hand, if Black plays at B, which is an excellent point locally, this would only take territory. In other words, the choice here is between an urgent point and a large point. Put that way, the choice is clear.
Solution 6 : To strengthen and provide some eye space for the marked black group, black 2 is best. If White aggressively attacks Black's base with 2 and 4, black 5 cleverly sacrifices a stone to ensure sente moves (moves that need to be answered) at 7, 9 and 11, to finally make good shape with 13. This should be good enough to either run out into the center or make two eyes.
Black 1 extending one line further at 3 would be dangerous. White might invade at 1 or one line higher towards the marked stones. This could easily render the Black stones eyeless.
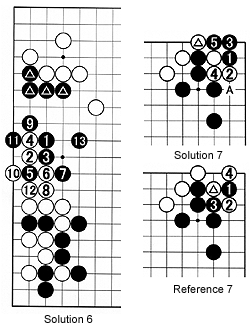 Solution 7 : If White plays 2 (an overplay) in response to black 1, black 3 is a good move. It makes miai of cutting at 4 or 5. For example, if white connects at 4, black 5 puts the marked white stone in atari. White's loss of tempo in defending that stone affords a black move at A.
Reference 7 : However, if Black carelessly answers with 3, putting the marked stone in atari, white 4 sets up a ko, marking failure for Black.
Diagram 1 : In the Judan title, Koichi Kobayashi and O Rissei are battling each other. In this third game in the series, O holds the black stones.
The exchange 5 for 6 is a favorite of O's-this is a very high-level strategy that O has been experimenting with for the past two years or so. White 8 is uncommon, as it allows Black to make two shimaris (corner enclosure). Usually, White makes an approach at 9 or thereabouts. But White 8 and 10 neutralize much of the influence of the black shimari on the left. Black 11 to 15 make use of 5 in a subtle way-it forces White to add a move at 16. Utilizing black 5 once more, Black stakes out a position with 17 through 21. Instead of 18, White likes to play a hane one space above 18, but this would only help Black.
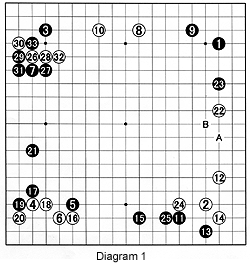 Exchanging 24 for 25 helps White turn the right side into territory as it prevents an invasion at A, which is answered by B.
White 26 is an abrupt declaration of war, but thanks to his solid play with 8 and 10, White can afford a deep invasion like this. Black 27 might be the losing move, as he has no good answer to white 28.
Problem 1 : Look at diagram 1-Where should Black have played instead of 27 ?
Problem 2 : After Black's cut at 33, how should White play ?
