Cho U, the 24-year-old Honinbo titleholder,
By Rob Van Zeijst
Cho U, the 24-year-old Honinbo titleholder, defended his title against challenger Norimoto Yoda and took home ¥36 million. Even though the score was a decisive 4-2, Cho won two of these games by half a point. Imagine if Yoda had won these two games by that margin. He would have been ¥36 million richer. So you can see how important those last few points can be. In the following game Cho is black.
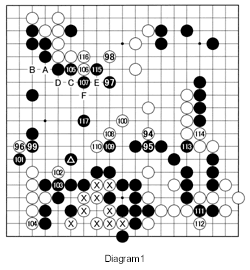
Diagram 1: After White invades the lower edge and ensures that his marked stones will live, Black defends with the marked stone. The game is very close. White forces 94 for 95 then expands the territory of his weakest group with 96. Black 97 forces White to defend with 98. White now has the chance to exchange A for B. After Black plays 105, White can exchange C for D and E for F, before Black falls back with 115. However, white 100 threatens 108, which would cut off Black's group in the lower right-hand corner. Black is quick to exchange 109 for 110 and 113 for 114 to avert this threat, then exchange 115 for 116 before switching to 117. This combination probably wins the game. And in retrospect, White's failure to make the A for B exchange is probably why he lost the game. The pros following this game looked into a host of alternatives with either White or Black winning by half a point, but in the end there was a ko worth one point that Black won as he had more ko threats. Some pros looked into the possibility of creating more ko threats earlier on to win that final ko, but in the final analysis it was doubtful White could have won. For the players, nothing is more painful for the loser and more satisfying for the winner than a half-point win.

Diagram 2: That brings us back to where we started a few weeks ago the endgame where everything is about those last few points. For those who want to improve their endgame, there are two books I highly recommend. The first is The Endgame by Tomoko Ogawa and James Davies and the second is Positional Judgment and High-Speed Game Analysis by Cho Chikun. The first book goes into detailed analyses of a variety of endgame situations and how to count each player's points. The second assumes a lot of knowledge of the endgame and should be studied later. In the right-hand corner of the board, White later goes on to play at 1. This is called the monkey jump. White seems to be going out on a limb, but the stone cannot be cut off and it is hard to stop.
Diagram 3: (White connects 9 at 4) There are various ways to stop the intrusion. Black 2 through 6 is a good combination. White has no choice but to capture with 7, then connect with 9. Black safeguards his territory by playing at 10.

Solution to last week's problem
Solution: (Black 6 connects after the marked white stone is captured.) After creating a ko threat with 1 and 2, white 3 is a good move. If Black connects with 6, White finishes his ko threat with 7. This is better than the game where white 3 is located at A. In the solution, white 3 is better because he can next play at B to threaten the black stones.
Reference 1: Connecting with white 1 is passive. Black 2 captures the marked stone in a ladder--check Diagram 1 to see how the ladder would pan out. White 3 and 5 are good local moves, but his overall position is too low while White's center position is thick.
Reference 2: (White 7 takes the ko by playing at the marked stone to capture black 4.) After white 3 and 5, Black probably will answer with 6. Black retakes the ko with 7 and Black connects with 8. What next? That was the problem the pros following the game were trying to solve.

Problems
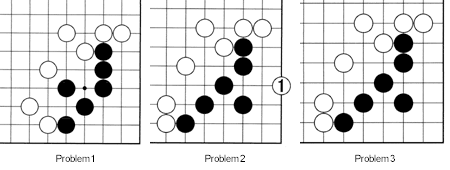
Problem 1: Where should White play to reduce Black's territory?
Problem 2: White 1 is not the best move here. How does Black counter it?
Problem 3: White to play. Can you find a better move than white 1 in problem 2?

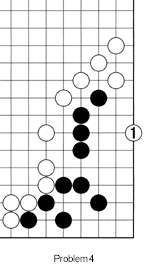
Problem 4: Black wants to stop white 1. What is his best move?

