At present, three young players dominate ...
By Rob Van Zeijst
At present, three young players dominate the Japanese pro go scene: Naoki Hane, current Kisei and holder of the Agon-Kiriyama Cup and Okan Cup; Cho U, current Meijin, Honinbo and Oza; and Keigo Yamashita, who recently took the Tengen title from Hane. In contrast to the conventional style of Hane and Cho, Yamashita is imaginative and bold, which is a pleasure to see but sometimes leads to inconsistencies and unexpected mistakes.
Yamashita is currently challenging Cho for the Oza title. As he was in a slump, he was not expected to stand a chance against Cho, who is at the peak of his game. Indeed, Cho won the first and second games, but Yamashita came back and won the third game in the best-of-five series.
Tengen title
Last week, we began looking at the third game for the Tengen title between Hane, the titleholder, and Yamashita. This is the second half of the game, which Yamashita won to complete a 3-0 sweep. Yamashita is White.
Usually, Yamashita builds influence in order to attack, but in this game, Hane is the one with overwhelming influence in the center. The danger of thinking you are in a better position is that if you fail to take advantage of this, you can quickly lose the game. Hane found that out the hard way.

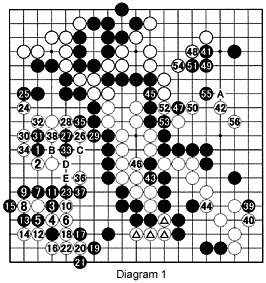
Diagram 1 (1-56 represent moves 107-162): Playing at A would probably give Black the lead. However, since White is thin on the left, Black wanted to decide the game once and for all and starts pushing him around with 1 and 3. Yamashita resists with 4. Relying on his center strength, Black presses his luck with 5 and 7, but White easily copes in the sequence through 22. In the analysis, there were some hairier variations, but each time, the marked stones were able to escape. With 29, Black once more presses hard with the intention of grabbing the entire left side. But after trapping two black stones, White easily survives up to 38. If black plays at B, White would respond with C, followed by black D and white E.
Black then starts an offensive on the right with 39 and 41. However, White takes the key point with 42. Black 43 through 47 is a clever combination, but White easily counters this and connects with 56. See Reference 1 and 2 to find out why. Black resigns at this point.

Reference 1: Can't Black cut at 1? Of course he can. And if White connects at 2, black 3 and 5 follow and White's marked stones die. Note that the marked black stone is in a perfect position.

Reference 2: However, in response to 1, White will capture with 2. If Black follows that by capturing with 3, white 4 kills all of Black's marked stones. Even before this sequence, Black's marked stones were in trouble. In addition, Black had time trouble. Personally, I would have fought on a little longer, e.g. by playing at 4 instead of cutting at 1. In that case, Black would be trailing by about five points or so. The position would be difficult, but not impossible.
Solutions to last week's problems

Solution 1: Cutting with 1 is not dangerous as White can easily live with the combination 2 through 8. Black even has to defend against the cut at A.

Solution 2: If Black plays the marked stone, white 1, 3 and 5 are a good combination. With 7, White captures two black stones and sets his marked stones free.

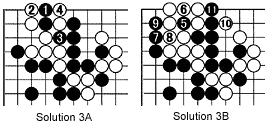
Solution 3A: Black 1 is a good move before the semeai (capturing race).
Solution 3B: After that, black 5 is a good move. If White captures with 6, 7 through 11 win the semeai for Black.

Problem
Problem: What happens if Black extends to 1? How should White respond to win the semeai?
