A complete novice at go first learns ...
By Rob Van Zeijst
A complete novice at go first learns how to capture stones, gain territory, and understand the concept of live and dead groups. The next step is about cutting--to cut and to be cut, or, conversely, when not to cut and to avoid being cut. It may seem as if the choice is obvious, but if we look at the games of some players, their personality during play basically makes the choice for them. Are they aggressive or passive? Will they take chances or are they cautious? Professionals have the ability to focus totally on what they are doing and adjust their aggression and fighting spirit depending on the situation. However, sometimes the gloves are off and the sparks fly. Let's look at a game where hair-raising battles appear on the board one after another.
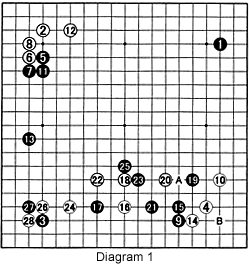
Diagram 1: This is the second game of the 41st Kisei title match between titleholder Keigo Yamashita and challenger Satoru Kobayashi (Black). After Black makes the 9 for 10 exchange, he switches to the left side to establish a sort of mini-Chinese fuseki (opening), i.e., the position of 3 and 13 match that pattern. White can now establish a position on the lower side (see Reference 1). However, since black 9 was left dangling, White attacked with 14 and 16, leading to a battle that spread all over the board. Black 19 is the vital point--imagine a white move at A instead. Black 19 jumps out into the center while aiming at an invasion at B (see Reference 2). Before defending, White probes with 20 (see Reference 3). Black cannot now follow the sequence in Reference 4. With 21, Black aims at White's weaknesses. However, White defends indirectly with 22 while aiming to attack black 17. The players keep ignoring each other and this leads to a furikawari with black 23 and 25 and white 24 and 26 exchanging territory. Incidentally, using the tewari method gives a similar pattern as in Reference 5.

Reference 1: At this point, White has plenty of options. The moves white 1 through 5 make a base while putting pressure on the marked stone. This would lead to a long drawn-out game.


Reference 2: The marked stone aims at invading with 1. White's sharpest moves are 2 and 4. However, the presence of the marked stone enables Black to cut with 5. In other words, White will have to compromise somewhere along the line.
Reference 3: Since White has marked stones in place, he could play at 4 to prepare for the cut with 8 and 10.
Reference 4: After White's marked move, Black should not play at 1 and 3 to defend against the cut at A and B. This would stop the invasion at C and strengthen White's corner, which is just what White wants.
Reference 5: This is a common joseki (standard exchange) we discussed a few weeks ago. Usually, Black's marked stone and other stones around it are not in place. How does this change Black's response?
Solutions to last week's problems
Solution 1: In response to white 1, Black should sacrifice his two marked stones with 2 and 4, leading to the exchange to 5. The result of this furikawari is favorable for Black as all of White's marked stones are dead.
Reference 6: Black should not resist with 2 because after white 3 and 5, Black loses one of his groups of marked stones. If he saves with 6, he is bottled up after white 7.
Solution 2A: White 1 is the correct move. Black can make a double atari with 2, but White 3 does the same. If Black captures with 4 or A, White captures the two marked stones with 5, making White's corner alive.
Solution 2B: Black can also play 2 or A, but no matter what, white 3 finishes off Black one way or another and either group of marked stones is taken with 3 and 5.

New Problem
Have a look at Diagram 1 and try to find a Black response to white 28.
Van Zeijst is a four-time European go champion and European representative at the Fujitsu World Championship.
