
Ever said something you regretted later? ...
By Rob Van Zeijst
Ever said something you regretted later? Ever done something you shouldn't have done? Well, join the club. Fortunately, if you play a move in go that you regret later, you can always tell yourself it is just a game. However, for pros that's not the case. As their livelihoods depend on the game, pros are extremely careful to play out a situation if other good possibilities exist. That is why they frequently abandon a position during a game and come back to it when conditions change. They leave their options open so they can strike when the time is right. But they will stick to a position when there is no alternative.
The game we started last week is the second in the best-of-five Women's Honinbo title between Kaori Chinen, current female Honinbo, and challenger Kumiko Yashiro (Black). Yashiro won the first game by 1! points. In this game, Black blunders into aji keshi (eliminating potential) and landed up in a tough fight.
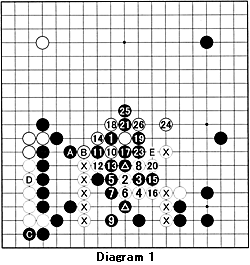
Diagram 1(1-26 represent moves 45-70; white 22 fills in at 1): White's net of marked stones is strong because Black exchanged A for B, which was a natural follow-up after Black made the C-for-D exchange. As you can see, neither of these exchanges helps Black-both are aji keshi-while they strengthen White's position. With 1, Black tries to break through White's net. However, white 2 is a strong counter. The moves through 10 are forced. Black 11 is a clever move and with 12, White falls for this decoy. White should have played at 14 immediately to try to block Black's path to the center. Also note that white 20 follows black 19 rather than 23. However, 19 gives Black a good atari at 21. White 22 connects at 1. White 26 is an unexpected cut. Let's see next week how Black uses her sente move at E to move out to the center.
Hints for improving your game
In general, playing moves that eliminate possibilities is not a good idea. Let us see why.

Diagram 2 The unmarked black stone occupies one of the board's interesections or star-points. The moves 1 through 7 form a joseki. Where should Black play next?
Diagram 3: If you feel the need to exchange 1 for white 2, you are not alone. However, this is a very bad exchange because it strengthens White's position and weakens Black's.
Diagram 4: If Black doesn't make the A-for-B exchange, he does not need to worry about the cut of white 1 and 3. This is because he can now exchange 4 for 5 in sente (without the A-B exchange, White needs to defend against the cut at C). Black then can bottle up White's stones with the sequence 6 through 14. Even if White plays at D, black E and white F would follow, and black G would kill the white stones.
Diagram 5: The moves to 11 are a joseki. However, white 12 is aji keshi. Although it allows White to extend to 14, the sequence 15 to 20 is sente for Black. In addition, black A is sente (White must defend at B) and therefore a white cut at C is impossible because of the sequence black D, white E and black F.Diagram 6: Instead, White should descend to 12. True, black 13 has to be answered with 14, but Black has a cut at A he should defend. In addition, white B is sente.
Solutions to last week's problems
Solution 1A (Black 6 connects where the marked stone is captured): After a white stone is in place at A, White can aim to use the aji of his marked stone by playing at 1. If Black descends to 2, White can respond with 3, a strong move. Black must capture with 4 after which white 5 is atari, Black then fills in where the marked stone was and White makes a base with 7 (or B). Whatever Black does, White can either connect at C or extend to D and is safe.
Solution 1B: In response to 1, Black can opt for 2 to allow White to connect underneath with 3, and then defend the corner with 4. Of course, White can now capture a black stone by playing where his marked stone was taken to reduce Black's corner even more. However, if he has plenty of ko threats, he can play at A, with the threat of cutting at B. If Black defends at B, White can play at C, the vital point. New Problems:
Problem 1: Let us have another look at the joseki of Diagram 2 with some changes. For instance, the marked black stone has been added. Should Black now make the exchange B for C because White cannot aim for a cut at A? Or is that aji keshi? If so, where should Black play?
Problem 2: After white 1, Black will usually play a hane (diagonal connecting stone) move at A. However, if he does not, how should White proceed?
Want to find out more? Come to Ben's Cafe in Takadanobaba, Tokyo (03) 3202-2445 where the English-speaking go community congregates every Sunday. You can enjoy free lessons, 11 a.m.-1 p.m. Ben's Cafe can be accessed at www.benscafe.com.
Van Zeijst is a four-time European go champion and European representative at the Fujitsu World Championship.