Everybody gets into trouble sometimes. ...
By Rob Van Zeijst
Everybody gets into trouble sometimes. That's just life. One can deal with the situation in an awkward way and make it worse or handle it skillfully. Some people have a flair for solving problems, but many of us rely on trial and error before we catch on and learn how to deal with them. Some methods involve abandoning the idea that everything is personal and rejecting the concept of attachment. This makes it easier to maneuver and get on with our lives, hopefully making progress and achieving some worthwhile goals.
Sabaki
In handling a difficult situation skillfully, sabaki encompasses a range of techniques to make a light, flexible shape, as well as eye-shape, while threatening the opponent's weaknesses. Sabaki frequently involves sacrificing one or more stones to achieve this.
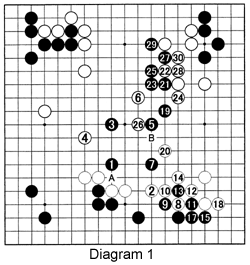
Diagram 1: Let us continue last week's game for the NHK Cup between Cho Chikun (black), holder of the Judan title, and Naoki Hane, the current NHK Cup titleholder. Cho's forte is grabbing as much territory as possible while forcing his opponent to build thickness and strength. Then, in a cat-and-mouse manner, just before his opponent can turn the thickness into territory, Cho invades and destroys the framework. This often involves a high level of sabaki skills, leading to complicated and drawn-out life-and-death problems. Black 1 starts this maneuver. White does not respond by connecting at A but jumps to 2 instead. Note that Black does not cut either--in fact cutting or connecting is worthless. Instead he jumps lightly to 3, 5 and 7, while White slowly tightens the net. (See Reference 1.) With 8, White employs another attacking technique--the leaning attack. Black needs to strengthen his stones with 9 through 17, but in the sequence through 18, White becomes stronger, too. Black continues to run with 19, threatening to jump into the top or the right side. White 20 attacks from the rear, but Black marches into the top territory with 21, 23 and 25. White 26 is a great move. Black cannot connect his stones with B. Why not? (See Reference 2.)

Reference 1: When Black jumps to 1, cutting with 2 and 4 may look interesting, but Black would rather sacrifice his marked stone to build center thickness to 7. In contrast, White uses too many stones (including the marked stones) to make too little territory. It defeats the purpose of thickness: attack.


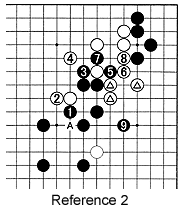
Reference 2: Black 1 is the vital point to protect eye-shape in the center. If white plays at 2, then Black would play at 3. However, after black 9, Black seems to be able to make eyes easily. If White connects at 7 (instead of at 6), Black jumps to 9, and White must somehow save his marked stones.
Diagram 2: Black cannot play at 36. If he does, White would play at 33 to make miai of cutting at A and B, i.e., if black plays at A, White would play at B, and vice versa. Therefore, Black plays 31 and 33 to prevent White from occupying the vital point at 33. The problem for White is he can't go for broke and capture the entire Black group, because if he fails, the game is over. That is why White plays 36. However, after 37, White's stones at top right seem weak. Black 39 and 41 aim at the weakness at D while preventing white C, a huge move. (See Reference 3.) White 42 is a good move that takes away Black's eye-space, makes territory and aims at connecting at E. Cho regretted 47--this was aji-keshi, a move that wastes possibilities. He should have invaded at F or attached at 48. After 59, Black has no visible eyes. The comment for 36 also applies to white 60. You should never "excessively" attack. But Black looks like he's dying anyway. How should he continue?


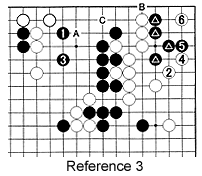
Reference 3: If Black plays a safe move at 1 and 3, White will play 2 and 4. After 5, white 6 is a nasty move that will prove to be a huge headache. At the very least, white B is sente, making it possible to jump all the way to C. In the meanwhile, Black's territory would dwindle. That is the problem for the invader (Black)--running around the board to save his invasion group, he inflicts collateral damage on his other groups.
Solution to last week's problem

Solution 1A: Thanks to the marked stone, White can play 1, 3 and 5. (The latter move deviates from last week's solution.)
Solution 1B: At this point, Black has three options: A, B or C. If A, White would play at B, and Black cannot connect at C. If B, White would again play at A, and once more, Black cannot connect at C. If C, White can play at A or B and Black is in trouble. So Black's group is dead and there is no ko.
New problems:

Problem 1: Where should Black play to kill the White stones?
Problem 2: Where should White play to kill Black? Hint: Be careful with the order of play.
Van Zeijst is a four-time European go champion and European representative at the Fujitsu World Championship.
