
It had to happen someday.
By Rob Van Zeijst
It had to happen someday. Cho U, current holder of the Honinbo and Meijin titles, found himself sitting opposite his father-in-law in the semifinal of the NEC Cup on Jan. 29. Cho is married to Izumi Kobayashi, the daughter of Koichi Kobayashi, who has won many go titles over the years. In fact, Kobayashi hoped to capture the NEC Cup for the fourth time and the second year in a row. Since this is a knockout, speed go tournament, this is not an easy feat. We will see what happened during their game further down the column. Let's look first at a technique called hasami-tsuke, which was decisive in the NEC semifinal because one of the players failed to use it at a crucial point in the game.
Hasami-tsuke
Diagram 1: Hasami-tsuke is a technique where a stone is clamped between two rival stones. 1 through 5 is the beginning of a joseki. Black 5, therefore, is the hasami-tsuke move. Note that in this hasami-tsuke, the stone is not connected to a stone of the same color
Problem 1: In this situation, Black's marked stones seem to be in a lot of trouble. However, if he somehow captures White's marked stones he is in the clear. Where should Black play?
Solution 1: Black 1 is correct. This hasami-tsuke captures the marked white stones. Black's marked stones have three liberties, while White has two, which he cannot increase.
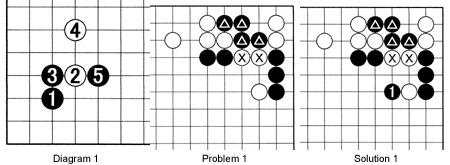
Reference 1: To verify that Black cannot capture White's stones in any other way, let us look at black 1, the most direct approach. The moves through 4 are unavoidable. Black cannot stop White now, but if he tries, such as with a ladder, he will collapse after White captures with 12.
NEC Cup
Kobayashi was Black in his game against Cho.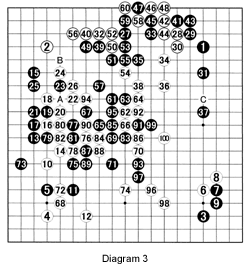
Diagram 2: White 16 through 22 are very instructive as White resists the understandable temptation to invade and opts for pressing Black back so he can build thickness. In the hope that White will connect at A, black 23 is a good move, but 24 is a strong move as it performs half a hasami-tsuke, with a stone later intended for A. Black 25 is a modest move and white 26 completes his wall. With the aim of completing the hasami-tsuke at B, black 27 seems natural, but with 28, White launches a marathon attack, lasting to the end of this diagram. Black could have prevented this by playing 37 at 38, but this would have given White an edge on the right side of the board by playing at C. However, with 96, White overstretches himself a bit.
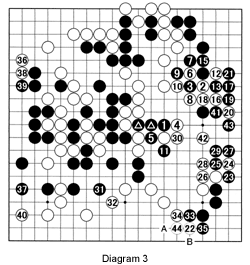
Diagram 3: (white 14 captures ko at 6) Due to White's "greed" on the lower side, Black can take the initiative and capture some stones in the center, but at the cost of White breaking through on the right. Black 41 and 43 are the losing moves. He should have cut at 44 and capture white 22 with B after white A. This would have set up a brilliant hasami-tsuke combination (see Problem 3). In the end, White won the game by 4! points.
Problems
Problem 2: Although Black is in trouble, he can use the hasami-tsuke technique to capture two white stones. Where should Black play?
Problem 3: Instead of black 41 in Diagram 3, Black should have captured with the sequence black 1, white 2 and black 3. White would then have played around 41 in Diagram 3. However, Black could take advantage of this by using the hasami-tsuke. But it is so complicated, neither player found the answer that day. The following day, Cho came up with an amazing sequence. Try to determine the first few moves of that sequence using the hasami-tsuke.
