Like scientists and philosophers,
By Rob Van Zeijst
Like scientists and philosophers, go players should always search for the truth. A problem arises when they think they know the truth, but actually don't. This inevitably stunts the growth of a go player, while those who question everything, including their own perception, ideas and judgment, are likely to keep developing. As the philosopher Ludwig Wittgenstein said: "Search and you shall find."
The World Amateur Go Championship 2005 took place last week. To find entertaining and incisive reports by Pieter Mioch, visit http://gobase.org/studying/articles/mioch/wagc2005/?issue=1.
Honinbo match
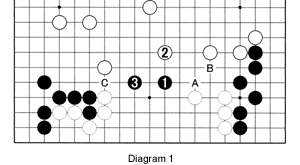
Diagram 1: In our search for the truth, let's continue with the first game between Cho U (black) and challenger Takao Shinji in the best-of-seven Honinbo match, which has a winner's purse of 32 yen million.
These are the last three moves we looked at last week. Black 1 is aiming at moves like A and B, while 3 threatens to cut at C. In analyzing the game, the pros concluded that Black's chances of prevailing were 50 percent. Usually, most pros will agree on some "best" strategy or move. However, without this consensus, they felt White had two alternatives.

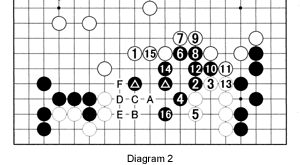
Diagram 2: It is realistic to assume White's chances of killing Black's marked stones are only 50 percent. If White safely responds to each of Black's threats 2 through 16, Black will easily make life with his last move. The sequence white A, black B, white C, black D, white E and black F puts White on the spot. However, White probably would offer more resistance earlier in the sequence from 3 through 16. The problem is when and how. Pros don't like to kill stones because this generally provokes maximum resistance from an opponent. However, if you are having a poor game, going for the kill is not a bad idea.

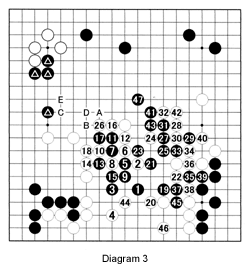
Diagram 3 (1-47 represents moves 43-89): Shinji probably felt he didn't need to kill or couldn't kill Black's stones. Perhaps he thought he could win on territory by defending at 4 and chase Black out. However, in the sequence through 47, Black cleverly extracted his stones. Without sufficient territory, the game is now hopeless for White. If you are wondering why Black did not try to escape by playing at 26 (instead of 19 through 25), White would respond with A, followed by black B, white C, black D and white E. This would wreak havoc on Black's marked stones.

Next week, we'll see how White turns this game around.
Diagram 4: Before we start with the solutions, let's first look at the applicability of the adage: "What doesn't kill you makes you stronger." Some people believe, by playing at 1 they are attacking the white stone. At first sight, it reduces White's liberties by one. However, white's move at 2 actually increases White liberties by one--it doesn't kill him, it makes him stronger, as you can see.
Diagram 5: Even worse, if Black plays at 1, White may play hane at 2. Now, with only two liberties left, it is Black rather than White who is under attack.

Solutions to last week's problem
Solution 1: In response to White's marked stone, Black should descend to 1 to safeguard the corner as this kills a potential white invasion at A as well. Following this move, black B, white C or D would still be a concern, so it might be better to play at C or D instead of 1. Note that none of these moves strengthen White's marked stone.
Reference 1: When confronted by white 1, don't play at 2. This only strengthens White as he would extend to 3. Black still needs to defend his corner. Otherwise, White may invade at the 3-3 point or at A, followed by black B, white C and black D, which would be answered by white E. This is not good for Black.

Solution 2A: Black 1 is a common way to attack White's corner formation. Usually, pincering with 2 is best. Black will invade the corner with 3 and the moves through 13 are a possibility. After this move, White can play A, B or C depending on the situation.
Solution 2B: If the corner territory is important, defending at 2 is a good idea.
Reference 2: White 2 is usually a poor answer to 1. After 3, White can try to pincer with 4, but Black will invade the corner with 5. After 9, black can either play at A, threatening to pull out 5 and 9 with B, or jump to D. After A, White will probably play at C. As an alternative, Black can also capture at C, followed by white B. Anyway, Black's group will become quite strong, while white 4 may even come under attack.
New Problem
Problem 1: In Diagram 3, after 47, how can White launch an attack on Black's center group?

The English-speaking go community congregates at Ben's Cafe in Takadanobaba, Tokyo (03-3202-2445, www.benscafe.com), every Sunday at 11 a.m.
Van Zeijst is a four-time European go champion and European representative at the Fujitsu World Championship.
