The obvious advantage of watching go on television ...
By Rob Van Zeijst
The obvious advantage of watching go on television is that you can enjoy a high-level game with a good running commentary. You can also try to work out the next move before it is played. Every Sunday from 12:20 p.m. to 2 p.m., NHK broadcasts a game between top pros in the NHK Cup Tournament. As time restrictions apply, the games tend to be exciting, the players generally are most aggressive. Years of hard training and mastering high-level techniques pay off during these fast games. One of these techniques is the tsuke-koshi. An even more skillful technique is to avoid the pitfall of falling for it.
Next Sunday's program will feature a special about the life of Masao Kato, a top pro who died last month. During his career he won many titles and was chairman of the Nihon Kiin.
Tsuke-koshi
Diagram 1: The marked white stones form a keima, a shape often used in an attack. However, this formation also can be attacked through, for example, the 1-3 cutting combination when the marked black stone is in place. For this to work well, the ladder white A, black B, white C, black D, white E, etc. must be in Black's favor. However, this is not always the case.
Diagram 2: If the marked white stone is in place along with keima, we can think of this as a reinforcement. But, if Black plays the 1-3 combination and White captures with 4 and 6 (since the ladder is favorable), Black could cut through with 5 and 7. Clearly, White has failed. What should he have played? Let's look at a game in which this shape appears.


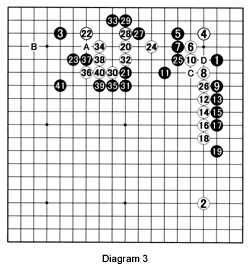
Diagram 3: (1-41) Gosei titleholder Norimoto Yoda (black) and Yoshio Ishida played in the NHK Cup Tournament last week. White captured a Black center group through a clever sequence, but the ultimate result came as a surprise.
Setting up a huge framework, black 1 and 3 are an interesting opening. White is almost forced to invade with 4 but Black is happy to attack in a sequence beginning with 5. White builds strength with 6 through 18, which allows him to pincer at 20 and start a fight.
Black 21 is a great move. Imagine a White move there! White then played at 22, which led to black 23, a perfect move that made it difficult for White to move into the center. Instead of 22, White should have played at A, which probably would have been followed by black B. White 24 is good, but black 25 is sente. If White ignores this, black C threatens to cut at 26 and at D. White cannot defend against both threats at the same time. In short, he needs to defend before Black plays at C.
White 26 is a threat, but it does not need an immediate response. Black attacks with 27 to undermine White's position. White comes under more pressure in the ensuing battle to move into the center. After black 41, White seems to be in real trouble. However, 3 and 41 both form a keima with respect to 23. This is the weakness that White should try to exploit. But how?
Reference 1: In response to black 1 (41 in Diagram 3), white 2 is a tsuke-koshi in combination with white 4. If Black tries to stop White's escape with 5 and 7, he runs into trouble after white 8, 10 and 12. If Black plays at A, white B sets up either C or D. Black cannot defend against both threats.
Reference 2: Therefore, in response to white 4, Black is happy to secure a huge corner with 5. Of course, White can move into the center with 6, but Black more or less secures the marked area. This is a great result for Black.
Reference 3: White 2 is another tsuke-koshi we must consider. Black 3 makes a bad shape (empty triangle), allowing White to force the play from 4 through 9. White can now play at A to stay alive, but before doing so he will play the other tsuke-koshi with 10. If black plays at B, the sequence of white C, black D, white E, black F would follow, with White capturing three stones with G.

Solutions to last week's problems
Solution 1: White 1 induces black 2, allowing White to connect at 3. After taking sente with 5, White can move out with 7.
Solution 2: With the black and white marked stones in place, black 1 is a good move. This does not look like a tsuke-koshi until you see black 3. White must play at 2 and 4 to cover his position. However, black 5 cuts off the white marked stone and forges a connection with his own marked stone.

Reference 4: In response to 1, if White plays at 2, black 3 is the next tsuke-koshi. White 4 is the best response, but in the sequence through 15, Black still manages to cut off White's marked stone. In addition, black A and B are sente, so Black is strong in this area and will get the upper hand in the ensuing battle.
Problem 1: After studying References 1 to 3, try to determine how both Black and White should continue after black 41 in Diagram 3.
Problem 2: This problem sometimes appears in handicap games. After white 10, Black seems sealed in. Apply what you learned today and determine Black's next two moves.

