Honinbo title holder Cho U will be challenged ...
By Rob Van Zeijst
Honinbo title holder Cho U will be challenged by Shinji Takao, 8 dan, in a match starting next month. In a playoff to decide the challenger, Takao defeated Cho Sonjin, 9 dan and a former Honinbo title holder. In the Honinbo league, Takao led with six wins and no losses, while Cho Sonjin trailed with five wins. But in the final game Cho beat Takao by half a point, leading to the playoff. These two players have similar styles as both prefer to build thickness and strong positions before launching into a full-scale battle.
Now let's continue our study of the crosscut, which is often employed to force the opponent to capture one stone, in order to make a light shape, help the other stone to escape or to strengthen it. This crosscut also appears in a variety of joseki patterns. Joseki, or fixed corner exchanges, are a good source of study material filled with tesuji; pointers on shape, aji and the balance of thickness versus territory; as well as life and death and endgame problems.
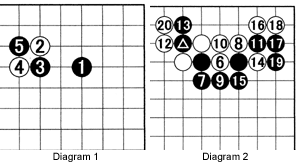
Diagram 1: The moves 3 and 5 are an example of a crosscut appearing in a joseki, which are sometimes seen in pro games. What is your reaction when you see the crosscut for the first time? Many amateurs panic, while aggressive players use it too often. Both "afflictions" can be cured by reading a few moves ahead and doing a bit of research. Experiment in your own games without worrying about winning or losing.
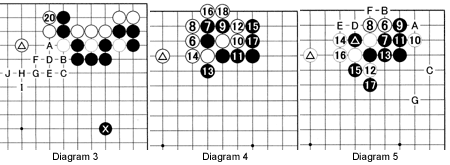
Diagram 2: White's response might be to play at 6 and 8. This is exactly what Black wants, because in the sequence through 20, he builds thickness on the right. On the other hand, White profits and builds thickness on the upper side. This looks favorable for White.

Diagram 3: However, if the marked white and black stones are already in place, the position is terrible for White. His marked stone is virtually useless, while Black's marked stone works well. In this case, White should connect at A rather than at 20. If he plays at 20, Black would play a forcing move at A, followed by white B, black C, and on through white J. In addition, Black has other sente moves at B, C and E, which may come in handy.
Diagram 4: What about 6, 8 and 10? Black can save his stones at 7 and 9 by playing at 12, but he can sacrifice these stones with 11 through 17 in sente. Again, White's marked stone is in a terrible spot, while Black's shape is superior in terms of both thickness and territory.
Diagram 5: White's best move is at 6. Black would defend his corner with 7 and 9, sacrificing his marked stone. But White would exchange 10 for 11 and 12 for 13, giving Black an ugly shape, before bottling up Black's marked stone with 14 and 16. Again, White's marked stone is not in a good place, but Black's shape is inefficient. Later, White can play at A. If Black plays at B to prevent White from connecting underneath, White would jump to C, followed by black D, white E and black F-capturing three stones. White would develop quickly by extending to G. This is good for White. However, before that sequence, Black may have an opportunity to play at B, giving him a slightly favorable result.

Solutions to last week's problems

Solution 1: In this game between Lee Changho (Black) and his teacher, Cho Hunhyun, you were asked where Black should play to save his stones 11 and 13. Black should play at 1 to connect his stones underneath. White 2 is necessary, but black 3 led to heavy fighting. The battle is far from over after white 32, but in the end, White stayed alive on the left. However, since Cho spent so much energy in that area, he lost the game in the end. Lee's aggressive strategy paid off.
Solution 2: After Black wrecks White's base on the right and White responds by trying to cut off Black's route toward the center, Black should split White into two groups and move out into the center by playing at 1. The hasami-tsuke clamp of 2 is a good move, but with 5 through 23 Black keeps up the pressure and in the end wins the game.

New Problems
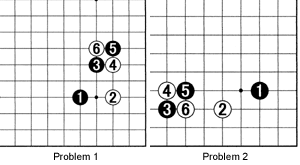
Problem 1: The moves through 6 are the first moves of a joseki. The ladder is important. If it is bad for White, he should not crosscut with 6. The question is, where should Black play if the ladder is good for him?
Problem 2: After 3, white 4 is sometimes seen. Black 5 is a fighting response. White has no choice but to cut with 6. Find a couple of alternatives for Black's next move.
Want to find out more? Come to Ben's Cafe (03-3202-2445, www.benscafe.com) in Takadanobaba, Tokyo, where the English-speaking go community congregates every Sunday. You can enjoy free lessons, 11 a.m.-1 p.m.

Van Zeijst is a four-time European go champion and European representative at the Fujitsu World Championship.
