Go players love to compare ...
By Rob Van Zeijst
Go players love to compare the game to life itself. Well, go is a long game and full of pitfalls and ups and downs. Often you are thrown off your feet by feelings of euphoria or despair. Recognize these feelings, but do not fall in love with them. The important point is to keep your eyes on the goal and keep trying to think of better moves. Top pros never give up and there are plenty games where a lost game is won in the latter part of the endgame. Today we will look at such a game.
Diagram 1: (1-34 represent 75-108) (18, 21, 24, 27 are played in ko) Last week we started this recent game between O Rissei (white) and Satoshi Yuki in the Kisei league. In response to 1, white 2 is paramount. White also wants to play at 3, but 2 applies pressure to Black's group in addition to defending his own stones. Black 7 threatens to cut with A, white B, black C--so White must guard with 8, allowing Black to slide with 9. White 10 is unexpected, as is 14. Playing at D, black 15, white E looks severe, but after Black exchanges F for G, he has no trouble making eyes. Normally, Black connects at 15 after white 16, but Black is stubborn and plays at 17. Thus, this situation becomes a ko with White capturing at 18, Black playing a ko threat at 19, White answering at 20, and Black recapturing with 21, and so on. The ko is discontinued when Black captures with 29, ignoring white 28. Next, White kills Black's marked stones with 30, worth over forty points.

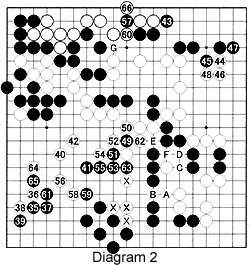
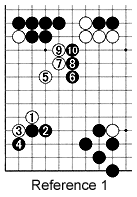
Diagram 2: (35-66 represent 109-140) Black 35 is huge, claiming the entire lower left quadrant. White needs to reduce Black's claim. White 36 and 38 are kikashi, or good forcing moves. White 40 is the correct move--any deeper is dangerous. See Reference 1. Black protects his corner with 43, while White turns his influence into territory with 44, 46, and 48. However, before doing so, he should have exchanged A for black B and white C for black D, because then he can always play E for F in sente. The implications are not immediately clear. However, when Black forces the exchange 49 through 53 and plays 55, it becomes apparent that a white stone at E would enable white 63. Therefore, if the A for B exchange had been made, Black would not play at 55 but at 63 instead, leaving a gaping hole at 55. Because White omitted this exchange, after Black kills the marked white stone with 55, White is slightly ahead. He could have reinforced his lead by playing at 60, forcing white G, before defending at 59. White plays 60, 54, and 66 to catch up a little. In the end, Black misses a few small endgame chances, while White does not miss a beat and goes on to win by half a point.

Reference 1: After forcing moves at 1 and 3, white 5 would be dangerous. After black 6, White cannot connect with 7 and 9. After 10, White's stones cannot live.

Solution to last week's problem

Solution 1A: White 1 is a good move. If Black captures with 2, what happens next?
Solution 1B: After White's captured stones are removed, this is the new situation. Next, White throws in with 3. If Black next secures one eye with 4, White 5 and 7 take out the other eye. Because of a shortage of liberties (damezumari), Black cannot resist by playing 6 at 7. (He puts his own stones in atari.)
Solution 2A: After exchanging white 1 for black 2, white 3 is the next move in the sequence. If Black plays 4, white 5 and 7 finish the kill. Black is in atari but he cannot play at A--see Reference 2. If Black plays B, White captures with C. Upon seeing this diagram, do not just smile because you found this sequence--Solution 2C is the correct solution.
Solution 2B: What about black 4 and 6? White simply connects with 5 and 7. Black can now opt for either A or B, but White will play the other move. Either way, C is a false eye (i.e., if White occupies all the outside liberties eventually Black has to play there) and Black dies.
Solution 2C: However, the real solution is a little more complicated. When White plays 3, 4 is Black's best response. White cannot play A, because after black B, white 5, black 6 puts three of White's stones in atari. Therefore, White has to resort to 5 and 7 now. Black must resist capturing this bait and play at 8 instead. White can now capture at C to make it ko. This is the best sequence for both players--so the best solution is ko.
Reference 2: At this point, the situation is like this--Black's marked stones are in atari. However, capturing the marked white stone with 1 does not help. After this stone is removed--try it on a real board--Black's marked stones are still (or again) in atari. White can play where his marked stone was captured and take away Black's last liberty and capture the marked black stones.
New Problem

Problem 1: Experienced players know the sequence 1 through 4 as the beginning of the taisha joseki with hundreds of variations. Sometimes, inexperienced players try to keep things simple by playing 8 through 12 when the ladder is favorable. Next, for Black the correct move is A. However, 13 and 15 look irresistible. How should White punish this?
Van Zeijst is a four-time European go champion and European representative at the Fujitsu World Championship.
