For the past few months we have studied ...
By Rob Van Zeijst
For the past few months we have studied the endgame and positional judgment. This week, we will look at a game that sweeps all over the board like a tornado until it wreaks havoc in the center. The game was important to Keigo Yamashita and his fans, who enjoyed his bold style.
After bursting into the big league a few years ago, taking titles in grand style, Yamashita married and then lost his titles one by one. After Yamashita lost the Kisei title, worth 36 million yen, to Naoki Hane two years ago, he went into a slump. However, Yamashita recently made a dramatic comeback, taking the Tengen title from Hane in three straight games. Let's have a look at the third game. Yamashita is white.
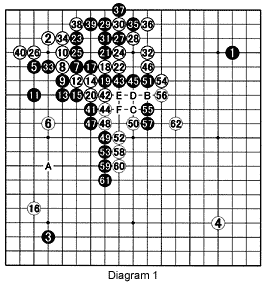
Diagram 1 (1-62): The moves through 13 are a joseki and are an improvement on the joseki in Reference 1. White 14 takes sente (initiative) and plays first on the left side. In exchange, Black 17 starts a battle that lasts until white 32. The game follows a similar pattern to that of a game played in June between Hane (Black) and O Rissei. But Hane's next move was poor.
However, Hene played 33, giving him sente to free his stone with 44 and start a large-scale battle. For both sides, A would be a huge move, but the fight in the middle takes the center stage. Note that White cannot cut at B. Black C is a good response. White D and black E would follow and White could then cut at F.
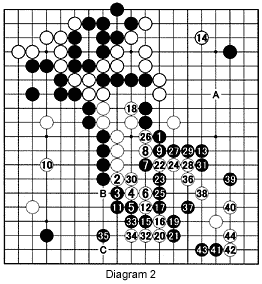
Diagram 2 (1-44 represent 63-106): After 1 through 6, black 7 hits the vital spot. However, white 8 is clever, as this allows him to play at 10, a move that might be worth 30 or 40 points. Once more, Black increases pressure with 11 and 13, but again White switches elsewhere with 14, good for 20 or more points. Hane is now compelled to do something drastic, so he starts a bold offensive with 15 and 17. White 18 is aimed at ensuring his stones will survive, but Black delivers another blow with 19 and 21.
White now seems to be in trouble. Yamashita solved this problem by cutting with 22. The moves through 31 follow and Yamashita seems to be in trouble again. With 32 and 34 he seems to initiate an all-or-nothing fight, but these moves were only meant to extend his liberties before playing at 36, which is the key that enables White to extend to 38 and 40. With 41 and 43, Black captures the four white stones at the bottom right, although there are still plenty of possibilities at B and C. If Black switches to A now, he also grabs plenty of territory.
We will look at the rest of this game next week.
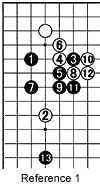
Reference 1: The moves through 10 are an old joseki. Black would then exchange 11 for 12 in sente, in order to switch to 13. However, in the variation in Diagram 1, White does not play at 10, but at 12, followed by black 11. Even though 10 is still a good move, White switches to the left side instead.
Problems
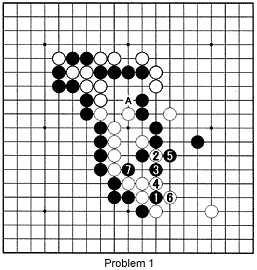
Problem 1: In response to 1 (17 in Diagram 2), White played A. That was a mistake. He should have cut at 2. If the moves through 6 follow, the cut at 7 is worrisome. How can White ensure life after this move?
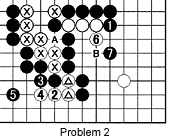
Problem 2: This is a difficult problem. After black 1, White played 2 and 4 before moving up with 6. Why did he do this? If White omits the 2 through 5 exchange, black 7 is a threat. However, with the exchange, black 7 is more of a problem for Black. Note that the white X stones are alive. The problem is for White either to break out around black 7 or free up his stones marked with triangles. How does he do that? Hint: White A is pointless, as B will connect all of Black1's stones.
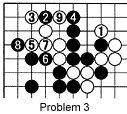
Problem 3: Here is another problem arising from the Yamashita-Hane game. Instead of 26 in Diagram 1, White might try 1. The moves 2 through 6 seem to do the trick. But what happens after white 9? How can Black win this semeai (capturing race)?
