One of the maxims included ...
By Rob Van Zeijst
One of the maxims included in The Art of War, written by Sun Tzu in the fourth century B.C., was that the enemy should always be left with an escape route--otherwise the battle would be fought to the last man, inflicting more losses on your own forces. Another axiom reads: "Hence to fight and conquer in all your battles is not supreme excellence; supreme excellence consists in breaking the enemy's resistance without fighting."
Honinbo title match
This is a continuation of the final game for the Honinbo title between titleholder Cho U (Black) and challenger Shinji Takao.
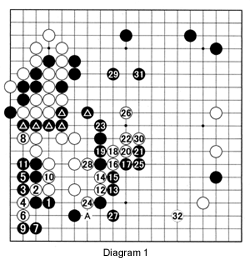
Diagram 1: (1-32 represents moves 55-86): Black has a very good position at the outset, but he then played at 1, which was a mistake. Cho knew he should not try to kill the lower left white group. However, black 1 is aimed at surrounding White. This gives White the opportunity to move two stones (4 and 6) into enemy territory and force Black to waste two moves (7 and 9) to capture them. White 8 weakens the marked black stones, and 10 makes eyes. Because Black's marked stones are weakened, White can cut through with 12, 14 and 16, eventually forcing Black to connect at 25 in response to 24, which leaves a gaping hole at A. By the time White plays at 32, he has turned the tables. In the end, White won by half a point, so Takao took the Honinbo title four games to one.


Reference 1: Instead of 1 in the game, where should Black have played? According to Masaki Takemiya, a veteran 9-dan and former Honinbo titleholder, Black should have played at 1 (white 10 in Diagram 1), then at 3. This would have prevented White from playing sente moves (moves that have to be answered) at 8 and 10 in the actual game.
Reference 2: If White pulls back with 2, Black can defend with 3. If White does not immediately counter this, Black can play at A, followed by white B, black C, white D, black E and white F, reducing White to an eyeless skeleton.
Hint for improving your game
To improve your game, let's look at different types of cuts. As a rule, the tighter you can cut two positions the better.
Diagram 2: Cutting through a keima position (knight jump represented by the marked white stones) with black 1 is terrible for White and therefore good for Black. This is a tight way of cutting through this type of position.
Diagram 3: In this case, Black can wreck White's position by cutting through with 1. Again, because White's marked stones are so close together, this makes the cut all the more serious--hence the tighter the cut, the more effective it is.

Solution to last week's problems

Solution 1: Look at Diagram 1. The cut of 2 and 4 make full use of Black's weaknesses, while References 1 and 2 illustrate how Black should have played.
Solution 2: Black must play at 1 (or at A) to ensure life. As we saw last week, white B has to be answered with C.
Solution 3: If Black plays at 1, he will die. White 2 is the correct move to do this. If Black plays 3, white 4 kills the group. Black cannot play at A. If Black plays at 4 instead of at 3, White would kill the group by playing at 3.
Reference 3 (failure): After black 1, white 2 looks like a good move, but now Black can squeeze a ko out of it with 3 and 5. It is obvious that white 2 in Solution 3 is superior.
New Problems

Problem 1: In response to black 1, where should White play?
Problem 2: If after 3, White cuts with 4 and 6, how should Black respond? Remember that Black, in effect, is cutting White, too.
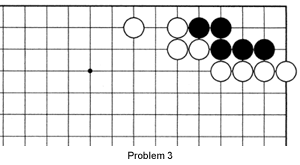
Problem 3: Where should Black move to ensure life? Refer to this and last week's solutions for similarities and watch out for damezumari (shortage of liberties).

Come to Ben's Cafe (03-3202-2445, www.benscafe.com) in Takadanobaba, Tokyo, where the English-speaking go community congregates every Sunday. You can enjoy free lessons, 11 a.m.-1 p.m.
Van Zeijst is a four-time European go champion and European representative at the Fujitsu World Championship.
