"It seemed a good idea at the time" is ...
By Rob Van Zeijst
"It seemed a good idea at the time" is a common way of explaining why something unexpected happened. This phrase can be used in regard to minor incidents to major events, including war. Studying the chronology of events often provides a clue to what happened, but when distancing ourselves from the timeline and putting on 20-20 hindsight glasses, we can often pinpoint which particular event led to disaster.
In go, tewari is a tool that gives us the power of 20-20 hindsight. Let's use this tool to gain a better insight into our powers of foresight.
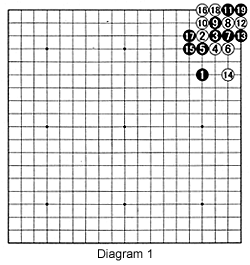
Diagram 1: Not too long ago, this sequence used to be considered a joseki (standard local exchange) with both White and Black even. After black 19, White still has to add a move, but by doing so he will capture six black stones. How to you feel about this? Do you feel this result is bad for Black because he lost six stones?

Diagram 2: After white 20, the six black stones are dead. Black now has the option of blocking off at A. White would not be able to resist playing at B, but this would be followed by the sequence black C, white D, black E, white F, with Black taking the corner with G. However, for the sake of argument, let's say Black exchanges 21 and 23 for 22 and 24. This gives White the corner with about 12 points (remember Black captured two stones there) while Black gains great influence to the left, certainly worth more than 12 points. However, even if we don't think in terms of points, we can still establish why this gives White a bad result.
Diagram 3: Let's now use tewari, i.e. change the chronology of the moves and add or remove stones to come to a similar situation and deepen our understanding. The moves through 20 give the same result as Diagram 1 and 2. The moves 1 through 3 are a joseki, but the exchange 4 for 5, 6 for 7, and 8 for 9 are all bad for White. The 11 for 12 exchange is slightly disadvantageous for Black and the exchange 13 through 20 is also not too good for Black. At the same time, White would never add a move at 10 at this stage of the game. All in all, White probably lost about half a move in the process.
Diagram 4: That is the reason why White does not grab the corner but goes for influence instead with 12 and 14. Now Black's corner is about 12 points while White's influence is worth less, but he has used only eight moves to Black's nine. Therefore, the result is even. However, there are still unexplored variations, so the judges are still out on the best result.

Solution to last week's problem

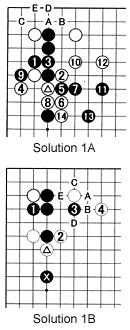
Solution 1A: In this game between Yoo Chang Hyuk (Black) and O Meien, both top pros, the following pattern appeared after White played the marked stone. Note, White's stone in the corner is not dead yet; White can play at A, followed by black B, white C, black D and white E, which starts a ko.
Solution 1B: Another real-game response to White's marked move is black 1. After black 3, white 4 is a light move, enticing black to play at A, followed by white B, black C, white D and black E. However, this gives White strong center influence. White also can pincer the marked black stone and seize the initiative. It is difficult to find a simple answer for Black, so Solution 1A is more common.
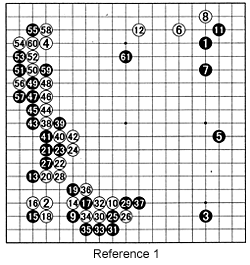
Reference 1: Solution 1B appeared in this game. The game was played between Chang Hao and Wang Lei almost nine years ago--both players are top pros now. As you can see, this led to a fight that covered the entire left side and later spread all over the board.

Reference 2: In response to 8, Black must not oblige with 9. The moves through 15 would be inevitable, followed by a white move at A or B. Black can force C for white D, but is still left with a cutting point at E. Although all of his moves seem natural, Black ends up with an inferior result.
Reference 3: Do not confuse the above moves with the joseki shown here, which evolves after White exchanges 6 for 7, then attaches at 8. Black 9 and 11 create cutting points that White needs to cover with 12, enabling Black to slip in the 13 for 14 exchange before turning at 15. The 13-14 exchange makes all the difference. After white 16, Black can always play at A followed by white B, black C, white D, black E, white F and black G, giving Black an excellent shape. Of course, if Black turns at 15 right away, white will play at 13, followed by black B. As we now know, this is bad for Black

New problems:
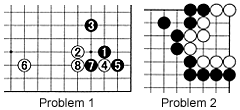
Problem 1: Now you know a bit about tewari, how do you feel about the 1 through 8 exchange here?
Problem 2: Where should Black play his next move and what is his best result?

Van Zeijst is a four-time European go champion and European representative at the Fujitsu World Championship.
