Most books dealing with ...
By Rob Van Zeijst
Most books dealing with memorization use systems in which you associate numbers or other things you want to remember with certain objects. These systems are generally enhanced with vivid visualization techniques. As go has so many standard shapes in which a move can make or break a shape, the idea is to try to remember the strongest move in a certain situation. However, a player must judge whether a shape or move actually works in that situation. Recognizing shapes is paramount to becoming a better go player.
Honinbo title match
Last week, we began the fifth game between the titleholder Cho U and Shinji Takao in which the challenger (white) defeated Cho to capture the title 4-1 in the best-of-seven-series. Let's continue this rather unusual game.
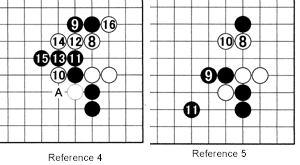
Diagram 1 (1-35 represents moves 21-55; white 20 is played where the marked black stone is captured): White has just played the stone marked with a triangle, a strange move in the eyes of pros as Black now has a terrific tesuji move, black 1. What do you think of this kind of move? See Reference 1 to 5 for similar shapes appearing in a joseki (standard corner exchange). In the actual game, can you see the similarities in Reference 4? Note that black 9, 11 and 13 and white 2 and 6 are distractions. White 26 is a great move, but Black grabs the initiative in the center with 27 and after 33, White seems to be in dire straits. However, 35 is a mistake. We will see why next week.

Reference 1: The moves through 7 are the beginning of a joseki. What should White play? He should not merely play at A. He has to try to put black 7 in atari by playing at both A and B.
Reference 2 (bad for White): This is White's worst choice as Black can surround his territory on the fifth line. After 15, White can play at A, but Black's two stones on the right are not weak while White's stones are still not alive.
Reference 3 (better for White): White 8 is the correct move. If Black pushes at 9 before defending at 11, white 10 and 12 immobilize the marked black stone.

Reference 4 (joseki): You may wonder what happens if Black extends to 9 (as in Reference 2). However, now the combination 10 through 14 works well for White. After 16, Black must defend at A.
Reference 5 (joseki): The moves through 11 constitute the most normal follow-up.

Hints to improve your game
Over the past few weeks, we talked about playing on your home ground, i.e., fighting where you are strong and keeping a local lead. Over the next few weeks, we will consider different types of cuts. As a rule, the tighter you can cut two positions the better.
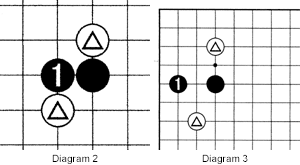
Diagram 2: If you can cut through a keima position, a knight jump as shown by the marked white stones, then do it! Black 1 shows the tightest type of cut you can come across, and White's marked stones are in trouble.
Diagram 3: Black can cut the marked white stones by playing at 1, but this is not nearly as severe as in Diagram 2 because the impact on White's stones is much smaller. By studying Diagram 2 and 3, you can deepen your understanding of References 1 to 5.

Solutions to last week's problems
Solution 1: Look at Diagram 1. Black 1, in combination with 3, 5 and 15, is correct.
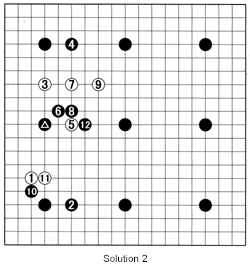
Solution 2: A common sight in 9-stone handicap games, after white 5, black may feel his marked stone is in danger. Note the marked stone is cutting White's formations and should maintain that role. Therefore, he should play at 6 to cut 3 and 5. If White plays at 7, Black must cut with 8 and 12 (after exchanging 10 for 11).

Solution 3A: Black's best move is 1, but white 2 is a clever counter. Black should block at 3 next, leading to white 4. Black's only resort is starting a ko with 5. It is an unfavorable ko because White takes it first with 6. However, this is optimal play by both sides.
Solution 3B (failure): Black 1 looks good, but white 2 and 4 put him on the spot as Black can't play at A.

Solution 3C (failure): After black 1, White's cleverest move is at 2. If Black tries to make his second eye with 3, white 4 puts a stop to it. Because of damezumari (shortage of liberties) Black can't play at A. However, if he captures at B, White A kills him anyway.
Problems
Problem 1: Look at Diagram 1. How can White profit from black 35? Where should Black have played after white 34?
Problem 2: Where should Black play to keep himself alive?
Problem 3: Black 1 is a mistake. How can White kill the black group?

Come to Ben's Cafe (03-3202-2445, www.benscafe.com) in Takadanobaba, Tokyo, where the English-speaking go community congregates every Sunday. You can enjoy free lessons, 11 a.m.-1 p.m.
Van Zeijst is a four-time European go champion and European representative at the Fujitsu World Championship.
