At 13 years of age, ...
By Rob Van Zeijst
At 13 years of age, Ziteng Shan of China won all of his eight games in the 28th World Go Championship for amateurs. South Korean representative Dong Ha Woo and Hironobu Mori from Japan each had seven wins. The top Westerner was Romanian Christian Pop, who finished fourth with 6 points. With 68 participants from as many countries, this world tournament had the largest number of participating countries ever. For more details and information, visit www.nihonkiin.or.jp/amakisen/worldama/28/.
Go has a few difficult concepts, including the ko rule. This rule makes the game very exciting, but it also complicates strategies as well as tactics. Instead of thinking ahead only a few moves, one has to think about the long-range possibilities of forced sequences and the problem two moves in a row can pose.
Diagram 1: Let us recapitulate what we learned about the ko last week. The marked stone is in atari, i.e., it can be captured on the next move because it has only one liberty left. A stone in danger of being captured is sometimes called a "hot" stone.
Diagram 2: Black can capture the marked stone by playing at 1.
Diagram 3: After capturing with the marked stone, this is the new situation. You might ask yourself whether that same marked stone is not in danger of being captured. It is, but the ko rule forbids its capture right away. The ko rule states that a board position cannot be repeated. This means that White must play somewhere else to change the board position before capturing the black stone.

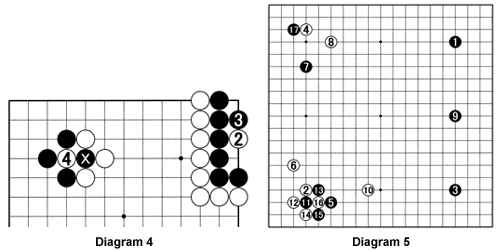
Diagram 4: The example we gave last week was that White could play at 2 to threaten to kill Black's group. If Black answers with 3 to keep his group alive, that means the board situation has changed. Therefore, White can now capture Black's marked stone. We also learned that a move like white 2, which was played as a threat that needs to be answered in order to recapture the ko, is called a ko threat. After white 4, it is Black's turn to think about where to play a ko threat.
Diagram 5: Let us see how this works in practice. The moves through 9 can be seen in modern go. Complications start when White pincers with 10 and Black plays 11 and 13 to settle his stones. There are many reasons why White plays 14 and Black answers with 15, but for the moment let's just look at what happens. Black 17 is a ko threat. White now has two choices: ignoring the threat and resolving the ko, or answering the threat.

Let's see what happens in either case.
Diagram 6: If White decides to fill the ko with 18, Black makes good on his threat with 19 to take the top left corner. White must now defend with 20. Black can threaten to attack with A or extend with 21. This move aims at using the marked stones that still serve some purpose. Follow-up candidates are black B to connect underneath, and black C, white D and black E to start a battle, or even F to isolate and attack White's marked stone.
Diagram 7 (white 22 and black 25 take the ko): If White answers the ko threat with 18, Black takes back the ko with 19. White 20 neutralizes the largest threat, but Black will not be deterred and makes the ko larger by playing at 21. Of course, White recaptures with 22. Black must make another ko threat, e.g., at 23. After White answers with 24, Black again captures the ko with 25. White has no ko threats, but white 26 is a good move that neutralizes all of Black's stones here while capturing a lot of territory. Black now resolves the ko by capturing with 27. Black won the ko, but he does not get a spectacular result. White lost it but he gets a lot of territory at the top left. Both players are satisfied.

Solutions to last week's problems
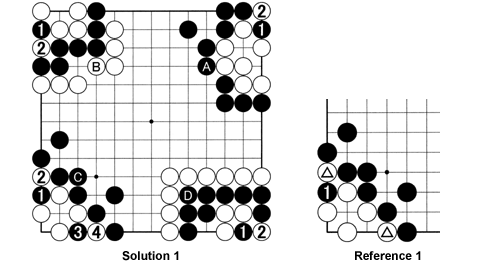
Solution 1: Case A: Black 1 makes a ko. Of course, White will capture it first with 2, but White's group is at stake here.
Case B: Black must start a ko with 1 at some stage, and the earlier the better. White will capture with 2, but the question is what happens next?
Case C: Black 1 and 3 are a good combination. Both times his stones are captured. Now look at Reference 1.
Case D: Black has no choice but to start a ko. If he does not, White will play at 1 and then at 2, giving Black a dead shape.
Reference 1: Both of White's marked stones in Case C are in atari. Black can now capture at 1--it is a ko. But even if White has a ko threat, Black can capture the other white stone that is in atari. White cannot win both kos. This situation is called double ko.

Problem
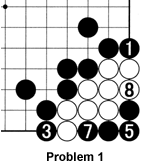
Problem 1: The problem at top left is the result given in Case B. What should Black do now? Last week, we briefly mentioned the difference between the Japanese and the Chinese rules. According to the Japanese rules White's group at lower right is unconditionally dead. The proof offered is basically that Black can play the moves through 7 at any time he chooses, while White cannot do anything. The underlying thought is that Black is able to eliminate all ko threats. That is important for what happens next, after White captures the four stones with 8. Where should Black play next?

Van Zeijst is a four-time European go champion and European representative at the Fujitsu World Championship.
