In his book How to Get Ideas, ...
By Rob Van Zeijst
In his book How to Get Ideas, advertising creative director Jack Foster defines an idea as a new combination of old elements. He then goes on to say that curiosity is an important factor because it will help you add more "old elements" to your repertoire, thereby giving you more ideas. This concept can be applied to the go board. In tactical maneuvers, the factor that can prove decisive is combining old elements in different ways to achieve a breakthrough.
The basic shape of the stones generally makes up these elements. By learning more about shapes--their strengths and their weaknesses--you can come up with better tactical plans. To become more expert at recognizing these shapes, study them individually, then when they appear on the go board, you might recognize them. Before mounting an attack on a certain shape, visualize the likely result and possible variations. You will become better at exploiting the strengths and weaknesses of different shapes.
Tsuke-koshi
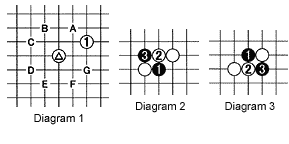
Diagram 1: If White plays at 1 with the marked stone in place, the move is called a keima, or knight's jump. The moment you see this move, you should realize that this is a keima. Note that any move A through G would make a similar keima shape.
Diagram 2: The keima formation has both strengths and weaknesses. An obvious weakness is that this formation can be cut, e.g. by black 1 and 3.
Diagram 3: Another way Black can cut the keima is with this 1-3 combination. You may think this is a new shape, but it is similar to that in Diagram 2.
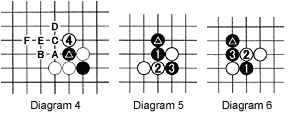
Diagram 4: After Diagram 3, White can play at 4 and capture the marked black stone. But this depends on the ladder black A, white B, black C, white D, black E, white F, etc. If the ladder is bad for Black, he should have avoided cutting in the first place.
Diagram 5: However, if there are black stones near the white keima formation, such as the marked stone, Black's success in cutting the keima increases. Black 1 and 3 will often lead to an all-out battle.
Diagram 6: The type of cut that Black carries out with 1 and 3 when the marked black stone in place is called tsuke-koshi.
Solutions to last week's problems

Solution 1: We asked what was the best way for Black to split White's stones. Black 1 and 3 form a tsuke-koshi tesuji. White has little choice but to capture with 4 and 6. Black can cut off the marked white stone with 5 and 7 if the ladder is favorable for him. If the ladder is unfavorable, Black might want to extend to A.
Reference 1: Black 1 accomplishes nothing. White will defend with 2. This removes all weaknesses in White's shape. However, many people play at 1 because it is sente, i.e. White has to answer. This is not a good motivation for your moves.
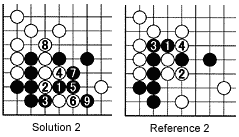
Solution 2: Black can save his corner stones with the tsuke-koshi of 1. If White resists by cutting with 2 and playing 4 and 6, matters only get worse. In the sequence to 9, White loses two stones and Black is connected everywhere.
Reference 2: Black should not play at 1. After white 2 and 4, Black's corner is cut off and his stones will die.

Solution 3: In response to the marked white stone, black 1 is a clever move. It may not be obvious, but this is a variation of the tsuke-koshi. White's best answer is 2 through 6, but now Black is alive in sente. Even if White plays at A, black B keeps the corner group alive. Still, it might be a good idea to exchange black A for white C (whether White answers at an early stage is another problem).
Reference 3: The move at 1 leads to the sequence through 5. As you can see, Black is alive, but in gote. He needs to use an extra move to defend, allowing White keeps the initiative.
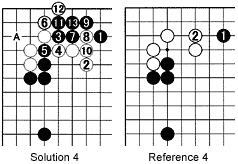
Solution 4: If White responds to black 1 by playing at 2, black 3 and 5 put him on the spot. White 8 does not work. After black 13, White has to defend his corner with A, leaving Black with the initiative in the center.
Reference 4: It is best for White to refrain from being aggressive and lie low with 2. This type of defense is called honte (proper move).
New Problems
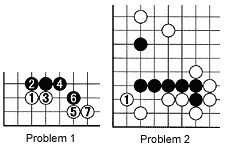
Problem 1: The moves 1 through 7 form a joseki. This shape is similar to solution 1 earlier. Where should Black play next?
Problem 2: White 1 is overly aggressive. How should Black react?
