As in all areas in life,
By Rob Van Zeijst
As in all areas in life, acquiring new techniques can make a huge difference. In go, mastering a few endgame techniques, such as the clamp, will improve your game in no time.
The clamp
The endgame has many tesuji (clever moves) combinations and requires a lot of accurate board reading to make one or two extra points, but it could easily change a possible defeat into victory. Like the monkey jump we discussed earlier, the clamp, or hasami-tsuke, can do great damage to your opponent's--or your--territory.
Diagram 1: Black's territory looks solid, but White can slice it up. Where should he play?
Diagram 2: White's hane (diagonal connecting stone) at 1 is a good move. Black's territory is a lot smaller now, but White can do better than this.
Diagram 3: This sequence with White playing atari at 1 and nose-tesuji at 5 is an improvement, but he can still do much better. Note that White can change the order of 1 and 3.

Diagram 4: White's best move is the clamp at 1. This move is a common technique for dan players, although beginners may have difficulty coming up with it. Just how good is it?
Diagram 5: Black's best answer is usually 2. White can then play at 3 and wreak more havoc with 5. Later on, he may even get to play A for black B. On the other hand, if Black gets to play at A, White's two stones 1 and 5 are in danger. Still, White reduces Black's territory in sente by at least five points more than in Diagram 2.
Diagram 6: Considering the preceding diagrams, Black will usually defend at 1 at an early stage.This is worth more than 10 points in reverse sente, which is usually thought to be twice the value of an ordinary gote move. In other words, black 1 is worth more than 20 points. It is probably best playing this move during the middle game.

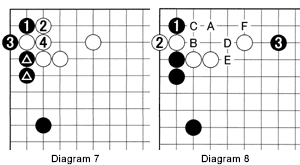
Diagram 7: Here, Black plays 1 as a probing move. In response, White can answer with 2, but then he is forced to connect with 4 after Black plays at atari with 3. In addition to reducing White's territory, Black also slightly strengthens his two marked stones.
Diagram 8: White can also descend at 2 but this leaves behind a lot of aji (bad potential). For example, black 3 is a strong move. If White doesn't take any precautions, black A is devastating. To protect against the cut at B, white C is necessary, but then black D, white E, black F link Black's stones to 3, leaving White with little eye-space. In certain cases, Black may want to omit the D-E exchange for more effect.

Problems
The first two are problems about double sente, which we covered last week. Use what you learned this week for Problems 3 to 5.
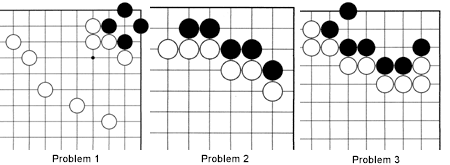
Problem 1: If White plays first, what is his best move? Where should Black play if he is to move first?
Problem 2: This is a no-brainer. Where should Black play, if it is his turn? What if White were to play first?
Problem 3: White to play first. Where should he play?

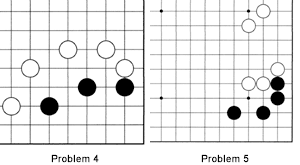
Problem 4: Do you see a clamp here? Where should White play in this case?
Problem 5: How secure is White's territory? Where should Black play to wreck it?

